Best Audio Cutter: Audacity to Trim Audio

Editing and trimming audio files is a must-have if you are a podcaster, YouTuber, music producer, or broadcaster. This is essential because trimming a useless audio portion or a noise part in any podcast or vlog enhances its quality. This is where audio editing software comes in handy.
Although several audio trimmers are available online to deliver high-quality output, most audio cutter tools have a complex user interface. However, you can use Audacity, a top-notch audio editing software, to cut your audio files seamlessly. If you don't know how to trim an audio file in Audacity, don't worry. In this article, you will find an easy guide for how to trim audio files with Audacity and Tuneskit Video Cutter tool. Let's get started!
Part 1: A Best Audio Cutter: Audacity
Audacity is a free, open-source editing and audio capturing tool available to use on various operating systems, including Windows, macOS, Linux, and UNIX. Audio recording, mixing, and production are all possible via this powerful software. Moreover, it has the features like audio recording, mixing, digitizing, and resampling. The tool supports multiple bit formats: 16-bit, 24-bit, and 32-bit.
Aside from its simplicity of use, the tool is distinguished from others because it supports various audio formats, such as WMA, MP3, AIFF, WAV, and AAC. Plus, it is a fantastic tool for both beginner and expert users alike. Audio editing capabilities such as cutting, compression, muting, speeding up, and many more are available via this free, open-source tool, which gives many conveniences for trimming an audio file.
Key Features
• Preview your VST, Audio Unit, and VST/LADSPA effects in real-time on Mac
• Install and remove effects and generators from the settings by utilizing the plug-in manager, which can also handle the installation of plug-ins
• The ability to create a wide range of sounds and silences
• Support changing the pitch without tempo change
• Use equalization, high-pass, low-pass, bass, and treble filters, as well as a notch filter, to alter frequencies
Not sure how to trim an audio file with Audacity? We have you covered!
Part 2: How to Trim Audio in Audacity
Audacity is a reasonably solid option for a wide range of users at all times. The most significant benefit of Audacity is that it is a well-developed free, open-source, and cross-platform application for both editing and recording audio. That is why so many users, particularly inexperienced and beginners, find it so appealing.
To know how to trim an audio file in Audacity, follow these instructions:
Step 1: Launch the Audacity tool on your computer. Then, on the top menu toolbar, press the File tab, and then select Open to upload the audio file you wish to trim.
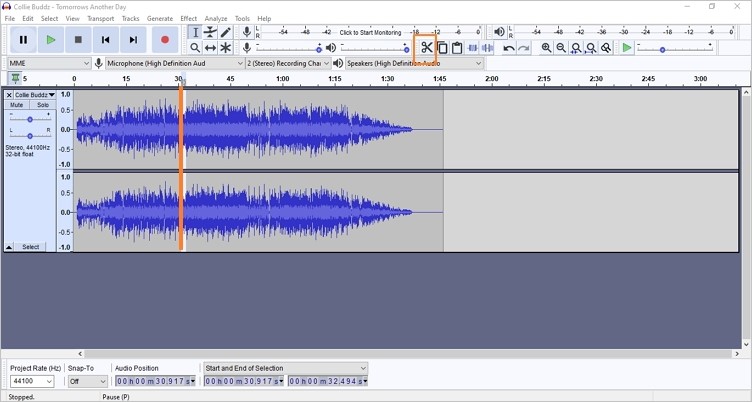
Step 2: Drag the audio track to the desired start point and click the Trim button. After that, you need to set an end time in the same way.
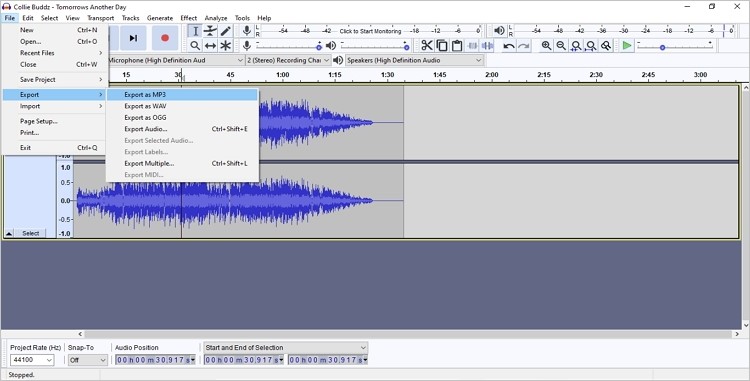
Step 3: Now, select the File button. After that, choose Export, and finally choose the format you want to export your audio in.
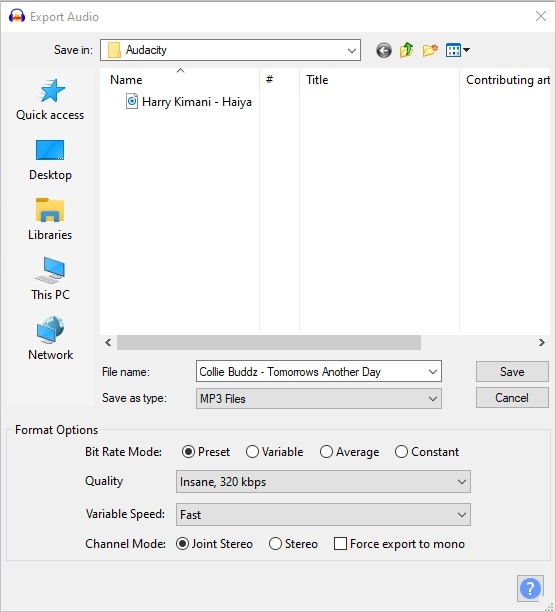
Step 4: Specify a file name, bitrate type, quality, variable speed, and channel in the Export Audio box. Finally, press the Save button.
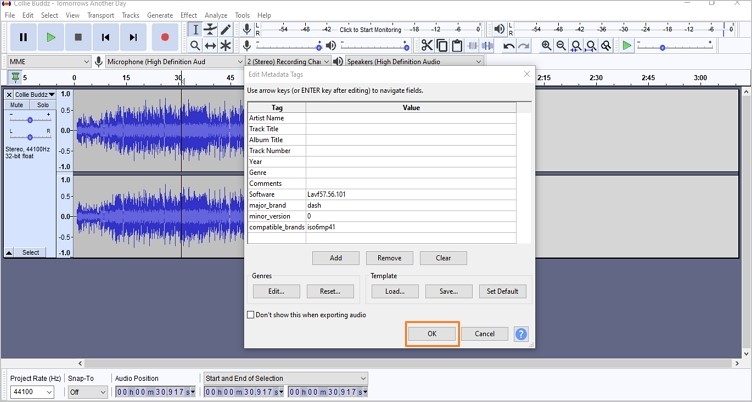
Step 5: Now, choose whether or not to include metadata before pressing Ok to save your reduced audio.
Part 3: Audacity Alternative to Trim Audios Losslessly--TunesKit Video Cutter
Audacity has several outstanding audio editing features, but some of you may find it challenging to use. Fortunately, TunesKit Video Cutter makes it simple to trim any audio file with only a few clicks.
The TunesKit Video Cutter for Windows and Mac is an excellent choice if you need to cut big audio files into tiny pieces without losing quality. For the best part, you can also edit and save the clippings with rich features in any format. After trimming, it allows you to add the necessary effects to the audio file and convert it to the most common media formats.
Key Features of TunesKit Video Cutter:
- Many video formats are supported, including MP4, MOV, M4V, AVI, etc.
- It helps you play and preview the video when you're editing it.
- It features two techniques to set the trim marks carefully.
- It allows you to remove large chunks of a movie using numerous trim selection marks.
- With a single click, merge many cut video clips.
- Lossless video may be exported quickly without having to recode.
To know how to trim audio files losslessly using TunesKit Video Cutter, follow these steps:
Step 1: Download and install TunesKit Video Cutter, and launch it on your PC. After opening TunesKit Video Cutter, select the Open option or drag the file type into the cutter to add the audio.
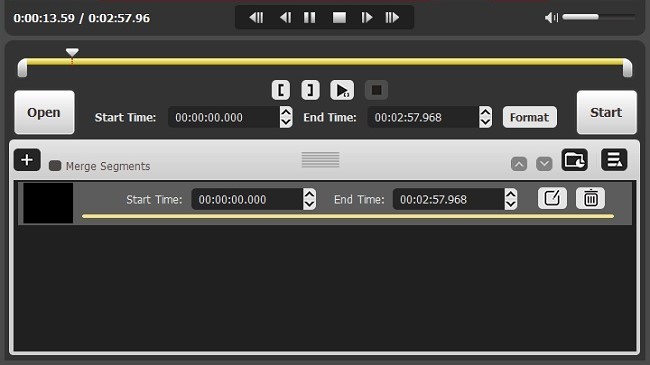
Step 2: The audio file would play immediately in the preview window after being imported. Now, use the sliders to cut the audio file.
Step 3: Click the edit button in each part to alter the audio. There, you may customize your movie by editing it and altering the aspect ratio using the slider bar.
Note: It also allows you to trim several pieces from the same audio recording. Simply clicking the + button will generate a new audio file for you.
Step 4: By selecting the s button, you will be sent to a window to pick the output format and device.
Note: We recommend selecting the High-Speed Mode to maintain the lossless quality of the source video during editing.
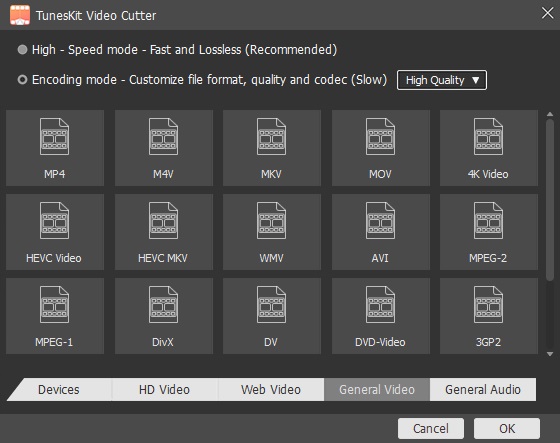
Step 6: Finally, press the Start button, and TunesKit Video Cutter will reduce the audios to short segments at up to 60X quicker speed. Wait till the dividing procedure is finished. Then, by clicking the history folder icon, you'll be able to access the required parts.

Conclusion
Now you know how to trim audio on Audacity. Audacity is an excellent tool for trimming and editing audio. Aside from being a free and open-source tool, it contains capabilities that can easily accomplish simple tasks exceptionally. It's simple to use and a tremendous technique to improve the quality of your audio apart from trimming.
And since cutting or trimming the audio file is essential, we hope that you have learned how to trim audio after reading this article. Moreover, we also recommend utilizing TunesKit Video Cutter if you wish to trim the audio files and edit.
