Quick Guide to Rip a DVD with VLC
DVD is a digital optical disc storage format, which can be used to store any kind of videos, music or other data. Yet you can only watch them by using a DVD player or a computer with a DVD driver. What if you don't have such a device? Well, you can rip them by pulling the data and files from a DVD. There are many tools on the Internet that claim to rip a DVD to your computer, and if you're seeking for a free and easy one, VLC is a nice option. Next I will show you how to rip a DVD with VLC to the computer.
Part 1. How to Rip a DVD with VLC Media Player
As an open-source and versatile media player, VLC is actually a powerful disc ripper that enables you to convert DVD to other video formats like MP4, AVI, etc. It's available for various platforms, including Windows, Mac, Linux, iOS, Android, and more. Here I'll take Windows version as an example and tell you how to rip a TV series DVD with VLC.
Step 1 Insert DVD to your computer
First, open your computer's DVD tray and place the DVD into it.
Step 2 Open VLC and load DVD
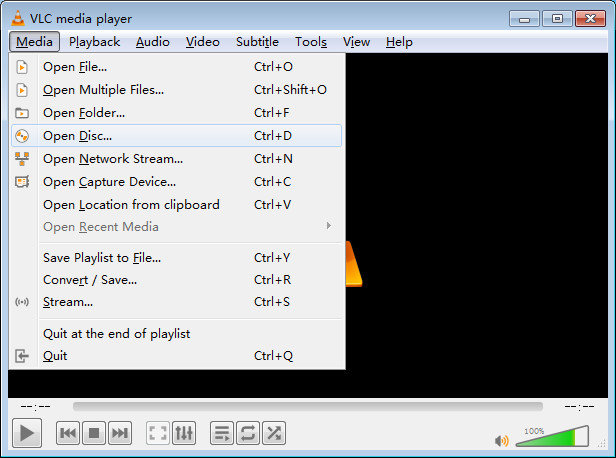
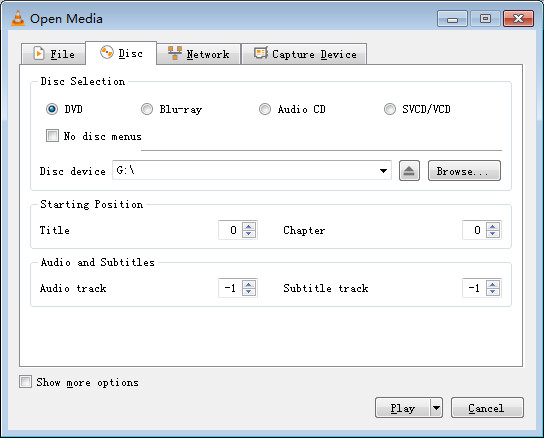
Then launch the VLC Media Player on the desktop, and go to the "Media" > "Open Disc…". Tick the "No disc menus" option in case there are some errors in the conversion. You can also press the "Browse…" button to choose your disc device if your computer has over one DVD tray.
Step 3 Set output format and other settings
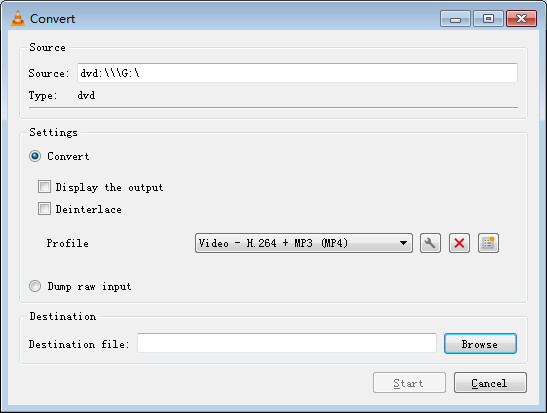
Next click the lower triangle icon at the right bottom corner and select the "Convert" option. From the "Profile" dropdown menu, choose the MP4 as output format, such as Video - H.264 + MP3 (MP4). You're also allowed to click the "Browse" button to change the output destination file path and then hit the "Save" button to save your settings.
Step 4 Start to rip DVD in VLC
Now click the "Start" button and VLC will start to convert your DVD to MP4 format. Wait for a while until the process to end and you can then find your DVD content in MP4 format.
Part 2. How to Rip a DVD with VLC Alternative
As VLC is not a professional DVD ripper, it is unavoidable that many users may encounter some issues while using VLC to rip the DVD movies, such as no audio in the converted file, no format supports, slow conversion, etc. Thus, if you want to find an alternative way to rip a DVD to computer, TunesKit Video Converter is highly recommended for you.
TunesKit Video Converter is a decent video converting tool as well as a DVD ripper. It allows you to convert any DVD files to MP4, MOV, AVI, MPEG, or other common formats with lossless quality. Besides, you can also extract audio from DVD and save it as MP3, WAV, AAC, FLAC, etc. Most importantly, even if your DVD movies are copy protected, TunesKit Video Converter can easily help you get them out for personal use.
Key Features of TunesKit DVD Ripper:
- Rip a DVD to PC or Mac computer easily
- Convert DVD or videos without quality loss
- Edit DVDs with built-in video editor
- Convert over 250+ videos and audios
- Easy of use with clear navigations
Step-by-step Guide to Rip a DVD with TunesKit
Step 1 Launch TunesKit Video Converter

Open TunesKit Video Converter on your PC or Mac computer after completed the download and installation. Put your DVD disc to the drive of your computer and the program will detect it. Now click the "Load DVD File" icon to add DVD to TunesKit. You can also simply open the drive folder and drag the DVD content to it.
Step 2 Set the output format
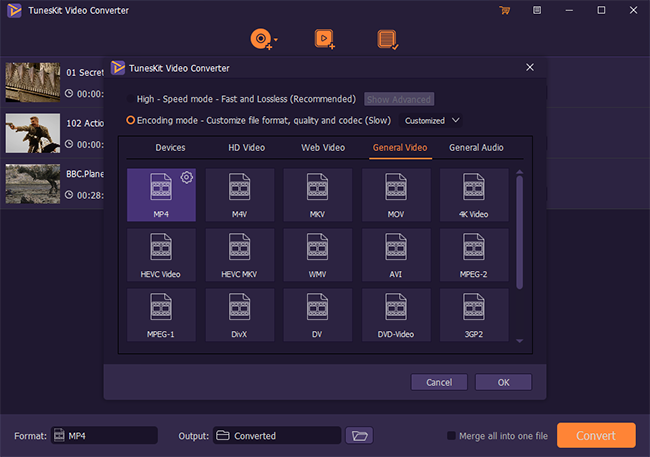
Then click the "Format" button at the lower left corner and a new window will pop up. There are two output modes for you. The High-speed Mode will help you convert DVD without quality loss while the Encoding Mode will give you chance to edit the DVD file, as well as configure the parameters like bit rate, sample rate, quality, codecs, etc. Choose the right one such as MP4 format, according to your needs.
Step 3 Edit the DVD movies (Optional)
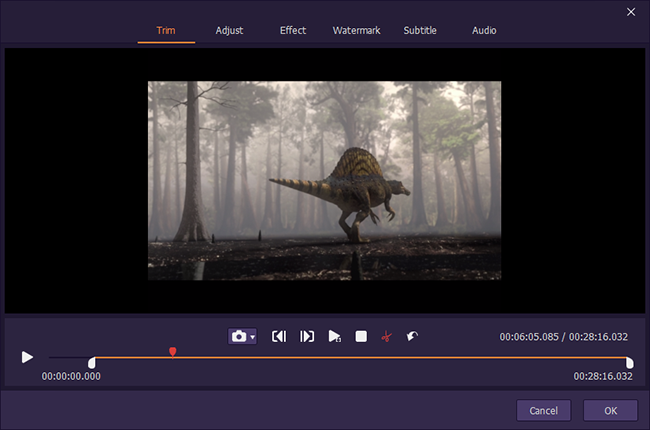
Thanks to the smart built-in video editor, you're also allowed to edit your DVD videos before conversion. Just click the Edit icon next to each movie and it will pop up a new window, where you can trim the file, rotate and crop it, add special effects, watermarks and subtitles, etc. If you don't want to do any editing, just skip this step.
Step 4 Start the DVD ripping conversion
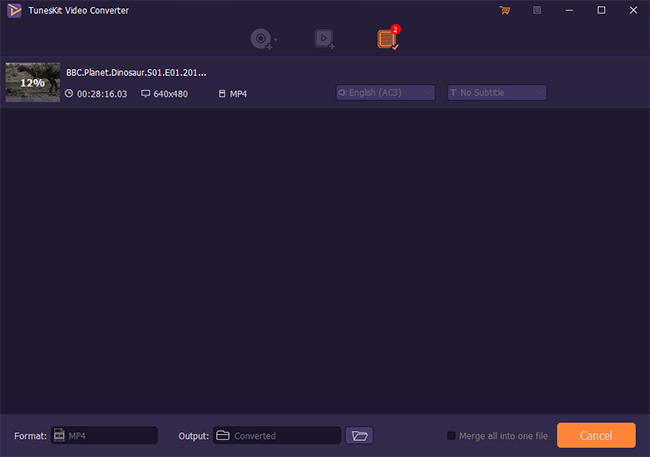
Once all the settings are done, you can click the "Convert" button and TunesKit will start converting your DVD to the format you chosen. If you want to merge all DVD files into one, remember to choose the "Merge all into one file" option before conversion. After that, you can find all your converted DVD content from the "Converted" file.
