How to Record Screen with OBS on Computer
OBS Studio is a professional free and open-source screen streaming and recording program that is widely acclaimed among novices and professionals alike. It is available for Windows, Mac, and Linux and is used to stream and record any content on your computer. Streamers often use it to live broadcast, but its powerful recording capabilities should not be overlooked. All kinds of recordings are possible there, including whole screens, specific windows, games, video, audio, webcams, and even text and images.
This post will show you detailed guides on how to record anything with OBS on your computer, including Windows and Mac. Please have a look.
Part 1. How to Record Whole Screen with OBS on Windows/Mac
As a versatile recording tool, Open Broadcaster Software(OBS) provides multiple source options, including Display Capture. It's easy to record the whole screen on your Windows or Mac computer. Meanwhile, you can add anything you want to display on the recording screen, such as text, image, color source, webcam, etc. However, this software may confuse someone, especially beginners, because of the complexity of the interface and usage. You can refer to the steps below to help your record the whole screen with ease.
How to Screen Record with OBS
Step 1: Download the right verison of OBS on your computer. After the installation, launch the program, and you will see a structured interface.
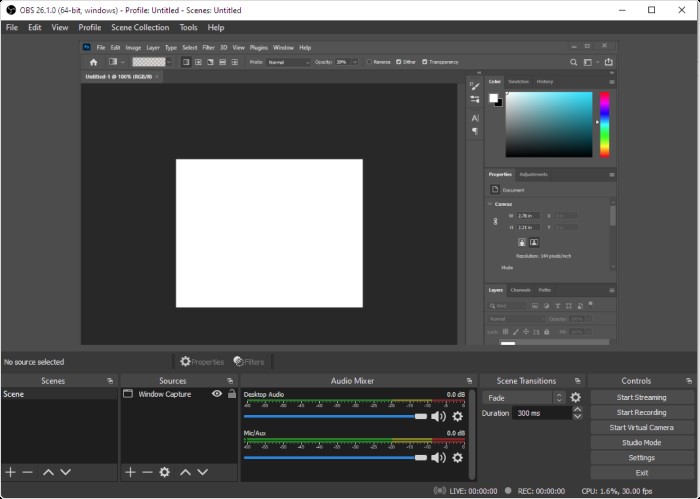
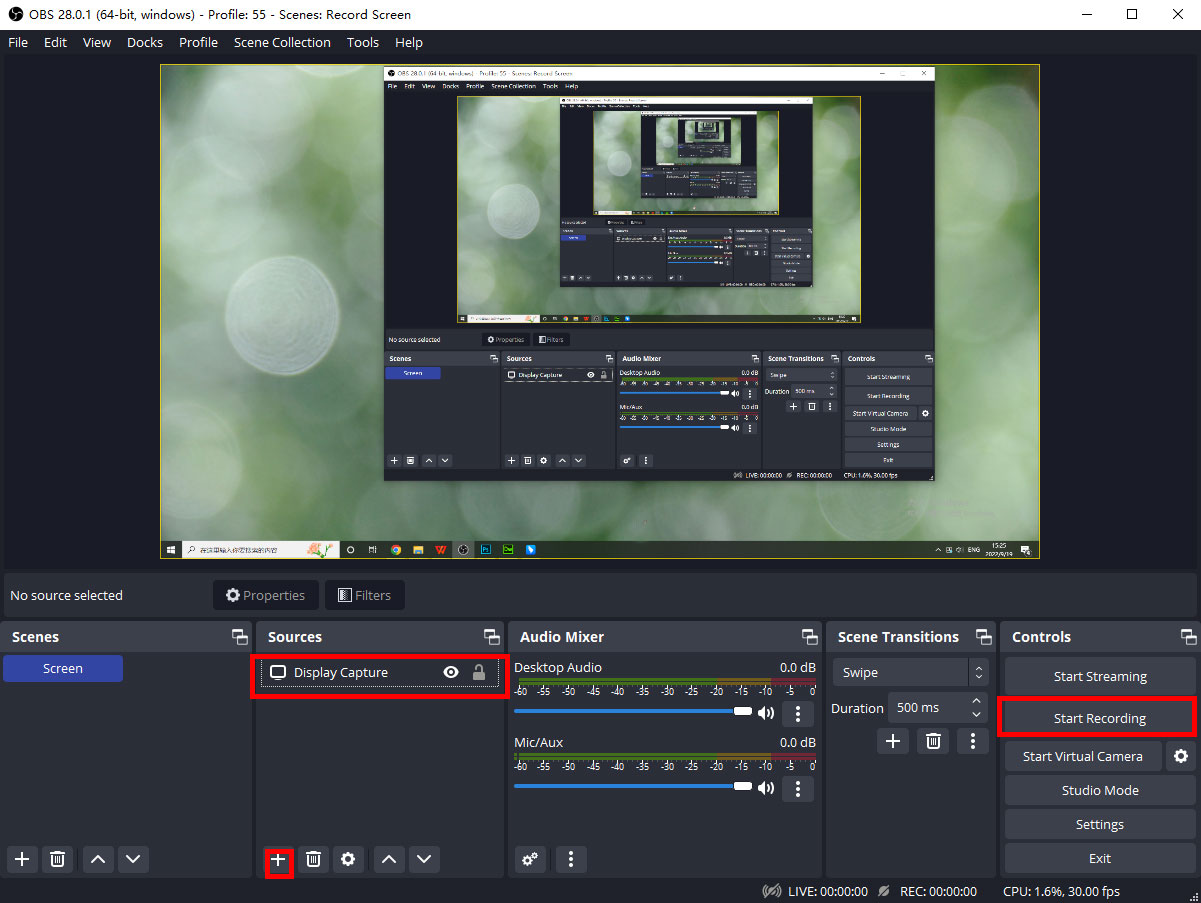
Step 2: First, click on + to create a scene from Scenes at the bottom left corner. You can rename this scene as you want. Next, turn to Sources which is next to the Scenes. Tap the + icon and select Display Capture. You will see the whole screen of your computer is on the preview window.
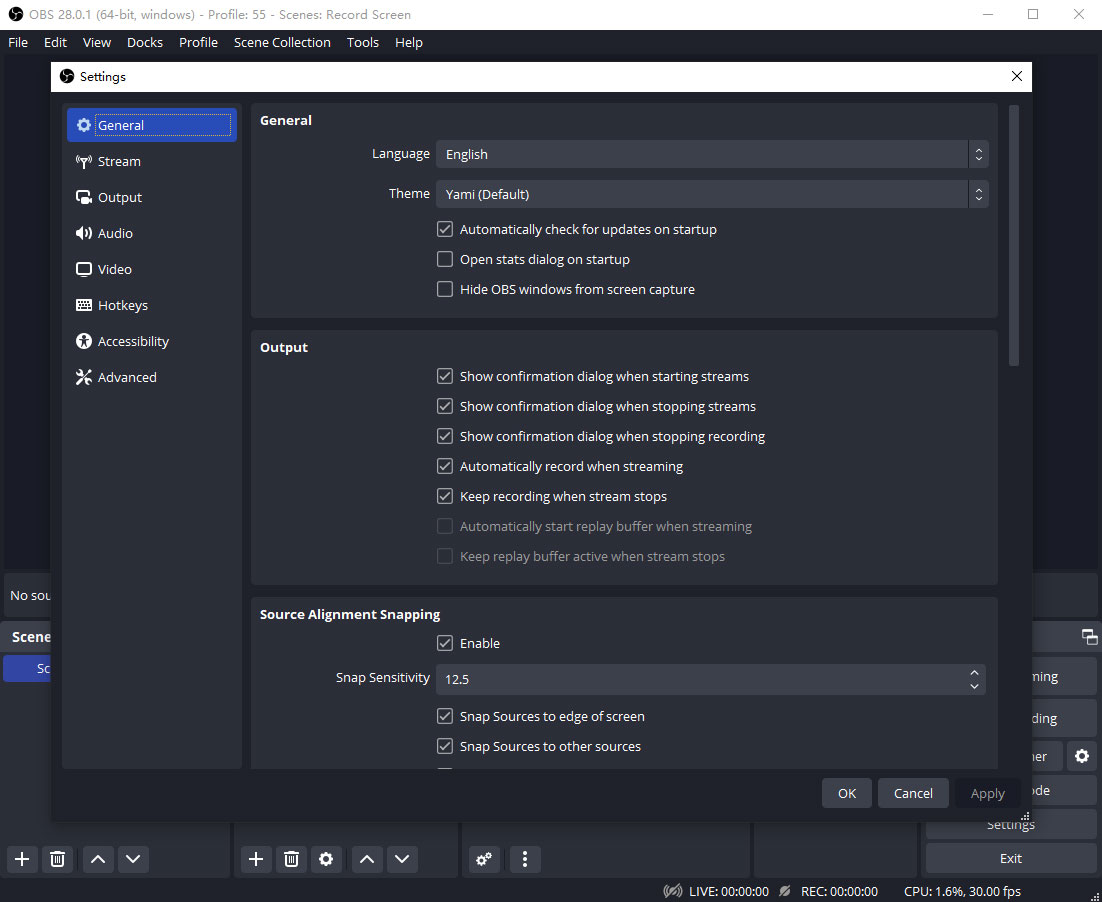
Step 3: Next, you can click on Settings in the Control options to adjust the preferences, such as output, audios, hotkeys, etc. Remember to click on Apply and OK after the setup.
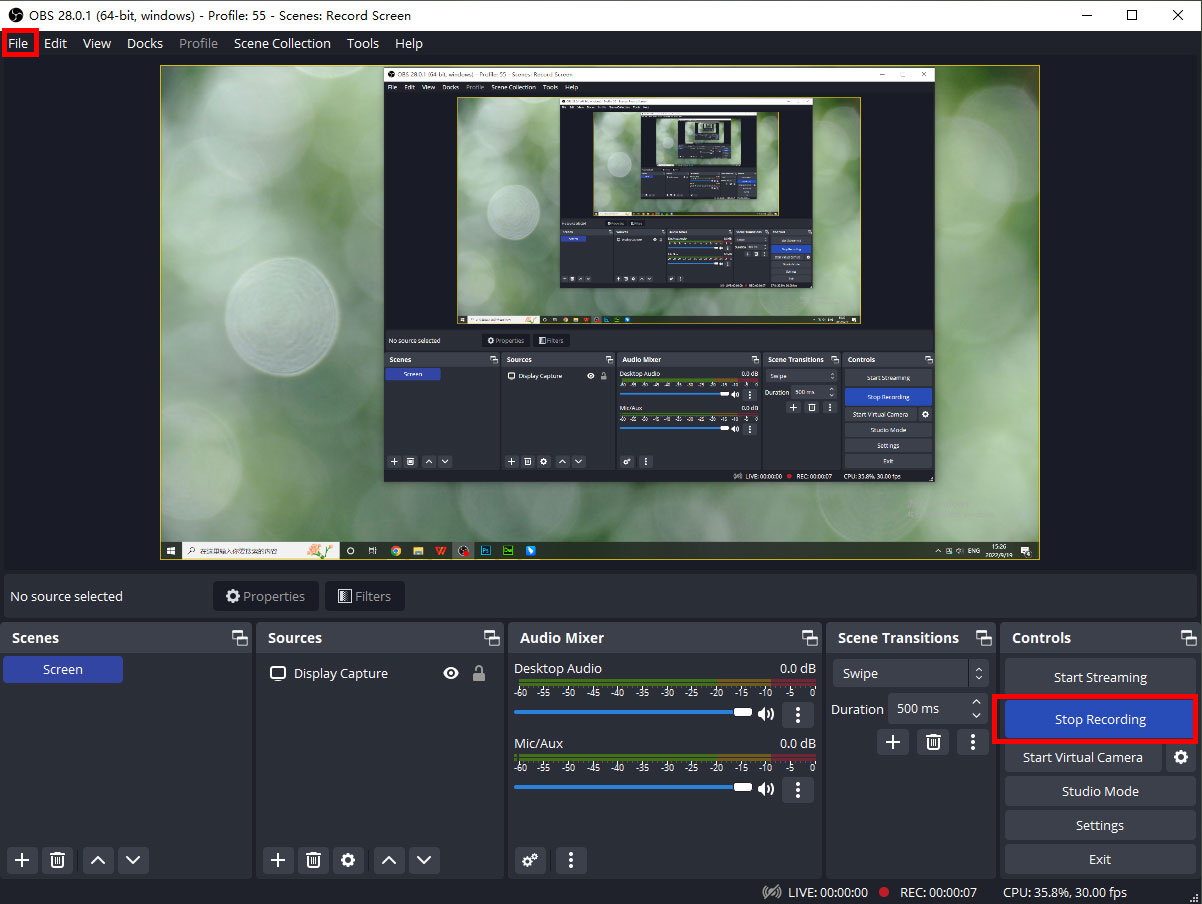
Step 4: When all is done, click on Start Recording. It will begin to capture the whole screen, and you can keep doing what you want on your computer. Once you've done, tap Stop Recording, and the screen recording video can be found by clicking on File > Show Recordings.
Part 2. How to Record Desktop Audio and Microphone with OBS
After the upgrade, Display Capture mode allows you to record all system audio directly on your computer, regardless of whether your computer's operating system is Windows or Mac. And if you want to record the audio from a single program, you can select Application Audio Capture or Window Capture. As for OBS below version 28+, they record audio slightly differently on Windows and Mac. An additional audio auxiliary tool should be installed on the Mac before you start recording from OBS. Check here to learn how to record desktop audio with older versions of OBS.
If you want to record your microphone voice, it's getting easier to do it on OBS version 28 as well. Let's see how to record microphone in OBS.
How to Record Micrphone Voice with OBS
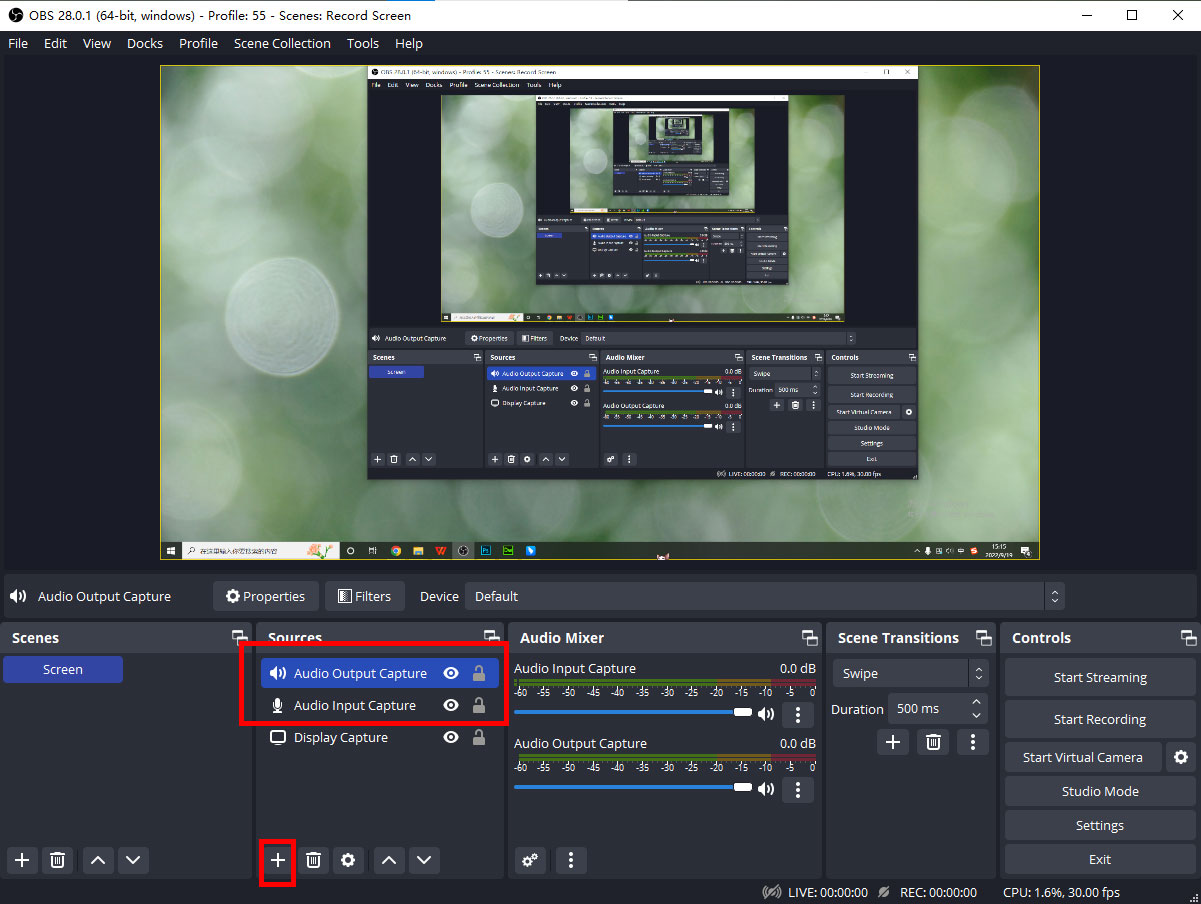
Step 1: Tap the + button in Sources and add Audio Input Capture. Select the microphone device that you plugin to your computer. This step will help you detect your voice input from the microphone on OBS.
Step 2: In order to output the microphone voice for you to hear, you should add Audio Output Capture in Sources. Then select the speaker or headphones you like.
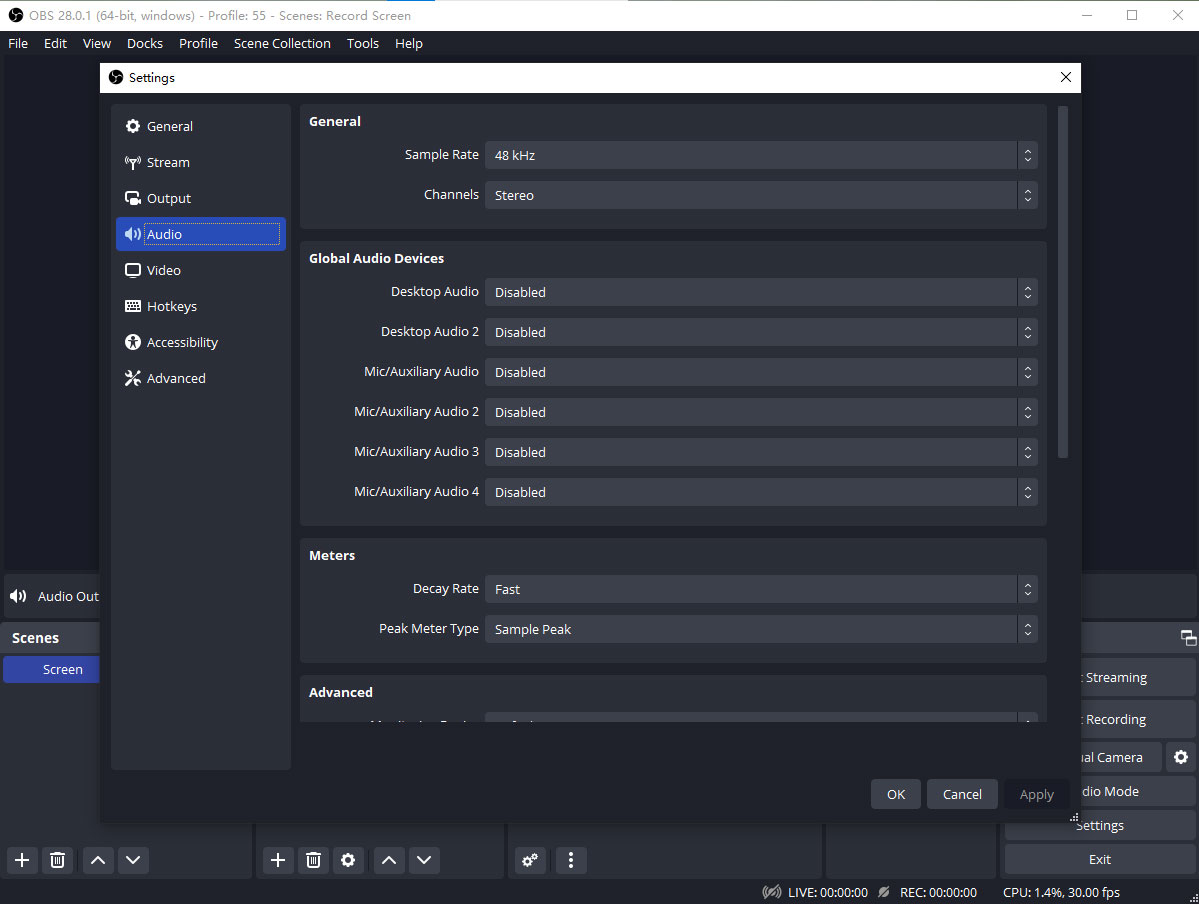
Step 3: Remember to disable Global Audio Devices in Settings > Audio if you just want to capture audio directly to the scene. Because it will cause an echo effect if you have the same device selected in Settings.
Step 4: You can adjust the volume or add filters in Audio Mixer. When you have set it up, click on Start Recording. The audio recording can also be found in Show Recordings after you click on Stop Recording.

Part 3. OBS Screen Recorder Alternative to Record Screen
It may look too sophisticated for some beginners as you have to do several setups before starting a recording. And that's where errors are often made in novices. So, is there any alternative program that is easy to use but not inferior to OBS? The answer is yes. TunesKit Screen Recorder is the one you can't afford to miss. No complex interface. No complicated setup. It includes plain and intuitive recording and setup options. Just a few clicks before you start recording your computer screen and audio.

As a professional screen recorder, TunesKit Screen Recorder is available on Windows and Mac, providing users with several recording modes for recording the whole screen, a customized area, a webcam, a single program, gameplay, and audio. It offers more than 20 V/A output formats and can set up to 4K and 60 fps video quality so you can record any type of activity on your computer without effort.
TunesKit Screen Recorder
- Record screen and audio on Windows and Mac
- Support recording webcam, audio, gameplay, and other activities on computer
- Export recording video to MP4, M4V, MOV, MKV, WMV, etc.
- Come with a built-in video cutting tool
Conclusion
This post has detailed guided you on how to record screen and audio with OBS. And it also brought you a great alternative screen recorder, TunesKit Screen Recorder, for your reference. TunesKit Screen Recorder focuses on recording anything in high quality on your computer. If you are hesitant to use OBS or want to use a more practical recording software, then TunesKit Screen Recorder is a good solution for you.
