How to Record a Skype Video Call

Are you looking for a method to record a Skype call so you can look back it again later? Whether for some important conversations or special moment, to record it is the best method for keeping your audio or video conversations.
Note that this may be illegal depending on where you and the other person are located or without asking the other party for permission. Check the laws in your local area, or ask for permission before recording. Here wi will share two methods with you about how to record Skype video calls with ease.
Part 1. Record a Skype Call via Skype's Built-in Recording
It has never been easier to keep a record of your Skype calls – both audio and video. The built-in recording feature is available for Skype desktop, mobile, and web. That means you can record an audio or video call, and then play and share your recordings with others. Here's how to use this function on your computer.

Step 1. Initiate a call with your friend or family from your Contacts list or receiving an incoming chat from others. The call can be voice or video and this works whether you're using personal skype or Skype for Business.
Step 2. Select Start recording by clicking the "+" icon in the bottom right-hand corner. If a red dot and message pops up at the top of the window, it means that the recording is taking place. A banner notification will be created for letting each person in the call know that they are begin recorded.
Step 3. Either hang up or press the "+' icon again and select Stop recording when you've finished recording the call. Then the whole recording will be finalized and processed. To revisit the recording, use the icon in the bottom-right of the call window, and you'll be brought to your chat window. You can press Play it to look it back.
The in-app recording function is only responsible for recording the whole process of chatting on Skype. For editing the recordings, you could have a try of TunesKit Screen Recorder.
Part 2. Alternative Way to Record Skype Calls on Windows and Mac
If you want to record Skype calls without the other person knowing or capture Skype calls on your Windows or Mac computer without using Skype's built-in methods, TunesKit Screen Recorder could be the obvious first choice. With the free trial, you can record video or audio up to several minutes in length. For longer videos, however, you'll need to pay for it.
Key Features of TunesKit Skype Call Recording Software
- Capture any audio and video from a number of programs like Skype
- Record any audio and video on screen separately or simultaneously
- Extract audio from video files to MP3, M4A, M4B, AAC, FLAC, WAV
- Save recording videos to MP4, M4V, and many other plain formats
- Serve as an audio recorder and editor and screen recorder and cutter
Just perform the following steps to record Skype video with ease
Step 1Choose recording mode on TunesKit

After completing the installation, open TunesKit software on your computer. Then you will see the main home of TunesKit. For example, if you want to record Skype meeting or other contents in the format of video, you need to choose the Video recording mode. Or if you just want to save it in the format of audio, the Audio recording mode could be selected.
Step 2Customize the recording settings

Before you start to record Skype for business calls or Skype video chatting, you need to select an area for recording at first. Just click the "+" button and a recording windows pop up. In addition, you could click the "Cog" button to open the setting panel and you can change the basic record options like video format, output folder, time scheduler and more.
Step 3Begin to record your Skype calls

The recording should appear in the TunesKit window, above the name of the Skype user with whom you were chatting. Now click the red REC button to record your Skype calls. You can also stop the process temporarily by clicking the Pause button or cut the recording by clicking the Scissors icon. To stop recording Skype calls completely, just click the Stop button.
Step 4Customize the recorded Skype calls

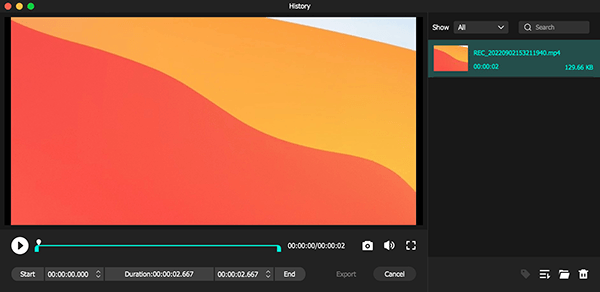
Once finishing recording, you will see a preview windows where you're able to review the recorded Skype calls by double clicking it. To personize the video, you can click the Edit icon to customize the video like split the video into parts, remove unsatisfied parts, take a screenshot or others. You can also click the Search icon to open the file location.
The Final Thoughts
The new call-recording features make it easier to record both audio and video calls, and even records shared screens in video calls. But if you want to further personalize the video, it cannot be achieved within this function. TunesKit software can bring this service to you here. Also, only ask for recording Skype audio, and TunesKit Audio Capture could give a hand. It helps you record Skype calls for podcast or keep your important audio conversation.
Main Functions of TunesKit Audio Capture
- Record any audio playing on the computer including Skype, Facebook, etc.
- Convert the recorded SoundCloud streaming music to plain audio formats
- Preserve the recorded audios with the original audio quality and ID3 tags
- Support multi-track editing like cutting, trimming, merging, and splitting
