How to Record Screen on Mac with Audio
The need for Mac screen recording is growing bigger and bigger nowadays. Everybody has something to record on their Mac. It could be a FaceTime call, a game video, a website video, or a clip of some workarounds on Mac.
When you search how to record screen on Mac on Google instead of going straight to "best screen recording software for Mac, I assume you need a detailed guide on how to record screen on Mac with audio. So here we map out all the information you need to know, including pictures and tutorials. This can make sure you successfully finish the screen recording on Mac with audio.
- Part 1. How to Record Screen on Mac with Audio via Mac Screen Recorder
- Part 2. How to Record Computer Screen with Audio on Mac with Mac Screenshot Toolbar
- Part 3. How to Screen Record Using QuickTime Screen Recorder on Mac
- Part 4. How to Screen Record on Mac with Audio through OBS Studio
- Part 5. How to Screen Record with Audio on Mac with Free Online Screen Recorder
- Part 6.Conclusion
Part 1. How to Record Screen on Mac with Audio via Mac Screen Recorder
First of all, let's get to know a powerful Mac screen recorder with audio product, TunesKit Screen Recorder.
It is a favorable and cost-effective option but it also has a free version for you to try. This software is available on both Mac and Windows, which features three recording modes to record screen and audio simultaneously and separately, and has the ability to record any kind of videos and activities on your Mac screen with audio as well.
What's more, its built-in editing tool gives you the choice to cut and edit the recording, and it supports multiple output formats and output devices so that you can export your Mac screen recording to any format for compatibility with different devices.
TunesKit Screen Recorder
- Record any screens play on your Windows 10 and Mac, such as FaceTime call, Twitch game video, live streams, etc.
- Record screen video and audio separately or simultaneously
- Work well as a screenshot tool, output high resolution recordings
- Convert recorded video to any format without watermark
How to Record Screen on Mac via TunesKit Screen Recorder
Step 1. Select Output Format to Screen Record on Mac
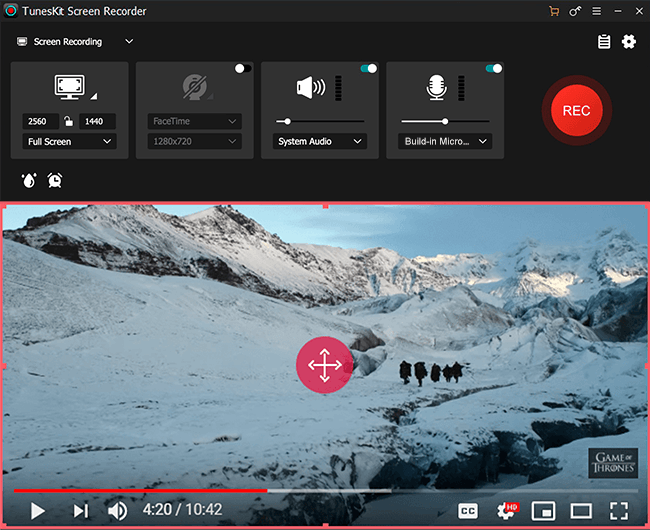
Launch TunesKit Screen Recorder on your Mac. Click the Options icon to open the setting panel. For the Basic record options, you can change the output folder and output format as you want. To capture lossless video, choose the format under HD Video.
In the Record time options, you can use the time scheduler to set a time to begin and end the recording. This feature is very convenient and you can leave the recorder to finish everything automatically. In the Cursor Options setting, we suggest you uncheck all the boxes to hide the mouse if you don't want it to show in the recording.

Step 2. Customize Size and Area to Record Screen on Mac with Audio
Click the "+" button on the left or the down arrow icon next to it. You can select the recording area using these two buttons. There are many fixed sizes for you to choose or you can customize the area by yourself.
Step 3. Start Recording Screen with Audio
When all the settings are done, hit on the REC button to start recording videos. Click the Stop button when you finish the recording. If you set the hotkey to start/stop capture, you can press the hotkey on your keyboard to finish the whole process.

Step 4. Edit the Recorded Video on Mac
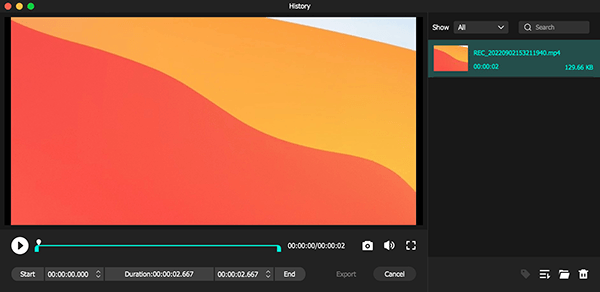
After that, you can click the Edit button to cut out the unwanted parts with the built-in video cutter. And you can also open the target folder by clicking on the Search button.
Part 2. How to Record Computer Screen with Audio on Mac with Mac Screenshot Toolbar
Sometimes you may want to capture the screen activities out of blue, like an unexpected plot on a live stream, a course that suddenly becomes informative, a sudden video conference, etc. And usually, these things leave you too late to start another third-party recording program.
The good news is that the situations can easily be handled. With macOS Mojave and later, you can fast take screenshots or start a screen recording on Mac with audio using the built-in screenshot toolbar. Just follow the steps below
How to Record Computer Screen and Audio on Mac
Step 1: Press Command + Shift + 5 on your keyborad to initiate the Screenshot Toolbar. Then you can see the recording toolbar opened on your screen.
Step 2: Click on the Option button and set the Save to, Timer, Microphone, Option.
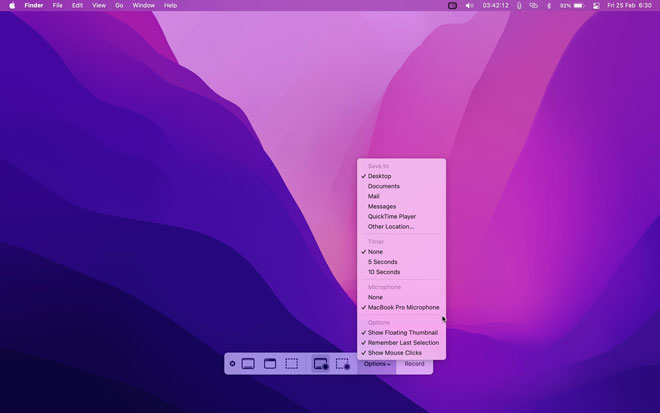
Step 3: After that, you can select Record Entire Screen or Record Selected Portion to create a recording area, then click on Record.

Step 4: When you finish, press Command + Control + Esc, or click the Stop icon on the top menu bar to stop the recording.
Part 3. How to Screen Record Using QuickTime Screen Recorder on Mac
The next shortcut we are going to introduce is something already on your computer – QuickTime Player. The built-in tool is always something you should try before you go looking for extra help. Unlike the built-in tool on Mojave, QuickTime supports all modern models of Mac. Let's see how to screen record with QuickTime.
How to Use QuickTime to Record Screen with Audio
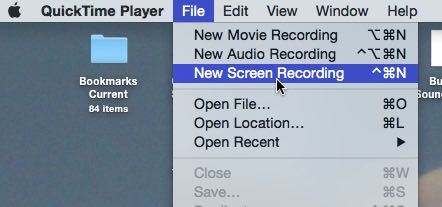
Step 1: Locate QuickTime Player from your Applications folder and launch it. Then go to the top menu bar and click File. From the drop-down list, select New Screen Recording and a screen record box will pop up.
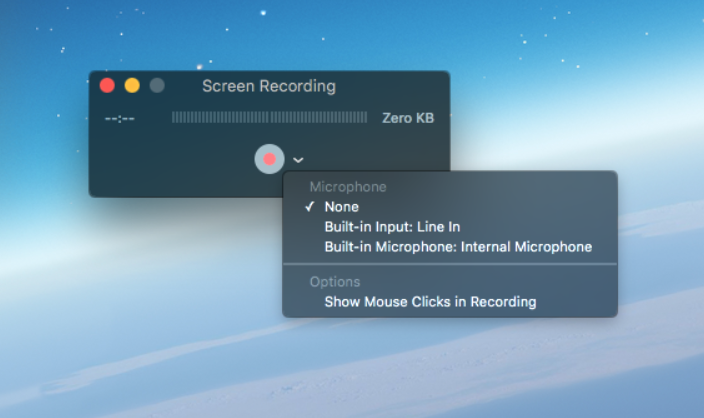
Step 2: Before starting to record, you should click the down-arrow icon next to the Start button to adjust the recording settings, mainly the sound settings. There are None, Built-in Input: Line In and Built-in Microphone: Internal Microphone for you to choose.
If you want to record your voice with a built-in microphone, choose Built-in Microphone: Internal Microphone. If you want to use an external microphone, choose Built-in Input: Line In. (Note that in some old version, there's no support for an external microphone.)
Step 3: To start recording, simply click ![]() and then customize an area to record your screen. To stop recording, click
and then customize an area to record your screen. To stop recording, click ![]() in the toolbar. After that, click File again and choose Save. Enter a name for the recording and decide which folder you want to save it. Confirm the settings by clicking Save.
in the toolbar. After that, click File again and choose Save. Enter a name for the recording and decide which folder you want to save it. Confirm the settings by clicking Save.
QuickTime is quite neat since there's no watermark or time limitation of the recording. However, the biggest shortcoming of QuickTime is that it can't record computer audio, which means that you can't record the streaming audio on your Mac. Solutions here are to raise the volume on your speaker and hope that the built-in microphone can capture that audio or add a sound extension, such as Sunflower, to your Mac. While these two solutions are both far from satisfying.
Part 4. How to Screen Record on Mac with Audio through OBS Studio
If you look for freeware that has the ability to record and stream your screen, this kind of Mac screen recorder with an audio feature is OBS Studio. Unlike conventional screen recorders, it does not have editing capabilities, but it featires powerful recording and streaming system so that you are possible to directly stream your screen on the stream media sites such as YouTube, Twitch, etc. And you can just choose to record screen and your audio on Mac.
What's more, it requires a specific screne and sourcce option so as to record more the accurate. You can read the following guide.
How to Record Video on Mac via OBS Studio
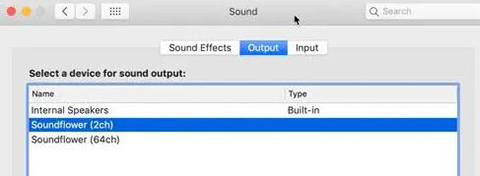
Step 1: To record system audio on Mac with screen, first, you need to install a plugin that enables recording system audio and your microphone. Here we recommend Soundflower. Download Soundflower and open the System Preferences on your Mac, then go to Sound > Output, and select Soundflower(2ch).
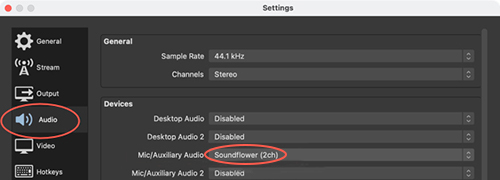
Step 2: Run the OBS Studio, click on Settings at the bottom right, turn to Audio > Mic/Auxiliary Audio and select Soundflower(2ch). Moreover, in the Output option, you can set the desried Recording Path, and change the Reocrding Format to MP4, MKV, FLV, and MOV.
Step 3: Now you can begin to record screen on Mac with audio. Back to main interface and find the Scenes and Sources options to add a scene and source. For example, add a scene, and add Display Capture, Audio Input Device, and Audio Output Device. And it also allow you to add Text, Image, Camera, and other sources.
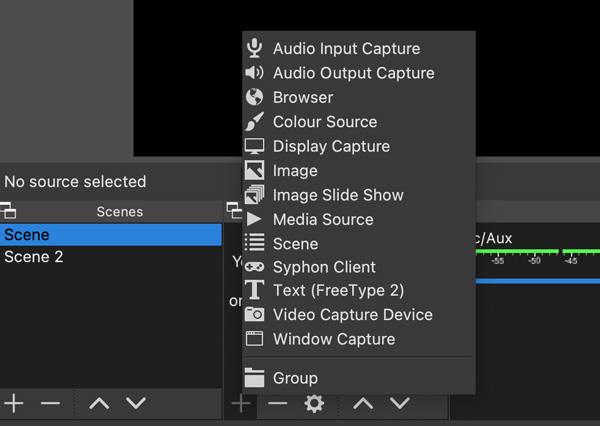
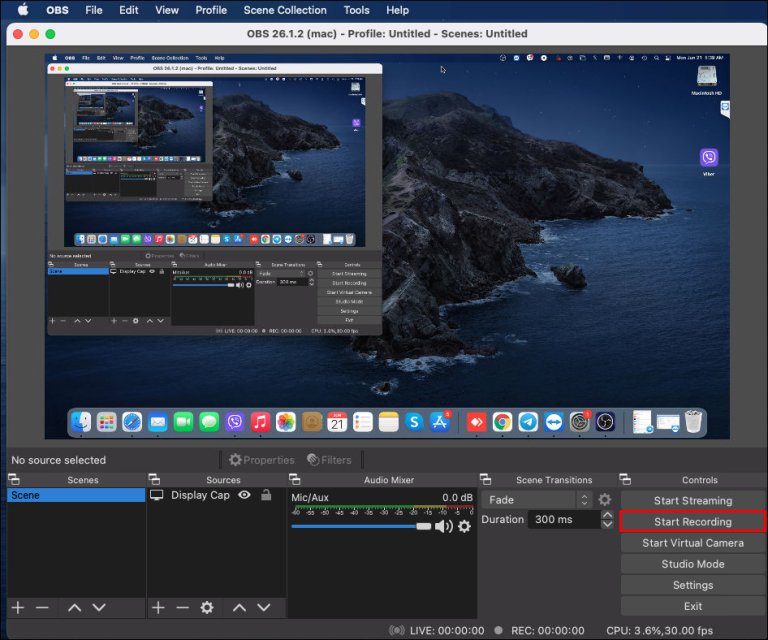
Step 4: Next, adjust the volume on Audio Mixer which next to the Sources. When all is clear, hit the Start Recording button and now you can open the target content to record Mac screen and audio. When you finish, click on Stop Recording, then choose File > Show Recordings to check the recorded video.
Part 5. How to Screen Record with Audio on Mac with Free Online Screen Recorder
If you don't have much storage, you can consider using some Chrome extensions or free online screen recorders to record the screen on Mac. These online extensions and recorders are mostly free and require no downloading or installation. More importantly, some of them have what the built-in Mac screen recorder doesn't have, which is the feature to record computer audio. Now, let me recommend some of the best of all I've used.
| Main Feautres | Screencastify | Chrome Screen Recorder | Loom | Apowersoft Free Online Screen Recorder |
| Record Full Screen | √ | √ | √ | √ |
| Record WebCam | √ | √ | √ | √ |
| Record Screen+WebCam | × | × | × | √ |
| Record Microphone Audio | √ | √ | √ | √ |
| Record Computer Audio | × | √ | × | √ |
| Output HD Recordings | √ | × | √ | × |
| Screenshot | √ | × | × | × |
| Mouse Highlight | √ | × | × | √ |
| Video Trimmer | √ | × | √ | × |
| Annotation Feature | √ | × | √ | √ |
| Shareable Link | √ | √ | √ | √ |
| Cloud Recording | √ | × | × | × |
| Log in Via Google Account | √ | √ | × | × |
| Limitation | free plan only allows 50 video recordings | only output .webm format | too many register steps | need to download a launcher |
Pros
1. Except Apowersoft, the other three are chrome extensions and this saves you the hassles to create a new account.
2. You can easily share the recordings with your friend as they all provide a shareable link and some of them even support cloud recording.
3. Some of them offer extra features, such as annotation and mouse highlight.
Cons
1. Most of them can't record the screen and webcam at the same time.
2. Not allow to customize the recording area except Apowersoft, so you can only choose to record the full screen or the tab in chrome.
3. They have very few output formats to choose, especially the Chrome Screen Recorder can only output WEBM format.
Part 6. Conclusion
It is not as difficult as you might think to record computer audio and screen on a Mac. The 5 methods above we summarized are all capable of handling the problem of how to record screen and audio on Mac.
Whether it's a built-in tool like Screenshots Toolbar or QuickTime Player, third-party software like TunesKit Screen Recorder or OBS Studio, or one of the recommended online screen recording programs, they all have their features to fulfill users' needs. Choose the one that suits you and start your screen recording task on Mac.
