How to Use QuickTime Recorder to Record Screen with Audio
QuickTime, a multimedia, sought-after video recorder and player, is available for all mac OS and consists of functions to record screen and webcam without loss of quality at the same time. On top of that, multiple audio resource settings are supported by it, that is to say, no matter whether the audio comes from a built-in Microphone, Parallels Access Sound, iShowU Audio Capture, or OWC Thunderbolt 3 Audio Device, QuickTime Recorder empowers users to be able to capture when the screen-recording is going on. In today's sharing, we'll dive into how to do QuickTime screen recording with music by general steps and meticulous audio settings.
- Part 1: Guides to Use QuickTime Screen Recorder to Capture Videos with Audios
- Part 2: Best Alternative Screen/Webcam/Gameplay Recorder to QuickTime on Computers

- Part 3: Differences between QuickTime Player and TunesKit Screen Recorder
- Part 4: FAQs about QuickTime Screen Recording You Need to Know
- Part 5: Bottom-Line
Part 1: Make a QuickTime Screen Recording with Background Sound
QuickTime Recorder was pre-installed on Mac and provides you with unlimited screen recording. During the whole process, users can take a snapshot at any time and QuickTime will automatically save the captured pictures and add it to the folder you set. In contrast to other screen recording software, QuickTime Recorder has a clean UI and multiple settings in the area to be captured as well as audio from multiple sources. Here is the ultimate guide to using QuickTime to record a video.
Step 1. Open QuickTime Recorder by pressing shortcut "Command + N"
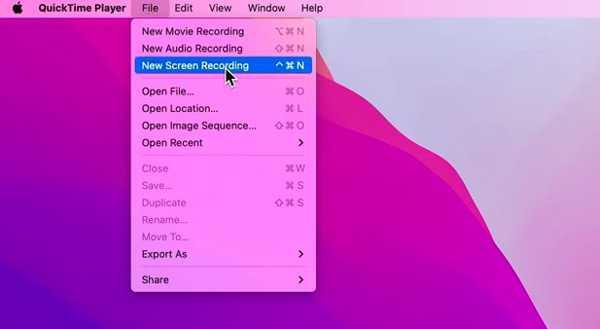
QuickTime is one of the default software on Mac, so you can operate it from your computer with several clicks. To make a new recording, go to "File" > "New Screen Recording". When it comes to the shortcut, press "Command + N".
Step 2. Fine-tune audio source and recording save path as per your needs
Selecting the audio source before the recording screen is necessary. When the toolbar pops up, click the "Options" icon and move to "Microphone" in which QuickTime allows you to choose the background audio source, it could be "None", "Built-in Microphone", "Parallels Access Sound" or else. Different soundtrack option defines the audio you capture later.
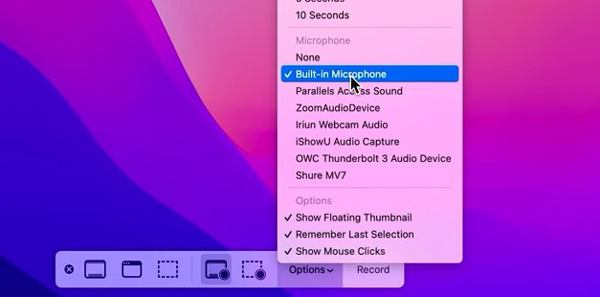
On top of the "Options", you're able to set the save path which is the location of your screen recordings. As you can see, saving your files to desktop, documents, mail and messages are included. By the way, adding a timer or choosing to show floating thumbnail or not are accessible in the following.

Step 3. Select screen recording area, which could be the entire window or selected screen
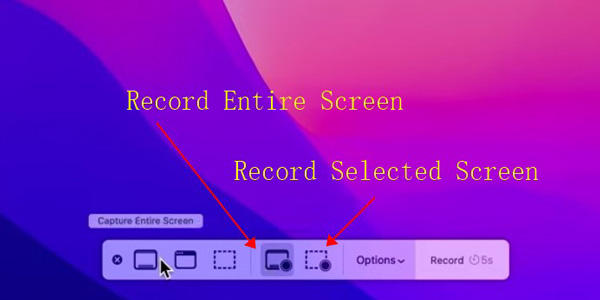
After finishing background audio and save path settings, make sure the recording area is what you want. You use QuickTime Screen Recorder either to record the entire window or selected screen. For example, if you need to select a fixed 1080p area, you need to click "Record Selected Screen" to make a 16:9 rectangle by clicking on the screen and holding the point to create such an area.
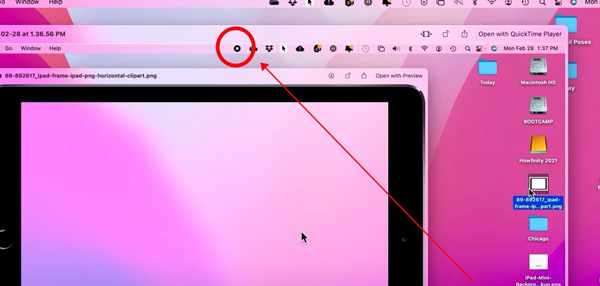
Step 4. Stop recording by tapping on the button from the toolbar. Check your files
When you want to stop recording, just click the "Record" icon from the toolbar on the top of the screen. QuickTime Recorder saves your files to the folder you set up beforehand. You can play it and use other tools to rotate or trim the recording. The next step is going to help you do advanced audio settings.
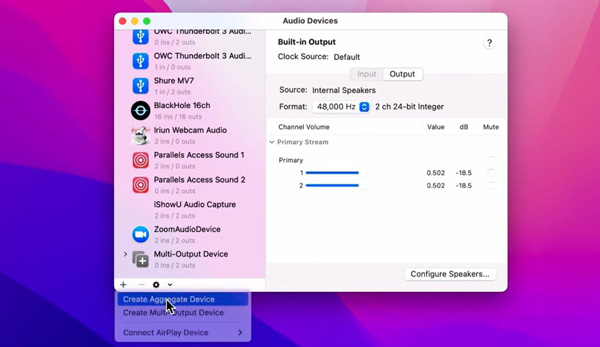
Step 5. Navigate to "Audio Devices" to do advanced audio parameter settings
For advanced audio controlling and setting, merely selecting the music source is not enough. To do meticulous work, go to "Audio Devices" on your computer. You can check the source, format, primary, value and more. Click "+" > "Create Aggregate Device" to set the aggregate device.
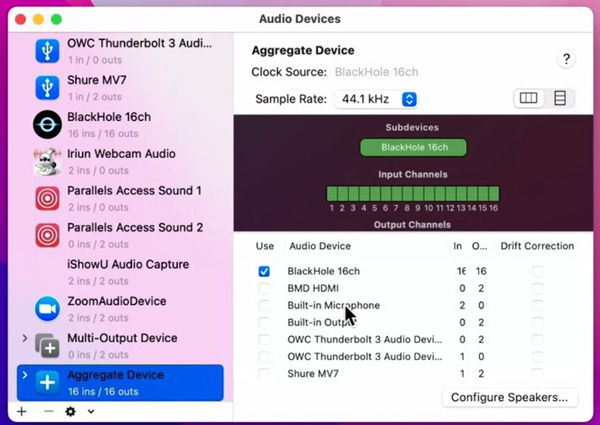
When you land on the workspace of the aggregate device, you're capable of reviewing the clock source and manipulating the sample rate as you see git. More importantly, you can mix multiple audio tracks when recording screen, to be detailed, using BlackHole 16ch, BMD HDMI, Built-in Microphone and more sources is possible.
Part 2: TunesKit Screen Recorder to Make a Recording with HQ/SQ Audio
Compared with QuickTime Player, TunesKit Screen Recorder is multi-purpose, easy-to-use software for personal and commercial. It comprises general functions to record screen (entire or selected), window, chrome, audio-only and gameplay. Users can use this software to pre-set video format, audio format, video resolution, audio bitrate, and more.
Surprising that TunesKit Screen Recorder empowers you to add watermarks on the video you record with customizable text font and color. Also, the scheduled recording function is supported by it to promote efficiency and record videos with ease. Let's learn how to record a screen and discover more about it in the following.
TunesKit Screen Recorder
- Choose a different video or audio format after recording
- Set your wanted video resolution
- Select an area with pre-made aspect ratios
- Advanced audio parameter settings
- Funny scheduled recording and watermark/logo addition
Follow the guides to make a screen recording by TunesKit Screen Recorder
Step 1. Get TunesKit Screen Recorder and run it. Select the screen recording area
Above are the buttons to download TunesKit Screen Recorder outright. You can choose to register or not. The UI of this software is quite beautiful, so you can master it quickly. When it comes to selecting the screen recording area, you can choose a ready-made aspect ratio by clicking on dropdowns from "Full Screen", such as 16:9 or 4:3. It allows you to customize the area as well.
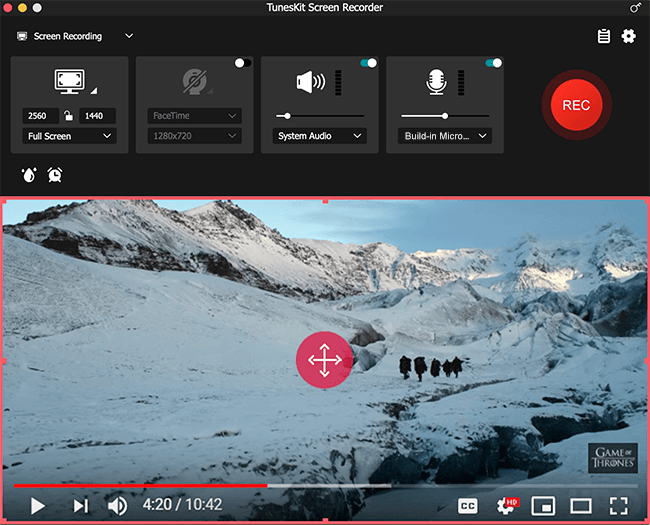
Step 2. Tap on the gear icon to set your preferences for audio and video
On the UI, you can find a gear icon which is used to do advanced settings. If you click "Audio" from your left-side toolbar, then the audio format and related parameters such as quality and bitrate can be adjusted.
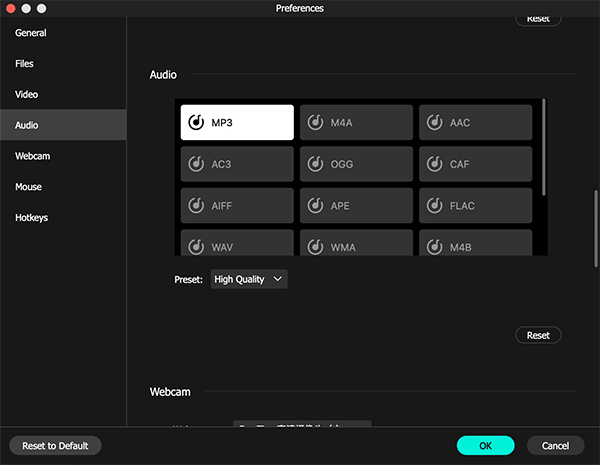
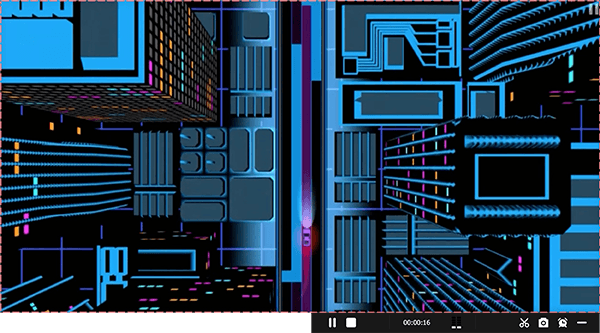
Step 3. Click buttons to pause, stop, trim, screencast and set scheduled stop time
During your screen recording, there are buttons designed to execute operations. Users can take a snapshot of the video at any time. It allows you to pause or stop the recording by clicking on buttons. By the way, scheduled recording and video cutting are provided as well.
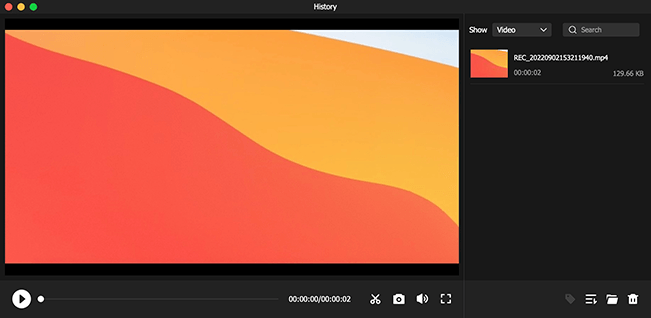
Step 4. Organize recorded videos and pictures from "History". Download your files
All the recorded videos and captured images will be auto-saved to the "History" of TunesKit Screen Recorder and the folder you set at the very beginning. The "History" panel allows you to marshal different files and trim out unwanted recordings. Right-click on the recording to get your files.
Part 3: The Differences between QuickTime Recorder & TunesKit Screen Recorder
We've shown you two screen recorders above with general and advanced settings. Here we'll discuss the differences between the two software from aspects such as OS, UX, functions, supported formats, file quality and more. Choose the best screen recorder according to your specific needs.
| OS | UX | Recording Projects | Subscriptions | Supported Formats | Video Resolution | Scheduled Recording & Add Personal Watermarks | |
| TunesKit Screen Recorder | Mac & Windows | Easy | Provides 5 recording projects: Screen, Window, Chrome Tab, Gameplay and Audio-only | $14.95/m, $29.95/y, $49.95/p | Almost all audio and video formats | Up to 2160p | Support |
| QuickTime Screen Recorder | Mac | Easy | Record screen only | QuickTime Pro is $30/one-time | MPEG-1, 2, 4, 3GPP-1, 2, AVI, DV, AIFF, AU | Up to 1080p | Not support |
Part 4: Record Screen with Music by QuickTime Recorder FAQs
Q1: Is QuickTime available for Windows system?
No. QuickTime only works with Mac. And all mac OS can operate QuickTime outright.
Q2: Is QuickTime Player good for screen recording?
That depends. If you need to make a simple screen recording with music on Mac, QuickTime Player is good enough. You can launch it to get started by the shortcut "Command + N". Nevertheless, when it comes to recording audio-only, window or gameplay, or adding watermarks to your recordings, QuickTime Player cannot help you.
Q3: Why my Mac screen Recording with QuickTime Recorder has no sound?
If there is no background audio when you record by QuickTime, you need to check if the Mic is selected. Click "Options" from the toolbar, and select the audio source to make the background soundtrack functional.
Part 5: Summary
Learning how to use QuickTime Screen Recorder is not as difficult as you thought. But the audio parameter setting still needs further operations. You need to adjust the bitrate, frame rate, format and more to fit into projects. We showed TunesKit Screen Recorder to help you release the recording magic from many aspects. Try the software for fun.
