Easy Guides to Record Your Webex Metting
Webex and Zoom are two of the commonly used online meeting provider, with a variety of communication features and recording ability to record the meeting and help you view the recorded videos. A lot of people choose Webex because of the larger participant capacity of people that can join in the meeting.
You may need to record a Webex meeting right now, but the basic recording feature of this software is bare. In this post, we'll introduce you to the best methods to record Webex meetings with powerful video recorders to help you make a Webex recording even if there is no host permission.
Part 1. How to Record Webex Meetings by Built-in Recorder of Webex
Once you have downloaded Webex software and joined a meeting within it, you can find a lot of meeting features on the user interface. As regards the built-in screen recording function, users with permission from the host are able to record Webex meeting, otherwise, there is no channel to record. If you're the host or alternate host, you're allowed to capture all the recordings in Webex without permission.
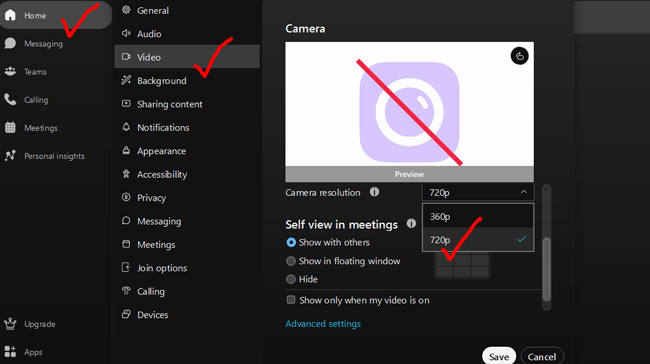
Step 1. Enter Webex software. Edit the camera resolution by "Home" > "Video" > "Resolution"
First of all, you need to ask the recording permission from the meeting host. To improve the recording video quality, you need to set the camera resolution within this software. By going to "Home" > "Video" > "Camera Resolution", you're empowered to increase the recording quality in advance. Once it is finished, click "Save" to save the changes.
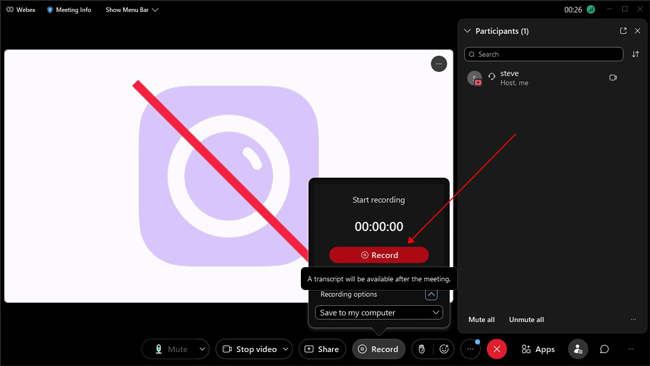
Step 2. Begin to record Webex meeting by clicking "Record" from the menu bar. Set the save path
During the meeting in Webex, you can find the button for recording from the toolbar. Before recording, there will be a popup window to let you determine the save path. You can choose to save the files to the computer. When the recording is over, you can view the recorded Webex meeting in the designated file. Now, hit the "Record" button to record.
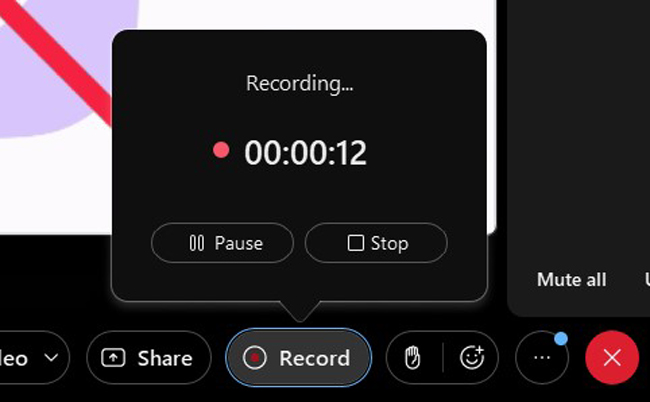
Step 3. Pause or stop the current recording. Find the saved recording file to view and share
If you hit the record icon again, then you can choose to pause or stop the recording anytime. The recorded Webex meetings will be saved to the place you set automatically. There is no watermark on your recordings. And you can share the files with others, or use a video editor to make trimming or cropping.
Part 2. Use TunesKit Screen Recorder to Record Webex Meeting Quickly
If you don't have the recording permission to record your Webex meeting, or you need to find an all-in-one video recorder, then you will like TunesKit Screen Recorder, which is replete with user-friendly interface and various formats. You can record Webex meetings with this software in a couple of clicks. The interface contains ready-made video quality conversion and output format change function.
More features you may be interested in include watermarks, trimming, scheduled recording, customizable aspect ratio, and video bitrate changer. That is to say, you can edit the recording and make it excellent with some features of TunesKit Screen Recorder.
TunesKit Screen Recorder
- Start to record Webex meeting in one click
- Design the recording width and height easily
- Add your watermarks to the Webex recording files
- Set the quality in 720p or 1080p in advance
- Use the professional recording method to record
How to Record a Webex Meeting by TunesKit Screen Recorder
Step 1. Select the "Screen Recording" method. Decide the area to record the Webex meeting
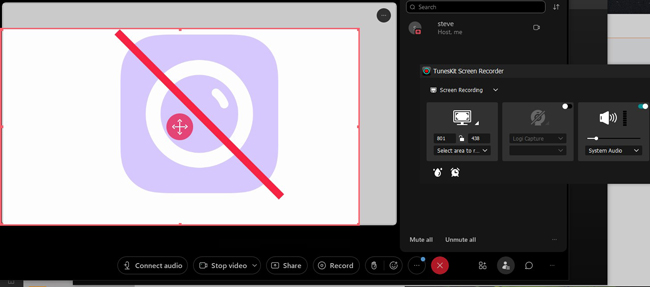
There are five video recording methods in TunesKit Screen Recorder. To record a Webex meeting, choose the "Screen Recording" project. After that, customize the area you want to record, or choose a ready-made video resolution and move it to the recording area. Simultaneously, you can change the audio channel, or set advanced parameters within "Settings" on the interface.
Step 2. Improve the recording quality by clicking on "Settings". Select the file format and related settings
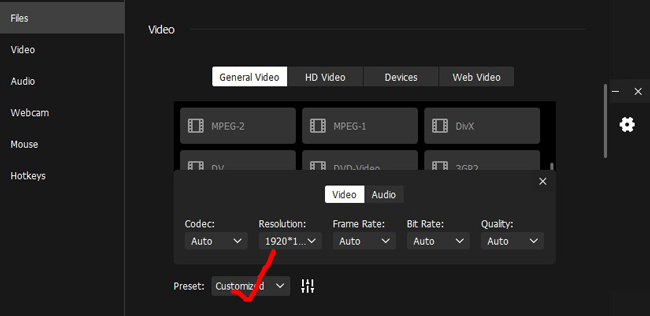
You can personalize the file quality by going to "Settings" on the user interface. Both audio and video settings can be changed according to your requirements. For example, users are allowed to select accurate codec, resolution, frame rate, and quality of the video track.
Step 3. View recorded Webex meetings in "History". Edit the recording or download the files directly
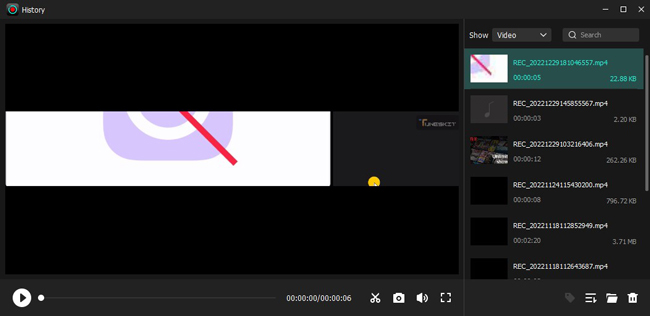
If you want to finish the Webex recording, click the "Stop" button near the recording window. The "History" panel includes all the recordings and screenshots during the Webex meeting recording. You can use the Trimmer to cut out unwanted parts of your meeting recording as well. This panel allows you to rename or locate the recordings.
Part 3. How to Record a Webex Meeting on iPhone or Android Using Go Record
Want to record Webex meeting on your mobile phones? Go Record is a powerful screen recording app for both iOS and Android. The interface of this app is beautiful and clean. Users can choose easy screen recording or facecam recording. Go Record allows you to adjust the sound volume and watch recorded videos directly. Once you need to record anything on your phone, Go Record can be a nice option.
Step 1. Download Go Record on your phone. Start to record your Webex meeting with background music
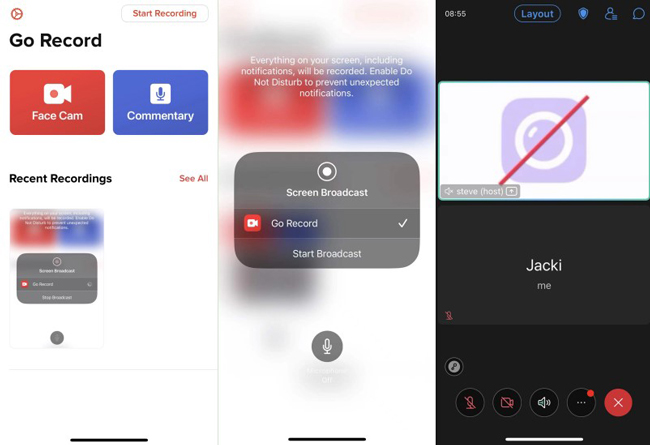
You can download Go Record for free. You can launch this screen recording app while the meeting is going on. Click "Start Recording" from the top-right place. Then switch the screen to the Webex meeting. And this app will perform the recording behind the system.
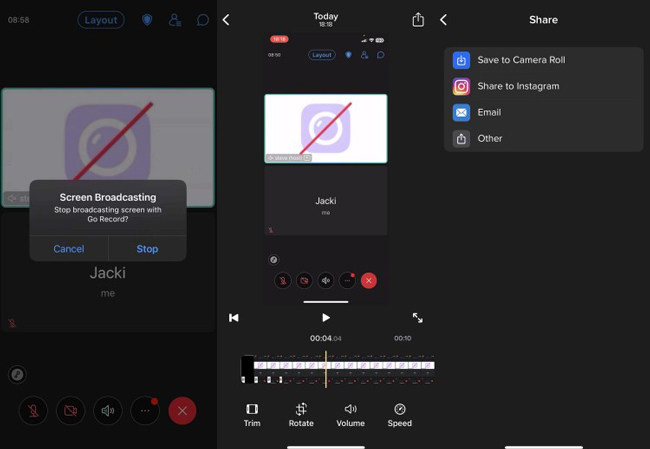
Step 2. Stop recording by hitting the red area. Choose to trim, rotate, change volume, convert speed, and view the recorded meetings
Once you need to finish recording, click the red area on the screen, then you can make adjustments to the recorded file by trimming, rotating, volume changing, speeding manipulating, and more. Afterward, you can save the recorded meeting to Camera Roll or share it on the social platforms, such as Instagram.
Part 4. Record Webex Meeting Frequently Asked Questions
Q1: Can I record a Webex meeting without permission?
Sorry to say that you cannot record the current Webex meeting if you have no permission. Webex allows specific people to record the meeting, including the host, alternate host, and account administrator. If you need to record in Webex, you should ask one of those people to get permission. Otherwise, you can download a third-party screen record to record the meeting.
Q2: Can I record Webex meeting for free?
On the desktop version of Webex, you can record Webex meetings for free when you have permission. Only with the paid version, can you save recordings in the cloud. Up to now, you cannot record Webex on the app version.
Q3: Does Webex know if you're screen recording?
Everyone in the Webex meeting will be notified that someone else is recording the meeting when you use the built-in meeting screen recording function. If you use a third-party screen recorder, there will not be any information to let others know that you are recording the meeting.
Part 5. Conclusion
We can see that Webex allows participants to record the meeting within the software. But the problem is you need to get permission, and your recording behavior will be known to others. Thus, you can use a third-party screen recording tool to record your Webex meeting. With those options introduce in this post, you can personalize the recording area and add watermarks to the recording.
