Create GIF from Screen Capture [4 Guides]
GIF comes with a lot of advantages, for example GIF plays repeatedly like a flipbook, which is smaller than other file-saving formats such as MP4 or AVI videos. It stands for graphics interchange format and is the same as .png or .jpeg files with reference to noiseless animations made from static images. When it comes to creating a GIF, recording belongs to one of the efficient tricks. If you need to make a GIF with screen capture or recording. Look here! This posting contains 4 ways to record a GIF based on your device, along with complete reviews of GIF recorders to help you choose the best tool in no time.
Part 1: TunesKit Screen Recorder: How to Record a GIF on Windows 10 and Mac
On the user interface of TunesKit Screen Recorder, users are able to pick up their wanted recording mode from "Screen Recording", "Webcam Recording", "Audio Recording", "Gameplay Recording", and "Windows Recording". If you need to record a GIF on Mac or Windows, just use the "Screen Recording". Customizing the GIF recording area is a wonderful thing to do, because you can choose a specific area or apply ready-made video resolutions as per your needs.
TunesKit Screen Recorder supports you to export video on multiple formats aside from .gif, to be detailed, MP3, MP4, AVI, MOV, WMV, M4A, DivX, MKV, and more types of formats can be chosen from at present. Keep reading to learn to use it to capture a GIF within a few minutes.
TunesKit Screen Recorder
- Multiple formats supported including GIF, images, and videos
- Different recording projects to start recording efficiently
- Easy-to-learn user layout design with pro setting buttons
- Add personalized watermarks to the recordings as per your needs
- It allows users to record without duration limit or registration
How to Make a GIF from a Screen Recording
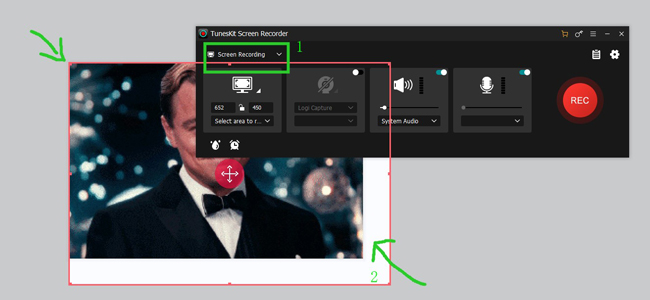
Step 1: Get TunesKit Screen Recorder. Customize recording area and manipulate relevant settings
Choose the "Screen Recording" mode for recording your GIF. Control the width and height of your recording area or use a ready-made video resolution. The area for recording is customizable and can be adjusted easily. Within the "Setting" panel on the layout, it allows you to set the output format in .gif or others. When you're ready to record, click "REC" to get started.
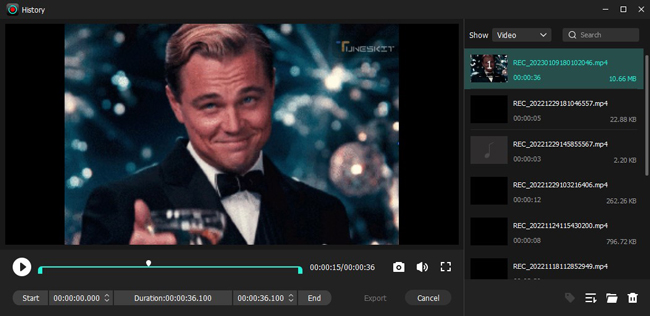
Step 2: During recording, you can pause, stop, take a screenshot, or set a scheduled time to end
There are a series of function buttons to click if you need to pause or stop the recording process. Also, you're allowed to take a screenshot or set the ending time via the scheduled feature inside. The layout displays all of the buttons and timestamps in real time.

Step 3: Trim recorded GIF, and find your GIF file from local folder to share via social media or email
In the last step, you can choose to trim out unnecessary recording parts in case you are unsatisfied with the result. After that, you're able to find the saved GIF files from the file save path you set before. If you haven't set the location for saving, right click the clip to find it. The Media provider allows you to settle all of the recordings including videos, GIFs, and screenshots.
Part 2: How to Capture a GIF Online Free by GIFCAP
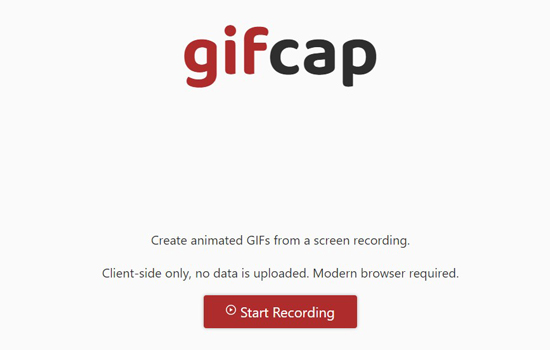
If you desire to create screen recording GIF via a web-based GIF file recorder, then you shouldn't miss out GIFCAP, which is an ad-free and simple-to-master online screen recording program that comes with free downloading services. Different from TunesKit Screen Recorder or OBS Studio, GIFCAP records your GIF or videos based on the window you're going to share. In other words, the basic system is used to share the recording window to work instead of letting users personalize their wanted recording area. It is efficient for specific needs but may be unpleasant for some users.
Step 1: Find GIFCAP for GIF screen recording on a browser. Click on "Start Recording" to begin recording
This program is simple and will not ask you to register or buy any premium services. You visit it on a browser online and begin to record your GIF by tapping on the "Start Recording" icon when you'er ready.
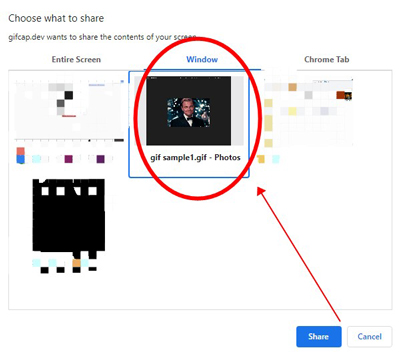
Step 2: Choose screen, window, or chrome tab to share for recording
You need to find and select the GIF you have opened or you're watching to share and then record by GIFCAP. With that said, you cannot choose or manipulate an area for recording with this online GIF recorder. In fact, the majority of online screen recorders are not capable of recording a GIF based on users' resolution. As a result, it is often needed to crop the GIF after recording.
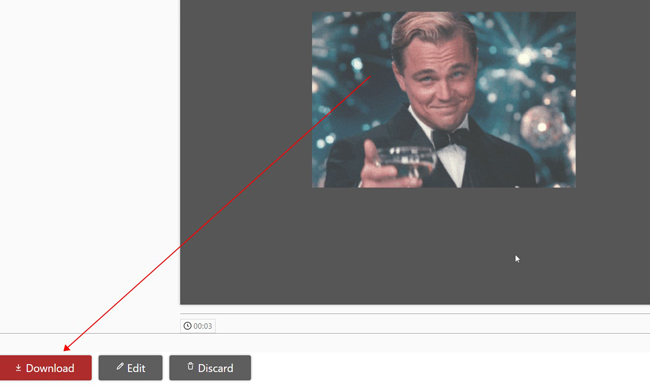
Step 3: Stop recording when you finish it. After rendering, choose to download, edit, or discard the project
Free online downloading is provided to help you get the recorded GIF files without hassle. Alternatively, you can edit the recording or discard it outright. You've learned the tutorial on recording GIFs online. If you don't want to download software or app, the online method is better, but keep in mind that it is possible for you to crop the GIF after recording.
Part 3: How to Record a GIF on iPhone by Built-In Screen Recording Tool
As we know, iPhone and iPad have it standalone screen recording function to capture GIF and video with a couple of clicks. Before starting recording on your iPhone, all you need to do is add the built-in recorder to the drop-down toolbar from "Control Center" inside "Settings". Moreover, it allows you to edit the recorded GIF screen by filtering, cropping, color enhancing, speeding, or other tools. Scroll down to record your GIF on your iPhone with me!
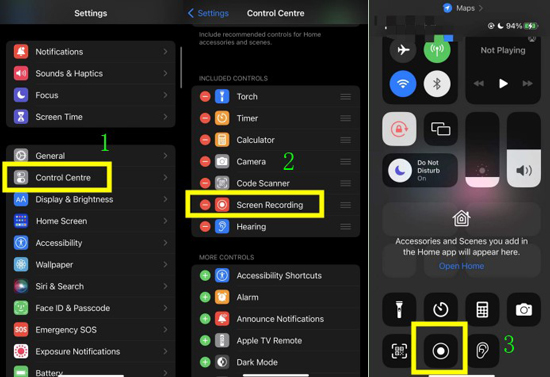
Step 1: Add screen recording function from "Settings" > "Control Center" > "+ Screen Recording"
To begin with, add the "Screen Recording" function from "Settings" > "Control Center" > "+ Screen Recording". In this case, you will find the "Screen Recording" button on the layout or dropdown toolbar.
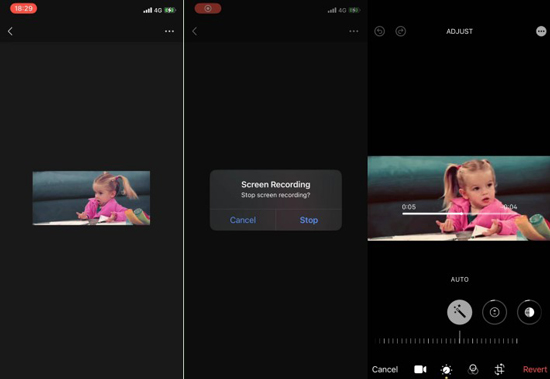
Step 2: Record GIF with the recorder. Stop recording. Edit recorded GIFs with filters or other features inside
The screen recording is going to work after three seconds when you click on its button. If you need to stop recording, finger press the red timestamp in the top-left panel. Choose "Stop" to stop recording. Afterward, iPhone gives you tools such as Cropper to crop the GIF and filters to enhance it. When it is over, download your GIF and find it on the album of your iPhone.
Part 4: How to Make a GIF of a Screen Recording on Android via Screen to GIF
Want to create GIF from screen capture on Android? There are many types of screen recording tools spread on your cell phones. It is wise to use the built-in recording feature which is pre-set in your phone. Nevertheless, the Screen to GIF app offers flexible canvas designs as well as frame picking or deleting. In other words, if you download and use Screen to GIF for recording a GIF, you can enjoy more features and effects to improve the GIF file quality.
Step 1: Enter into Screen to GIF. Design recording area's position and FPS. Click buttons to start recording
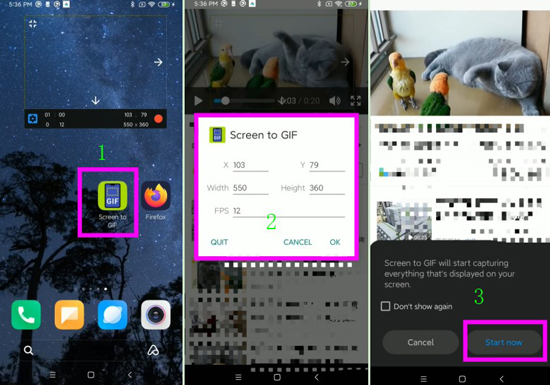
First thing first, download Screen to GIF on your mobile phone. Click to use it. Customize the recording area by controlling the variables of position, width, height, and FPS. Tap on the "Start Now" icon to begin recording GIF.
Step 2: Remove pictures or add reverse pictures based on your needs. Click the button to convert frames into a GIF and save it to the phone album
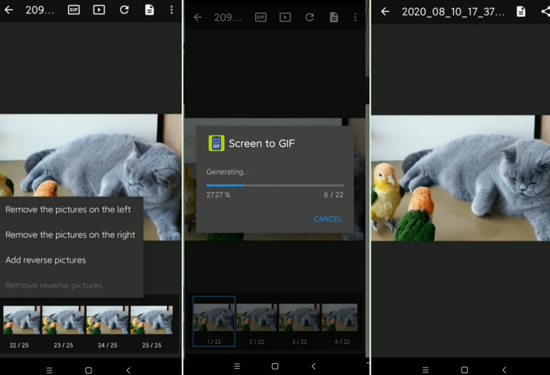
Your recorded video will be saved as a set of images that are ready to be removed or reversed, for example users can choose the wanted pictures to remove on the left or right. Commonly, there will be 20-40 images collected on the workspace, and you can review each of them one by one. Lastly, click the "Convert" icon from the menu bar to save these images into a GIF.
Part 5: Wrap-Up
Want to know which is the most proper GIF recorder to choose from? To be honest, it is wise to compare the surface, built-in recording modes, provided output formats, high-quality recording technique, and operating system before downloading the screen recorder. This article is mainly about recording GIF screen in no time by some selective recorders for users. If you need to execute gameplay recording or webcam recording, choosing software is better.
