How to Record Audio on Windows 10 via Audio Recorders
Have you ever had such an experience? When you are watching a movie or show on your Windows 10 computer, the background music for the film or show at a certain moment resonates with you and you want to record it. Or when you watch some music videos, you just want to save the music instead of the video, but you can't find the link to download the music.
When you encounter the above situations or others, you may wonder how to record audio on Windows 10. Luckily, we have found several ways for you to record internal audio on Windows 10. Let's go now.
- Part 1: How to Record Audio on Windows 10 with TunesKit Audio Capture
- Part 2: How to Record Internal Audio on Windows 10 with Voice Recorder
- Part 3: How to Record Computer Audio on Windows 10 via Audacity
- Part 4: How to Record System Audio on Windows 10 via Free Sound Recorder
- Part 5: How to Record Sound from Computer on Windows 10 via Online Audio Recorder
- Part 6: Conclusion
- Part 7: FAQs about Recording Audio on Windows 10
Part 1: How to Record Audio on Windows 10 with TunesKit Audio Capture
TunesKit Audio Capture is a powerful audio recording software that allows you to record any audio on your Windows 10 computer, including system audio, streaming music, live-stream, game sound, background music, etc. And it will save the audio recording in different formats, such as MP3, M4A, AAC, and so on.
Unlike other audio capture software, TunesKit Audio Capture works on both Windows 10 and macOS. It will analyze your audio data before you start recording the target audio, so the recording speed is faster and the quality is better than other audio recorders. Also, it comes with a built-in audio editor that can recognize the audio information while recording as well as edit or complete tags to the audio after the recording, and support merging or trimming recorded audio with simple clicks. Now please read the tutorial on how to record audio on windows 10 with TunesKit Audio Capture.
- With bulit-in ID3 tag editor;
- Losslessly and fast capture;
- Multi-audio tracks audio can be played without affecting the recording.
- The trial version can record 1 minute only.
Features of TunesKit Audio Recorder
- Record audio on Mac and Windows PC losslessly
- Have six output audio formats to choose, including MP3, AAC, FLAC, WAV, M4A, M4B
- With a smart built-in ID3 tags editor
- Support multi-track recording, audio trimming and merging
- Capture streaming music like Spotify, Youtube, etc. on Windows 10
How to Start Audio Recording on Windows 10
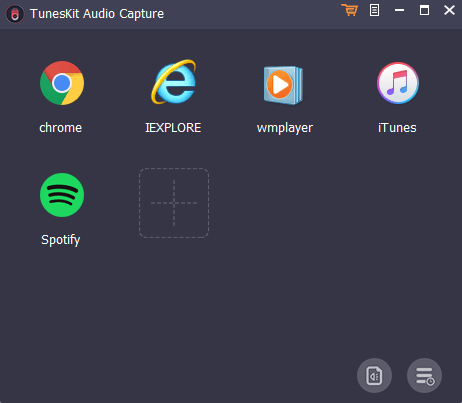
Step 1: Download and launch TunesKit Audio Capture on your windows 10 computer. You'll see an interface that lets you choose a recording channel. You can add recording sourcess by clicking the "+" button, such as adding media players like iTunes, Quick Time, VLC Media Player, and so on.
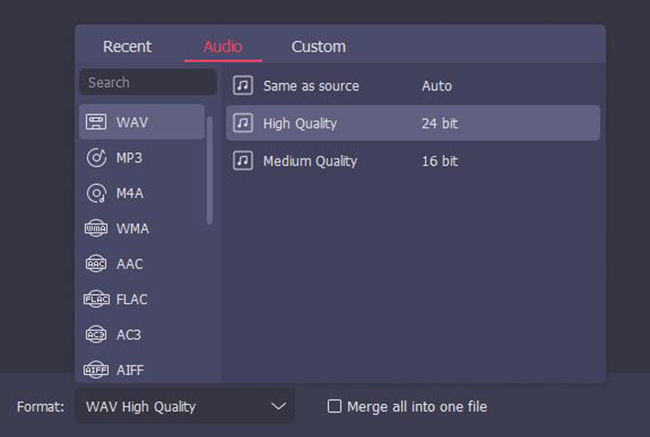
Step 2: Click the Format button to preset the output setting. In this scene, you are able to select the output format and adjust the codec, channel, sample rate, or bit rate, and set the output quality of your audio. Then click OK.
Step 3: Next, open the recording channel, and get ready the audio you want to record. TunesKit Audio Capture will display a recording window and start recording audio once the audio is played. When the music ends, simply click on STOP or quit the audio source. And you'll see the audio recording is in the Capture List.
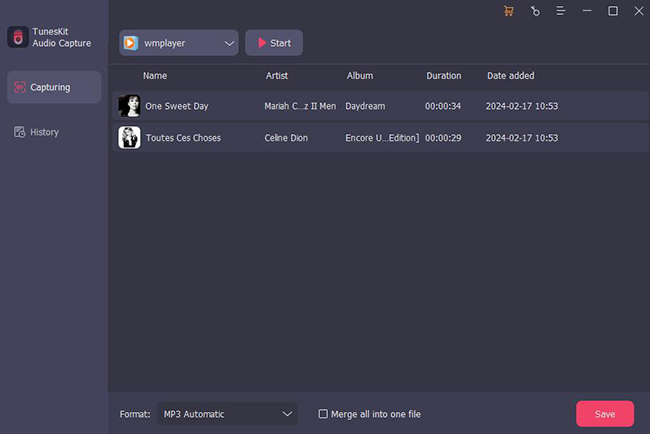
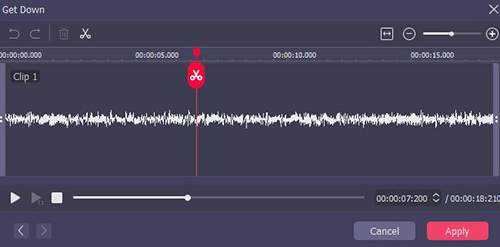
Step 4: If you have any editorial intentions, simply follow the prompts. The Merge button at the bottom left allows combining several recorded audio tracks into one, and the Edit button at the rear of each track enables trimming the audio length and editing the ID3 tags. Then click on OK.
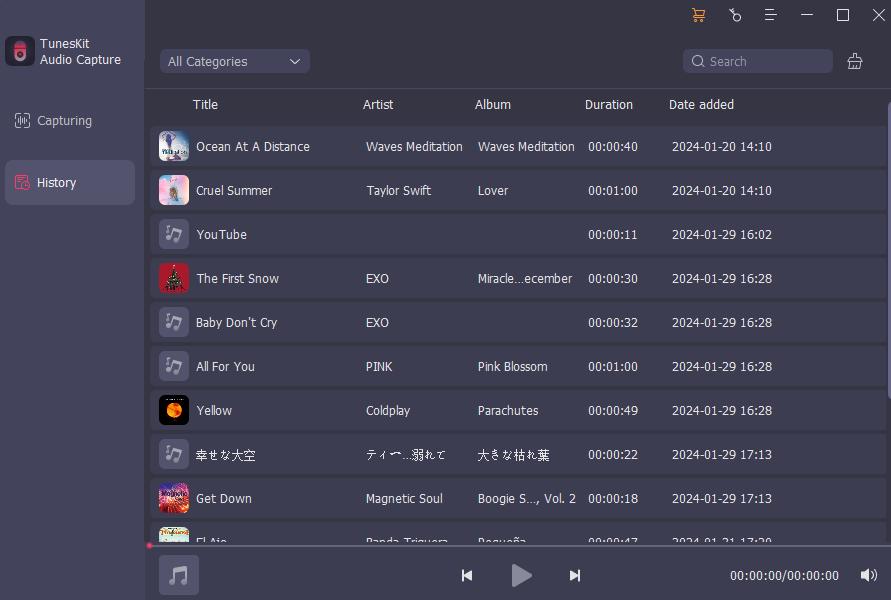
Step 5: Click on Save when everything is done. And the recorded audio will be listed in the History list. To locate the local folder, simply tap the Seach icon at the rear of each track.
Part 2: How to Record Internal Audio on Windows 10 with Voice Recorder
Recording internal audio on Windows 10 using your computer's built-in program is a very simple and convenient operation that does not require downloading and installing any additional recording software. The built-in audio recorder on Windows 10 called Voice Recorder allows you to record audio as well as trim the audio instantly.
All you need is a PC with Windows 10 and STEREO MIX and VOICE RECORDER programs. After reading the following tutorial on how to record audio on Windows 10, you will be ready to record the audio you want. The procedure is as follows.
- Simple and fast;
- Record audio for free;
- No need to download other audio recorder.
- Unable to a preset output format;
- The editor isn't powerful enough.
How to Record Internal Audio on PC
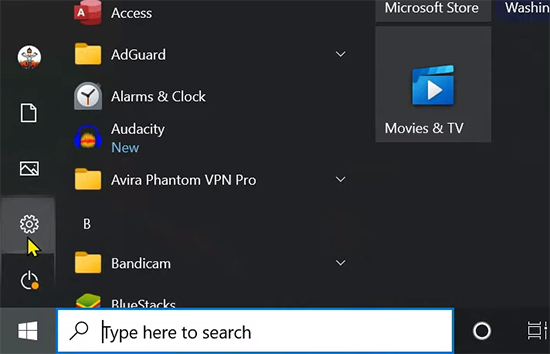
Step 1: Click the Win button and open the Settings.
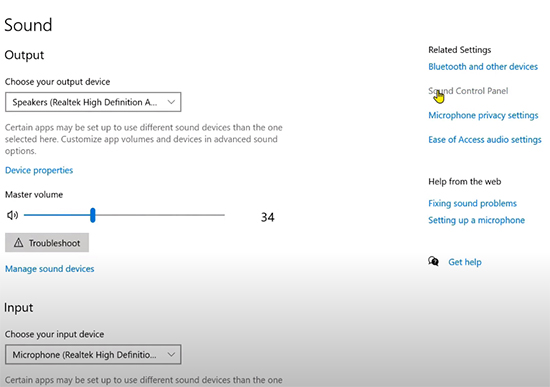
Step 2: In the Settings scene, click SYSTEM > VIOCE, And go to SOUND CONTROL PANEL.
Step 3: In the panel, click RECORDING > STEREO MIX, and enable it. Then click the SET DEFAULT button and OK.
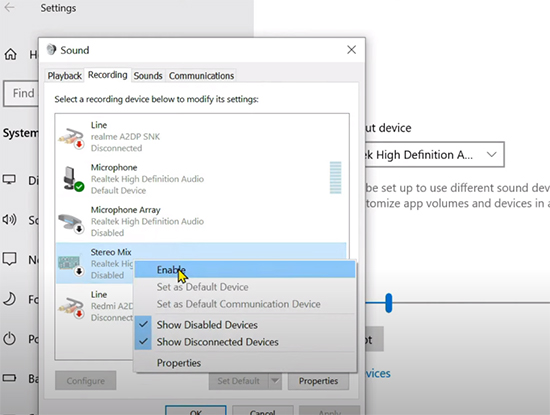
Step 4: After that, close the window and open the built-in audio recorder VOICE RECORDER. Now you can record the internal audio on Windows 10.
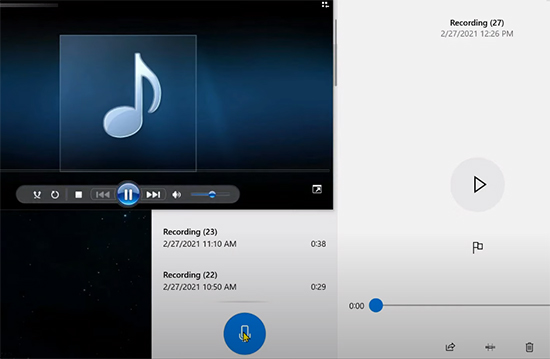
Step 5: When you finish, click STOP and the audio will be captured in the history file.
Part 3: How to Record Computer Audio Audio on Windows 10 via Audacity
Audacity is a free audio recordiing software for Windows 10. Actually, it's available on Windows, macOS, and Linux, which can record computer audio from internal and external. Also, it has a variety of useful functions that allow you to customize your audio recordings. For example, the visual audio track, which can make your audio modification more detailed and precise; it supports a variety of effects and plug-ins, and you can even add plug-ins written by yourself.
- Free and works on Windows, Mac, and Linux;
- Visualize the audio track;
- Add audio effects to audio recordings.
- Hard for novice;
- Can't record the audio automatically.
How to Record Audio from Computer on Windows 10
Please download and install Audacity on your computer. Launch the program and make some presets before the audio capturing on Windows 10 PC.
Step 1: Tap Audio Setup and select your preferred Host, Playback Device, Recording Device, and Recording Channel, or you can keep the default settings if you don't have any special requirements.
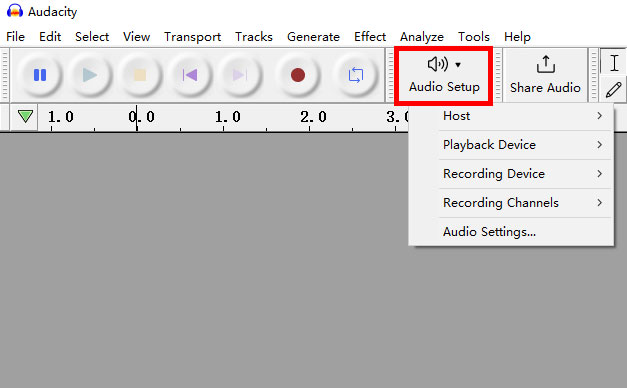
Step 2: Next, open the audio on your computer that you want to record. Then tap the red Record button to start the audio recording. After the audio has ended, tap the yellow Stop button to stop it.
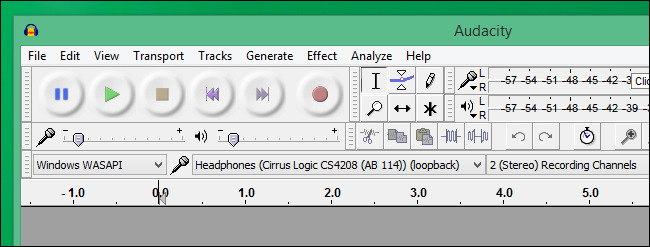
Step 3: The recorded audio will be shown as a waveform track on the main screen. Now you're able to edit it by cutting, trimming, splitting, adding effects or plug-ins, etc.
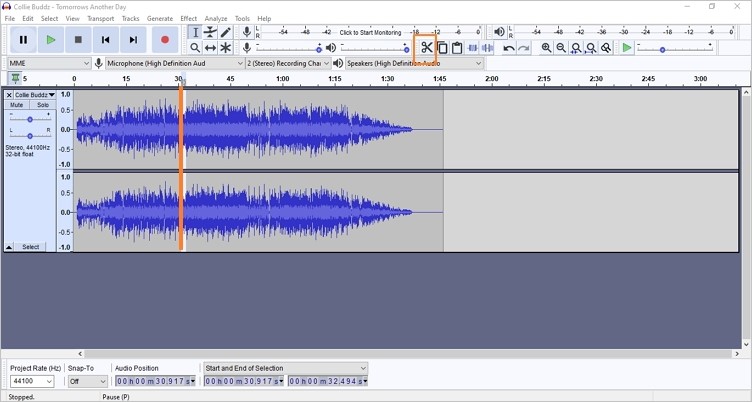
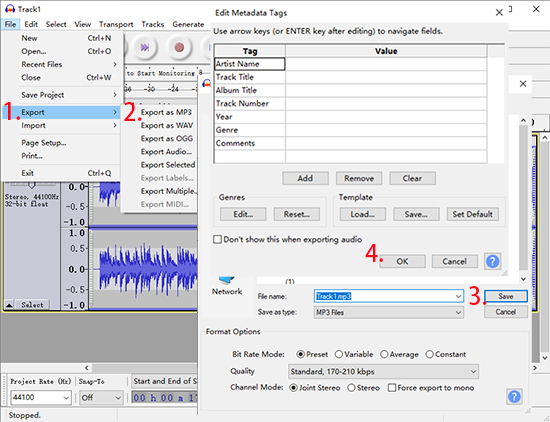
Step 4: Last, to export the recorded audio, simply tap File > Export, and select the desired format. It will then prompt you to name the audio file and fill in the ID3 tags.
Part 4: How to Record System Audio on Windows 10 via Free Sound Recorder
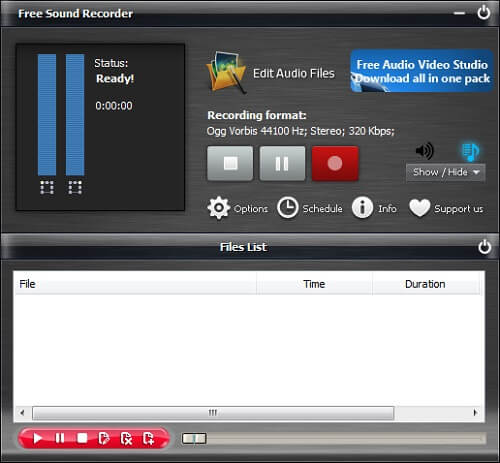
Free Sound Recorder is a system audio recorder on Windows 10 for free. It has the ability to record system audio, streaming audio, broadcast, external sound from microphone, etc. This simple yet effective tool will make you record system audio on Windows 10 without hassle. Also, it supports the recording schedule function, which can start and end the recording at a predetermined time. And you can also add some effects to make your recording more personal.
- Clean interface to record audio files;
- Can set a recording schedule.
- Editing platform function layout is complex;
- Only for Windows computer;
- The edited audio requires the purchase of software to save.
How to Audio Caputre on Windows 10
Step 1: Prepare the audio to be recorded and run Free Sound Recorder.
Step 2: Click the red Record button and play the audio, and it will start the recording immediately. When the audio is finished, simply click the red button again.
Step 3: The recorded audio file will be listed on the File button, and the red playback bar allows you to preview, pause, stop, edit, and delete.
Part 5: How to Record Sound from Computer on Windows 10 via Online Audio Recorder
Apowersoft Free Online Audio Recorder is a web-based audio recorder that can record any sound online for free on Windows 10, including internal and external audio. The first-time user needs to install a launcher that enables recording audio. All you need is to select the audio source and click the 'record' button then it starts recording. It lets you preview the recorded sound and export it to MP3 on your Windows 10 computer.
- Web-based free audio recorder;
- No need to install any program.
- Lack of audio editor;
- Only export audio to MP3 format.
How to Audio Caputre on Windows 10
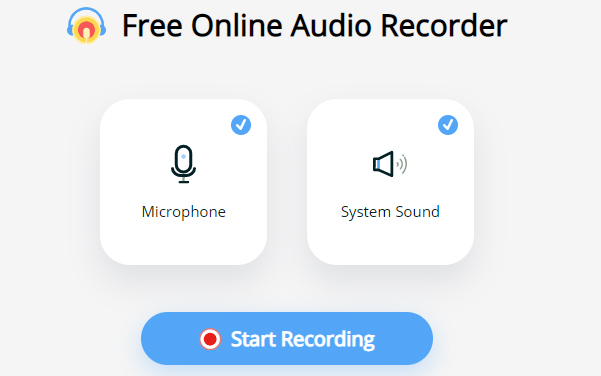
Step 1: Visit Apowersoft Free Online Audio Recorder and tap on Start Recording. (The first-time users need to install a launch first.)
Step 2: It will prompt you to select the audio source and tap the Share button when all presets are done.
Step 3: It goes to a recording page, and you should play the audio. Then tap the Stop button once the audio ends.
Part 6: Conclusion
Now you have already learned 5 methods on how to record audio on Windows 10. All of these ways can record computer audio on Windows 10 easily. Just select the method that works best for you. And we still recommend TunesKit Audio Capture, which is an easy and smart audio recorder for Windows and Mac, enabling you to record streaming music and other dsktop audio in high quality. If you have any questions, please leave your comments below.
Part 7: FAQs about Recording Audio on Windows 10
Q1: Does Windows 10 have audio recorder?
The built-in audio recorder is apt for recording any audio on Windows 10. However, its limited recording system and features only allow you to make low-quality recordings. If you have high stander recording needs, you are suggested to other professional audio recorders, such as TunesKit Audio Capture, which comes with losslessly recording features for capturing any internal audio, like streaming music.
Q2: What should I do if I want to record audio files on Windows 10?
You can download TunesKit Audio Capture. This audio recording software can be used in Windows 10. For more detailed steps, please refer to Part 1.
Q3: What can I do if I found the audio has no sound?
Before you start recording, make sure your system sound is enabled instead of disabled. If it is disabled, then your recording will not be able to record any sound.
Q4: Which is the best way to record audio on Windows 10?
After our comparative analysis, we found that TunesKit Audio Capture is the best choice to record audio on Windows 10. Because it can record audio losslessly. During recording, you can play other sounds without affecting the audio recording. And, it has ID3 tags editor, you can add information to your recording.
