[2022 Updated] How to Record Audio on Mac in 5 Ways
Are you still struggling to find a proper audio recorder for Mac? There will always be times when you need to record audio on your Mac computer, such as recording internal audio, music, audio clips, etc. According to the user's feedback from the internet, most people will only use QuickTime Player to record audio since it's a pre-install program that has recording features on Mac.
As you know, however, it's not perfect enough to record audio on Mac. So are there any other audio recorders that are available on Mac? The answer is yes. In this post, we will present you with 5 effective audio recorders and the toturials on how to record internal audio on Mac.
- Part 1. How to Record Internal Audio on Mac with TunesKit Audio Capture
- Part 2. How to Record Audio on Mac via QuickTime Player
- Part 3. How to Record Sound on Mac Using OBS
- Part 4. How to Record Music on Mac with Audacity
- Part 5. How to Record Audio on Mac with Online Free Recorder
- Part 6. FAQs about How to Record Audio on Mac
- Part 7. Conclusion
Part 1. How to Record Internal Audio on Mac with TunesKit Audio Capture
For users who want to record audio on Mac, such as streaming music, audio clips from videos, broadcasts, audiobooks, audio lessons, etc., there is a powerful audio recorder that will be the perfect match for their needs, which is TunesKit Audio Capture.
This audio recorder can record almost all the internal audio on your Mac, as long as the sound is produced by programs, such as iTunes, Spotify, Chrome, Tidal, etc., and the audio tracks in videos can be captured as well. Besides, it provides a soundtrack with lossless quality and ID3 tags preserved, which is especially important when recording music. Also, multi-audio recording is available as the sound produced by different apps will not mix up with each other.
Moreover, the audio recording can be exported to MP3, AAC, WAV, FLAC, M4A, and M4B, and you can use the built-in trim tool to cut the track and merge them into one.
Key Features of TunesKit Audio Capture
- Record audio on Mac on Windows with ease
- Record audio with original quality and ID3 tags preserved
- Export audio recording to MP3, AAC, FLAC, WAV, M4A, and M4B
- Feature built-in audio editor to merge or trim the audio records and edit the ID3 tags
How to Use TunesKit Audio Capture to Record Audio on Mac
With the help of the guidance, you can download the software from the link above and experience the software yourself. Please read the tutorial on how to record internal audio on Mac.
Step 1Launch TunesKit Audio Capture
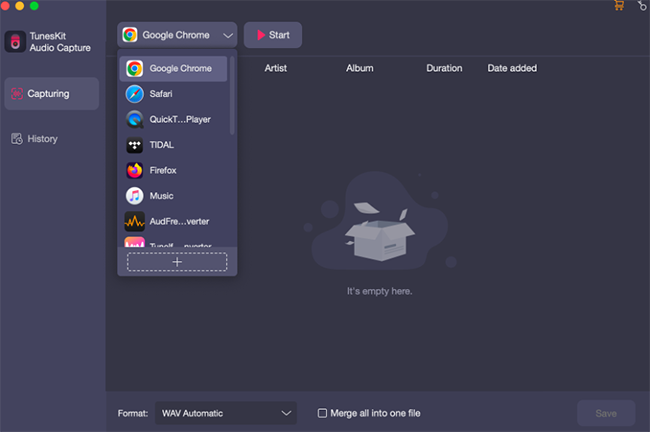
After opening TunesKit Audio Capture, you'll see the main interface for selecting an audio source. If the target source you want to record audio from is not in the list, you can add it by clicking the + button or dragging the program into this window.
Step 2Customize audio parameters
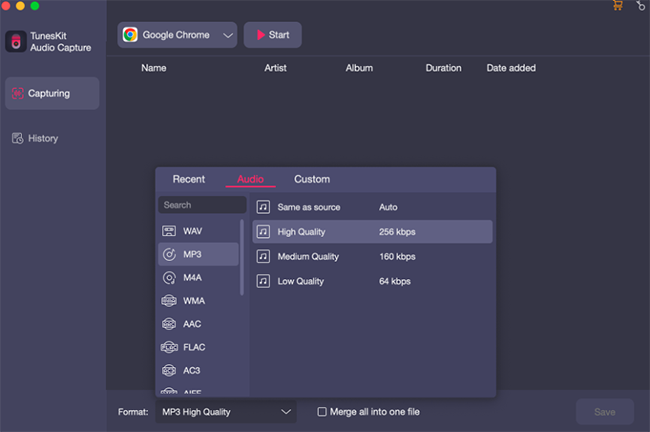
If you want to customize the recording tracks, click the Format button at the bottom right corner to change the format, codec, channel, sample rate and bit rate. If you are not familiar with these parameters, do not worry. You might as well change the preset (High Quality or Small Size) and the parameter will automatically change accordingly.
Step 3Start recording audio on Mac
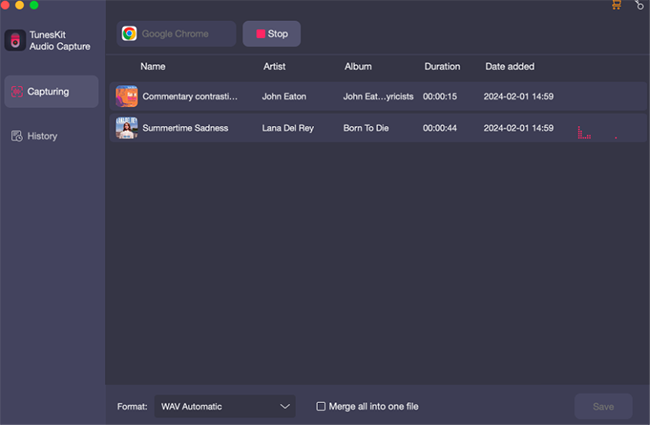
Launch the target program from TunesKit main screens. Simply play the audio, and the recording will begin automatically. If you want to record multiple tracks in one software, pause the audio first to finish the first record, then play the audio, which will record audio in a new track. Repeat this process until all audio tracks are recorded. When you finish, tap the Stop button.
Step 4Trim recorded audio tracks
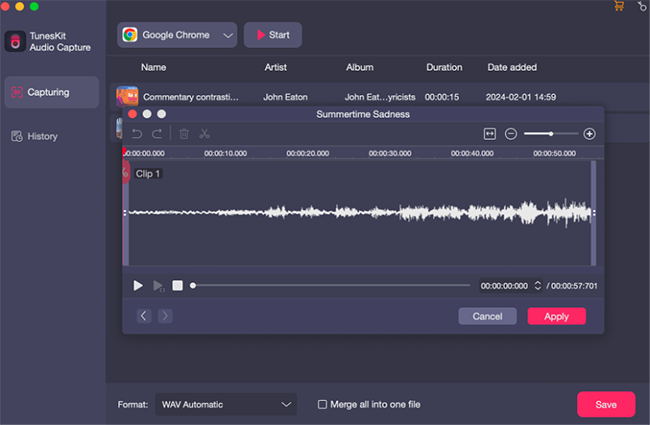
Once an audio track is recorded successfully, you can click the Edit icon at the rear of the track and start to trim it. You can set the start time and end time to get rid of the unwanted segments. Besides, With a built-in ID3 tag editor, you are able to edit the ID3 tags, including title, artist, album, year, etc.
Step 5Save the audio recordings
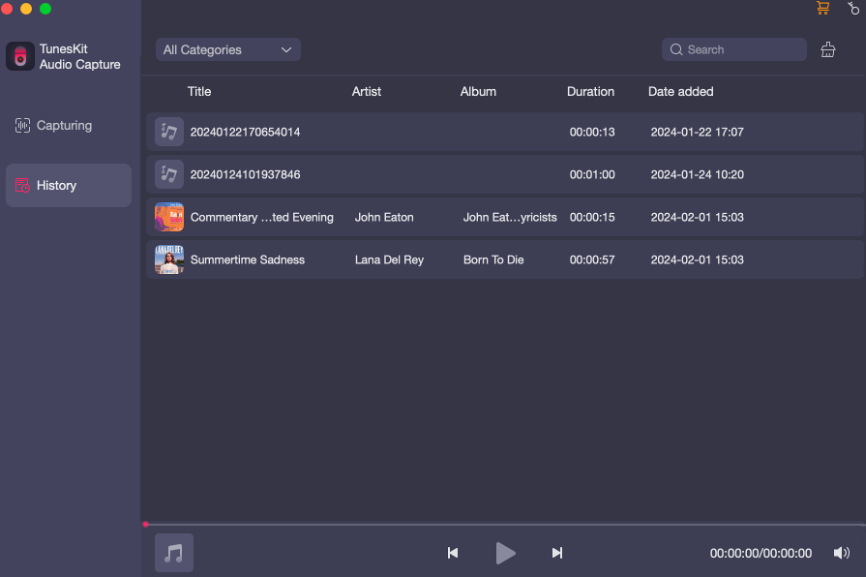
When all is done, you can simply press the Save button to save all captured audio. Go to the History list and you can enjoy these recordings right away and locate them by tapping the Search icon at the rear of each track.
Part 2. How to Record Audio on Mac via QuickTime Player
As mentioned above, most people will apply QuickTime Player to record audio on Mac, as it's free and easy to use. Technically, QuickTime Player is mainly used for playing media files, such as music, video, photo, etc., but it also has recording capabilities, supporting audio recording on Mac.
Although it is no more powerful than professional recording software, it can be quickly launched for immediate audio recording on a Mac. Here are the steps for your reference.
How to Make an Audio Recording on Mac Using QuickTime Player
Step 1: Launch QuickTime Player and click on File > New Audio Recording.
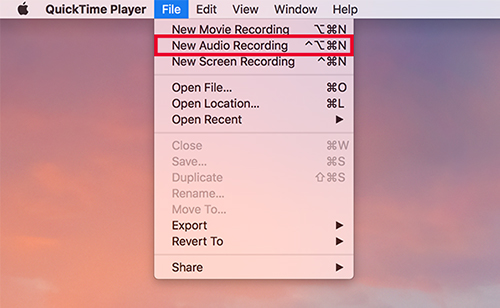
Step 2: A recording tool will be shown on the desktop. Tap the drop-down menu to select the audio source, then click on the Record button.
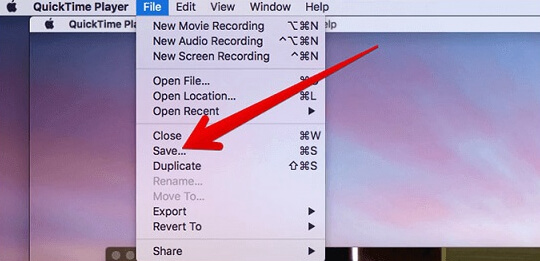
Step 3: When you finish, tap the Stop button. You can perview the audio recording through the Play button, or export the audio recording by clicking on File > Save.
Part 3. How to Record Sound on Mac Using OBS
It was a little cumbersome to record internal audio on Mac using the previous versions of OBS as they required additional software to be added as an auxiliary output. Thanks to the upgrade, with the latest OBS Studio version 28+ on macOS 13 "Ventura" or later, you don't need to add any more programs to record audio on Mac.
A new source called Audio Application Captured has been included for OBS 28+, which can directly capture audio from a single software. However, since it's still in beta mode, you may encounter recording issues while the audio recording, but the good thing is that in addition to this feature, there are still other two sources that can record audio on Mac directly, which are Display Capture and Windows Capture. With its help, audio is automatically added to the mixer and recorded, regardless of which display or software you choose. You can refer to the guide below.
How to Use OBS Internal Audio Recorder on Mac
Step 1: Download and install OBS version 28 or later on your Mac. Launch OBS and create a new screen in Scenes first at the bottom left.
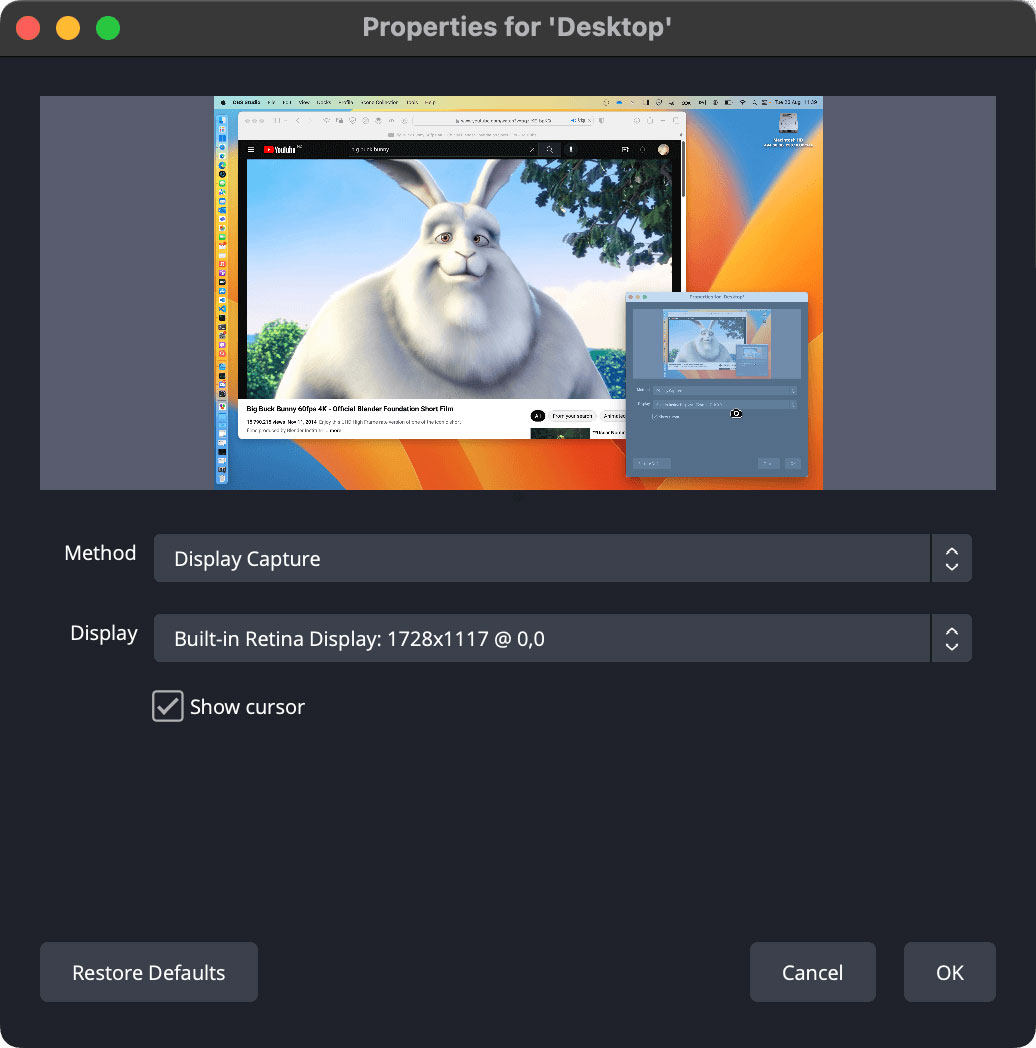
Step 2: Select Display Capture or Window Capture in Sources. Set up the Display/Window, Capture Method, and tap OK. And the desktop audio option is already in the mixer, so you don't have to add it manually.
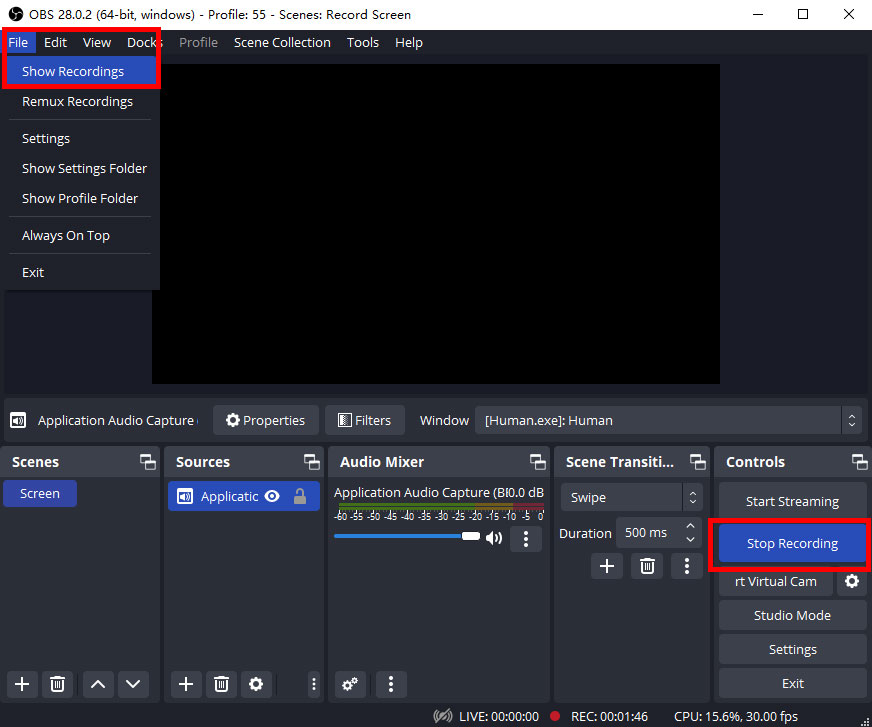
Step 3: Now tap Start Recording and play the audio. Once finished, hit Stop Recording. To locate the audio recording, simply click on File > Show Recordings.
Part 4. How to Record Music on Mac with Audacity
When it comes to free audio recorders for Mac, Audacity is always the most mentioned one. It's free and open-source software available on Mac, Windows, and Linux. No matter whether you want to record desktop audio like music, game sound, or external audio like voiceover, podcast, or others, it's all done quickly on Audacity, as it supports recording audio via a speaker or microphone. Besides, it provides various audio editors, allowing you to trim, cut, split, copy, paste, mix, add plug-ins or audio effects, etc. To record system audio, you should install additional software to record desktop playback on Mac.
How to Use Audacity to Record System Sound on Mac
Step 1: Download and install Audacity and Soundflower on your Mac computer.
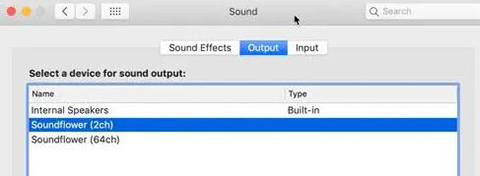
Step 2: Turn to System Preferences > Sounds > Output, and select Soudflower(2ch) as the sound output device.
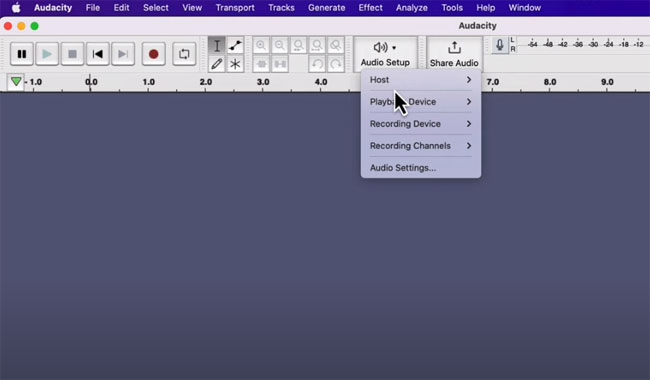
Step 3: Open Audacity, click on Audio Setup and choose Soundflower(2ch) as the Playback and Recording device. Next, you're able to tap the Record button to record music, sound, system audio, and more on Mac.
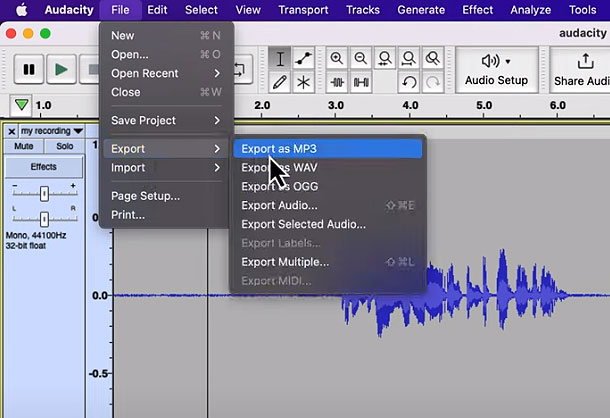
Step 4: When finished, click on the Stop button, tap File > Export, and select the preferred output format to export the audio recording.
Part 5. How to Record Audio on Mac with Online Free Recorder
In addition to the desktop audio recorder, you can also choose from free online web-based audio recording tools to record sound on Mac, such as Screen Capture. Despite its screen recorder, it also has the ability to record audio on Mac, including external sounds from the microphone and internal sounds from software such as music, narration, audio live, etc. One thing you should be aware of, however, is that as screen capture exports the recording as a video, you should seek out other converters to convert it to an audio file.
How to Use Screen Capture to Record Sound on Mac
Step 1: Access screencapture.com. Choose the Microphone or Sound option that you want to record, and tap Start Recording.
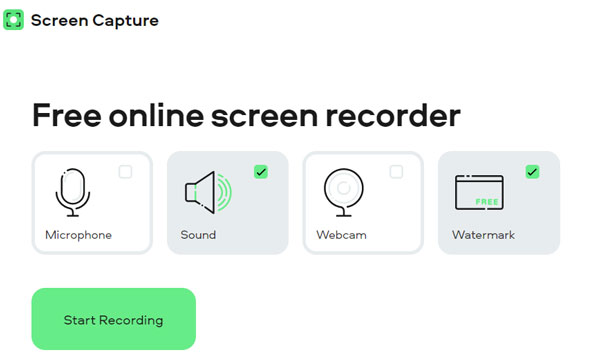
Step 2: Next, select the audio source and click on Share. Then it will start recording immediately.
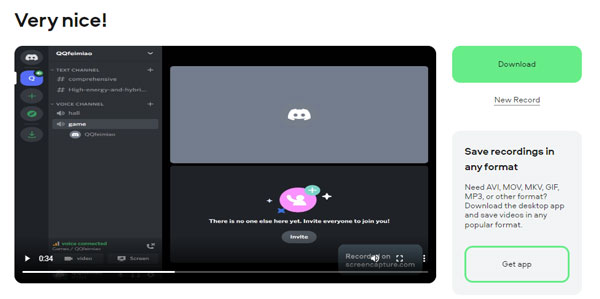
Step 3: When the audio ends, click on Stop Recording. The recorded audio will auto-play for your preview. And you are able to tap the Download button to save the recording.
Part 6: FAQs about Recording Audio on Mac
Q1: How to record audio on Mac from website?
You can think of recording audio from websites as recording internal audio on Mac. And we have presented 5 effective audio recorders for Mac for your reference. You can pick one of them to record audio from websites hassle-free.
Q2: Can I record streaming audio on my Mac?
Yes. Here we recommend TunesKit Audio Capture, which is a professional audio recorder designed for recording streaming audio on Mac and Windows PC. You can refer to Part 1 for more details.
Q3: How to record audio on Mac from YouTube?
Record audio from YouTube on Mac needs a reliable audio recorder for Mac, such as TunesKit Audio Capture. The tool doesn't require any additional plug-ins, and all you need to do is set up an audio source (which is YouTube) and record audio.
Part 7: Conclusion
These are the tutorials on how to record audio on Mac. If you just want to record streaming audio, you are suggested to TunesKit Audio Capture as it has a powerful recording system and can even record multiple tracks without affecting each one. Anyway, we hope this guide will be of use to you. Just try them out and find your preferred one.
