How to Add Apple Music to PowerPoint
Are you confused about how to use your favorite music in your wonderful PPT? As we know, we can use local audio or music in a PPT easily. However, sometimes we want to add a song that is not a local file but an online audio and cannot be downloaded to our local folders. For example, there is a song that is suitable for your PPT but it is from Apple Music that doesn’t allow users to download its music outside of it. What can you do so that you can use the music in your PPT? To solve this problem, we bring some effective ways that tell you how to add Apple Music to PowerPoint.
What Audio Formats Compatible with PowerPoint?
7 audio formats are compatible with PowerPoint. If you want to get a local audio file and add it to PowerPoint, you should make sure it is one of those 7 formats. The specific formats are shown on the following list.
| File format | Extension |
| AIFF Audio file | .aiff |
| AU Audio file | .au |
| MIDI file | .mid or .midi |
| MP3 file | .mp3 |
| Advanced Audio Coding - MPEG-4 Audio file | .m4a, .mp4 |
| Windows Audio file | .wav |
| Windows Media Audio file | .wma |
Can We Add Music from Apple Music to PowerPoint?
Unfortunately, the answer is no. The music on Apple Music has DRM protection, so you cannot download it outside of Apple Music. It seems to be an impossible thing to complete. However, you can resort to a third-party tool to do it. Among the following methods, we give you a useful tool to remove DRM from the music from Apple Music and download it to your computer. Keep reading and you will get surprises.
Method 1. How to Add Apple Music to PowerPoint via TunesKit Audio Capture
TunesKit Audio Capture is a multifunctional audio recorder on Mac and Windows. This software allows users to record all of the sounds playing on computer and download them to the computer. Whether the songs from those music services or the music on website or videos, you can use TunesKit Audio Capture to get them download. Audio Capture offers 6 formats for every user which includes MP3, M4A. M4B, WAV, AAC, and FLAC. You can choose the corresponding output format according to your needs. In addition, if you find some unnecessary audio clips, Audio Capture offers a built-in audio trimmer so you can use it when you need it.
Main Features of TunesKit Apple Music Downloader
- Download unlimited number of audios from Apple Music
- Supports 6 export formats like MP3, AAC, FLAC, WAV, M4A, and M4B
- Save streaming music with high audio quality and ID3 tags
- Support the trimming, cutting and editing of the recorded songs
1. How to Remove DRM from Apple Music via TunesKit Audio Capture
Step 1Download and launch software
TunesKit Audio Capture is a PC software, so you need to download it to your computer before you use it; you can click the above download button to download it or visit its official website to download it; Download iTunes software on your computer;
Step 2Customize music format
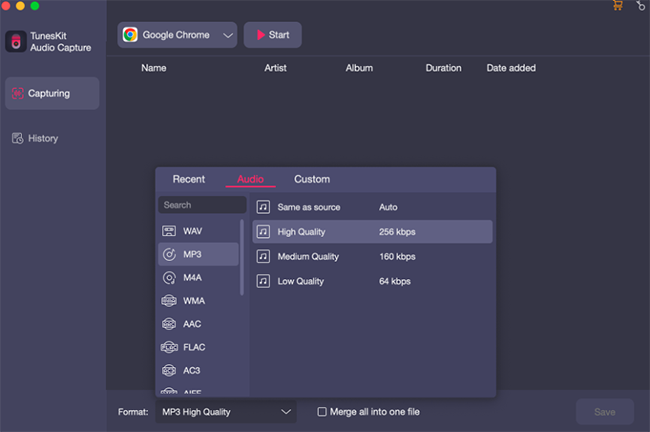
According to your needs, you can choose your music output format from the six audio formats by clicking the Format icon on the bottom right of the homepage in Audio Capture; the default format is MP3 which is compatible with most platforms and devices;
Step 3Play and download music from Apple Music
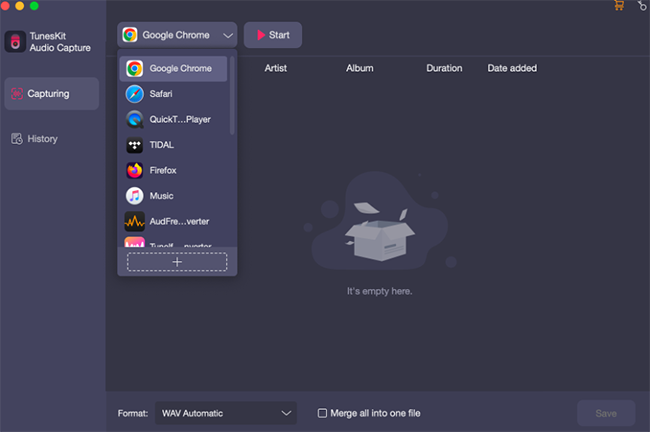
Click the + icon to add iTunes to Audio Capture and iTunes icon will appear on the homepage of Audio Capture; click the icon to find the music you want and play it; Audio Capture will record and download it automatically;
Step 4Stop and edit recorded music
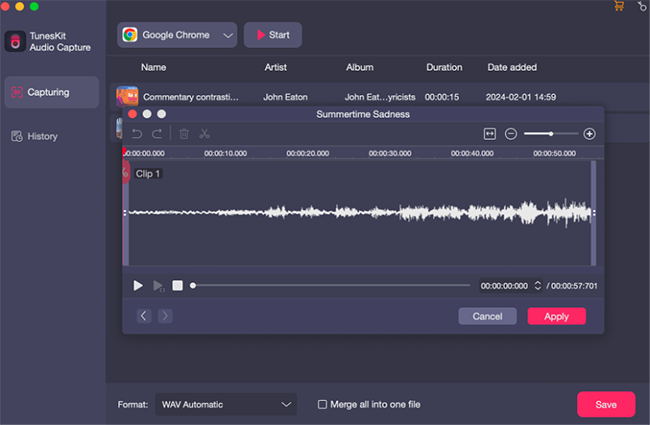
Click the Stop button to end your recording process; if you find some useless clips, you can click the Edit icon to enter the built-in audio trimmer and then delete it;
Step 5Save and locate music file
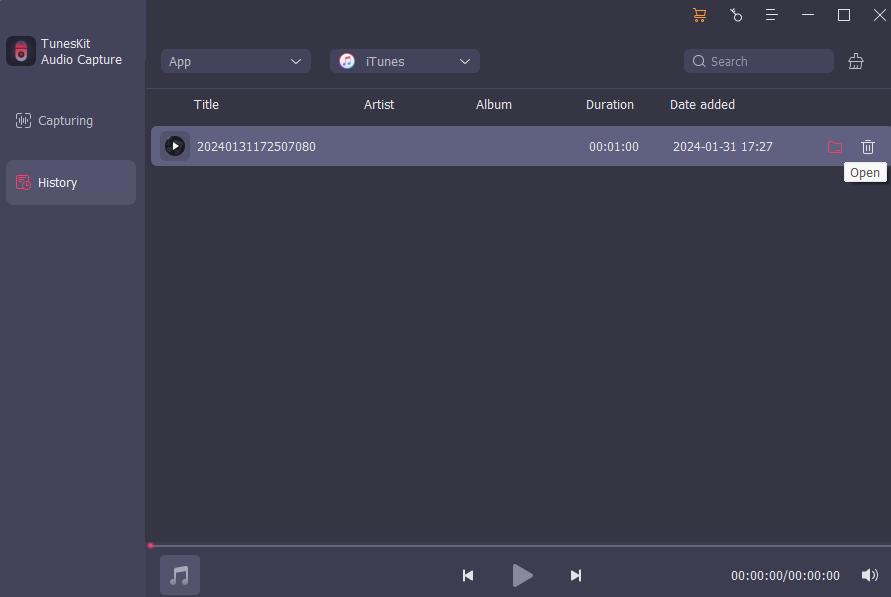
Click the Save button to save your downloaded music to the software and your computer; go back to the homepage and then click the Converted icon to enter the History list that saves all your downloaded audio and then you can click the Search icon to locate your music file on your computer quickly.
2. How to Add Downloaded Music to PowerPoint
Step 1. Open your PPT file within PowerPoint;
Step 2. Click the Insert word at the top and then find the Audio icon; click the drop-down arrow to choose the Audio on My PC... option;
![]()
Step 3. Find the music you just downloaded from the pop-up;
Step 4. Now you will see Audio Tools panel at the top of the screen; in this panel, click the Playback part to choose the way to play the music on your PPT;
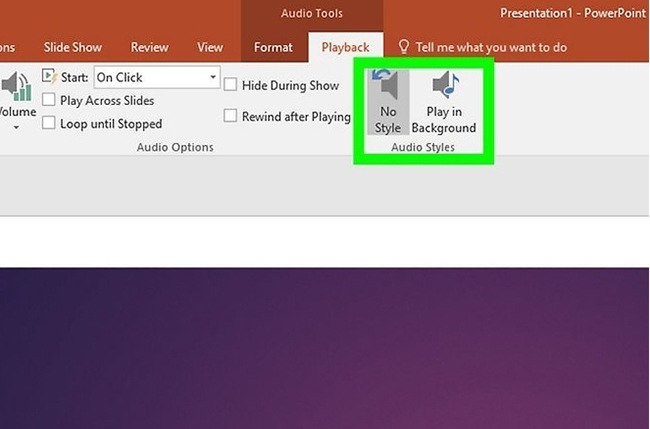
Step 5. If you choose No Style, the music will be played only when you click the Playhead icon; if you choose Play in Background, the music will be played as background music through your PPT playing.
Method 2. How to Add Apple Music to PowerPoint via Built-In Audio Recorder
Microsoft PowerPoint has a built-in audio recorder which allows you to record the audio playing on your computer. But the audio quality is not so good. If you don’t mind this, you can also try to use this method.
Step 1. Open your PPT with PowerPoint;
Step 2. Turn to the Insert > Audio > Record Audio... options;
Step 3. Find the music you want in the iTunes software on your computer;
Step 4. Click the Record button in PowerPoint and play the music at the same time;
Step 5. When you get your satisfied music, you just need to click the Stop icon to end it;
Step 6. Click the OK button to add the music to your PPT.
Conclusion
With the help of third-party tools, you can get Apple Music easily. Once you remove the DRM protection of Apple Music, you can add the music to PowerPoint directly. TunesKit Audio Capture gives you more high-quality audio, so it would be a better choice. Hope this tutorial helps you in a way.
