- Utility
- Multimedia
- Freeware
- Support
- Download Center

Whether playing AR games or using location-based apps, you can use TunesKit Location Changer to hide your actual location or simulate a personalized GPS movement for a better immersive experience. Before getting started, you need to connect your device and turn on Developer Mode. The steps for iOS and Android devices are different. Here's how to do it.
For iOS Devices:
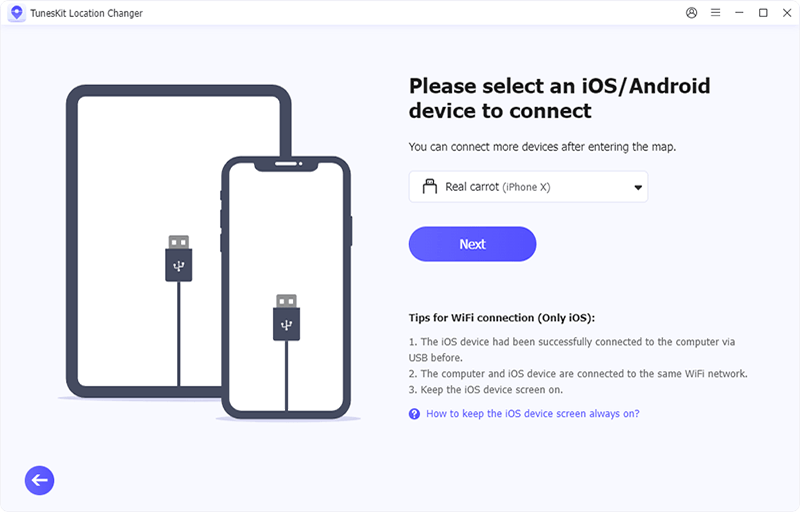
Step 1. Connect iOS Device to Computer
Download and install TunesKit Location Changer on your Windows or Mac computer. Carefully read and agree to the disclaimer and click the Start button.
Connect your iOS device to your computer via a USB cable. Alternatively, you can connect your iOS device to your computer via Wi-Fi. Then click the Next button.
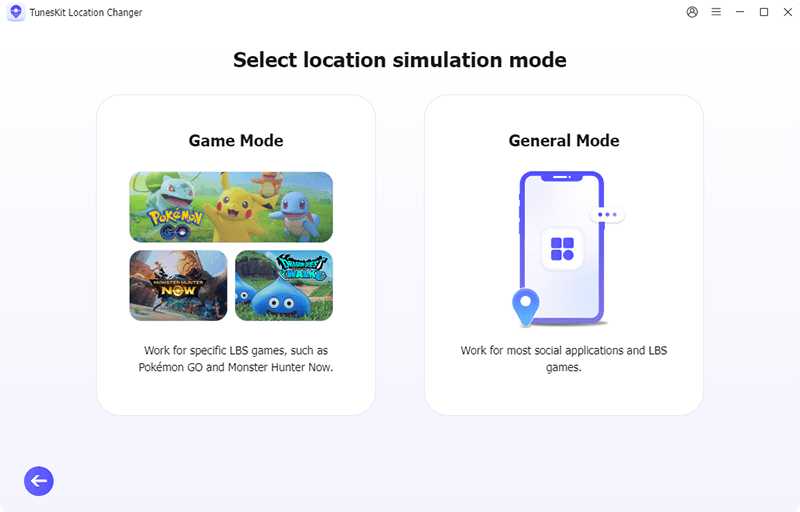
Step 2: Choose a Location Simulation Mode
Now, you can select a location simulation mode between Game Mode and General Mode. If you're going to play Pokémon GO, Monster Hunter Now or Dragon Quest Walk and want to change the location, you can choose the Game Mode. Otherwise, please choose the General Mode.
Step 3: Trust This Computer and Turn on Developer Mode
Unlock your iOS device and enter the lock screen passcode to trust this computer. You can follow the onscreen instructions to turn on the Developer Mode of your device first.
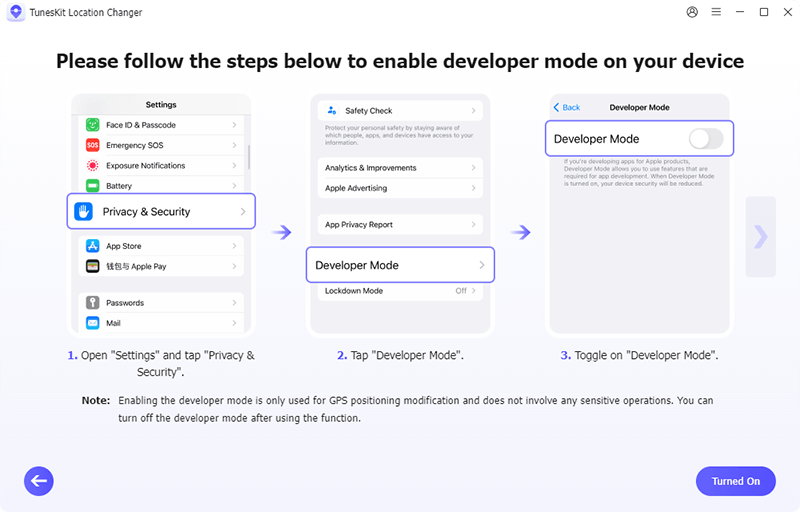
Now click on the Turned On button to access the map interface. After the Developer Mode is activated, you don't need to do this again the next time this device enters the program.
Note: If you choose the Game Mode, you don't have to activate the Developer Mode in Step 3. You just need to pair your device with the computer via the bluetooth.
For Android Devices:
Step 1: Connect Android Device to Computer
Launch TunesKit Location Changer on your computer. Read carefully and agree to the disclaimer and click the Start button. Next, connect your Android device to the computer via a USB cable and unlock your device. Then click the Next button.
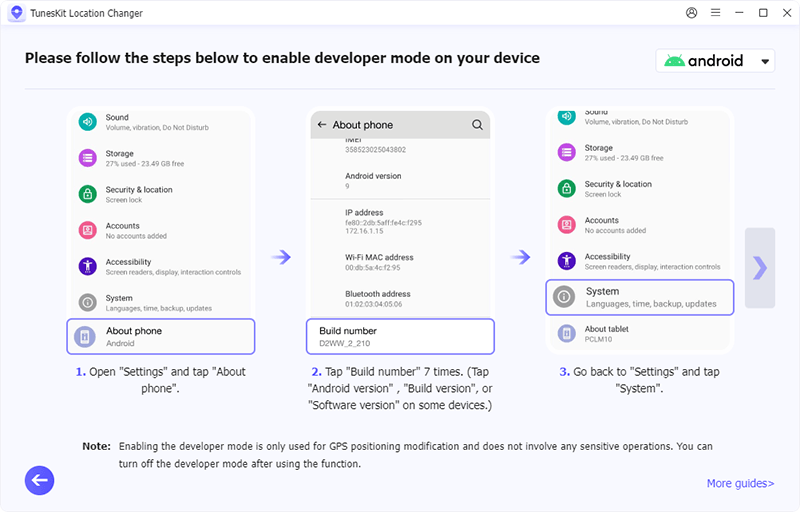
Step 2: Turn On Developer Mode
Follow the prompts to turn on your device's developer mode and USB debugging. Choose your model from the top right corner and check the corresponding instructions. Once the developer mode is turned on, you don't need to do this again on your device next time.
Step 3: Choose Simulation Mode and Install TunesKit Location Changer App
There are two simulation modes for you. The Game Mode is available for specific LBS games like Pokémon GO, Monster Hunter Now, etc. The General Mode works for most social apps and LBS games. Choose the one based on your needs.
After the program recognizes that the device has enabled developer mode, the program will automatically install the app on the device. If your Android device prompts you to install the "Location Changer" app, please choose to allow the installation, as this app is required to realize the virtual location. In your Android phone's developer options, tap "Select mock location app" and select the "Location Changer" app. Then you can successfully access the map interface of the software.
Note: If you choose the Game Mode, you can skip the step to install the app and just wait for loading the service for changing the game location.
After entering the map, you're allowed to change your GPS location or simulate the GPS movement. In this part, let's see how to use the Change Location feature of with TunesKit Location Changer.
You can use this feature to modify the GPS location on your iOS or Android device to a specified location. It can be used in LBS games, travel apps, social apps and other geo-location based apps. The following are the quick steps.
Step 1: Select a Destination on the Map
Either click on any spot on the map, or enter the address/GPS coordinates you want to teleport to in the search box.
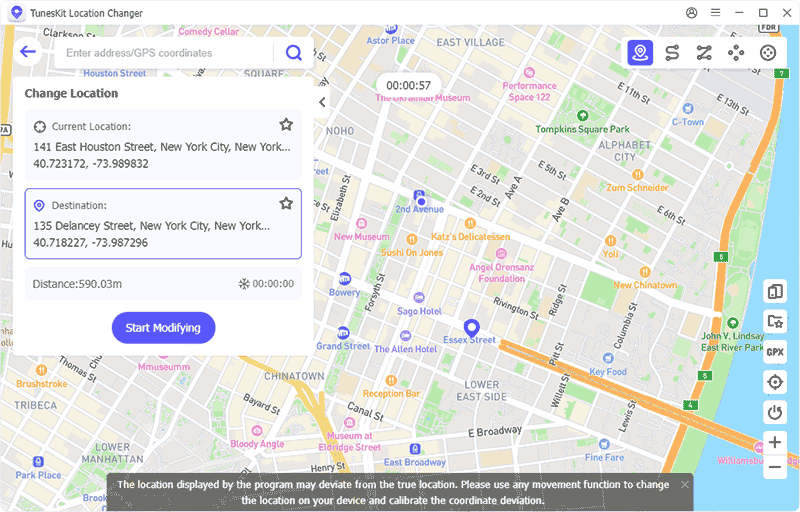
Step 2: Start to Change Location
A cool-down time indicator will appear. Then click the "Start Modifying" button. And your location will be modified successfully.
Wanna change your location but don't want to be found? Well, you can simulate your GPS location by using TunesKit Location Changer. It offers four GPS movement modes, including Two-Spot Movement, Multi-Spot Movement, Jump Teleport, and Joystick Movement. With any of it, you can achieve a more realistic effect.
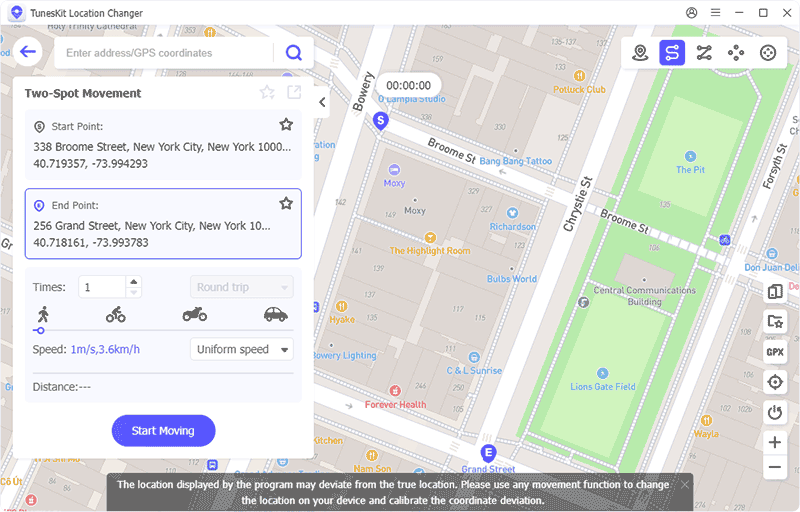
Two-Spot Movement
Two-Spot Movement mode lets you customize the start and end points, allowing the device's GPS location to move along a system-generated route at a specified speed.
Step 1: Select the start and end points on the map. You can delete or favorite the locations as you want. Set the speed and number of cycles. When the number of cycles is 1, the cycle mode selection is disabled.

Step 2: Next, click the "Start Moving" button to generate a movement route to move between two spots. During the movement, you can pause/continue the movement or stop the movement.
Multi-Spot Movement
Multi-Spot Movement mode allows the device's GPS location to move along a customized route at a specified speed.
Step 1: Choose Multi-Spot Movement icon at the upper right corner of the interface. Then select multiple spots on the map to plan your route. You can drag the order of locations. Once the order of locations changes, the serial number will also become the actual order of the serial number.
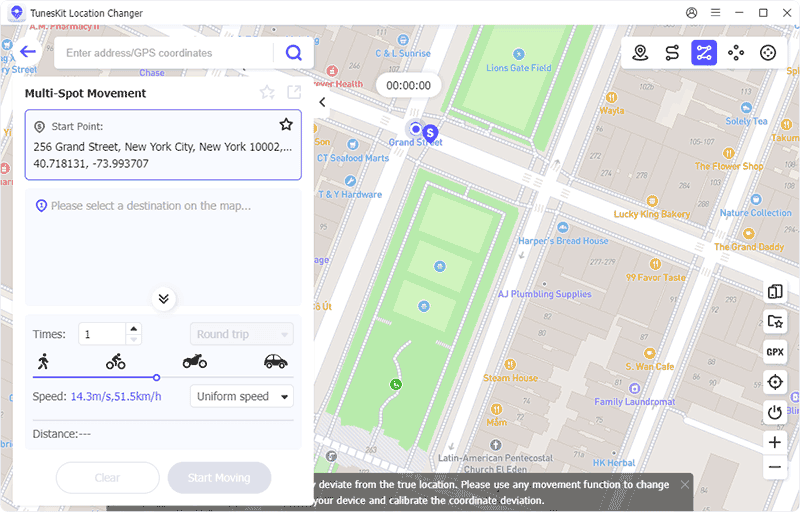
Step 2: Click the "Start Moving" button and it will move along the customized route. You can pause/continue the movement or stop it during the movement.

Jump Teleport
Jump Teleport Mode allows you to customize your jump teleport routes to instantly move to multiple designated locations in sequence.
Step 1: Select Jump Teleport Mode icon at the upper right corner. Next, choose multiple spots on the map to customize your route. You can choose to jump manually by clicking on it or automatically after the cooldown time.

Step 2: Click "Start Moving" to start jumping and teleporting. Manually click the "Previous Point" or "Next Point" button to jump to the previous or next point.
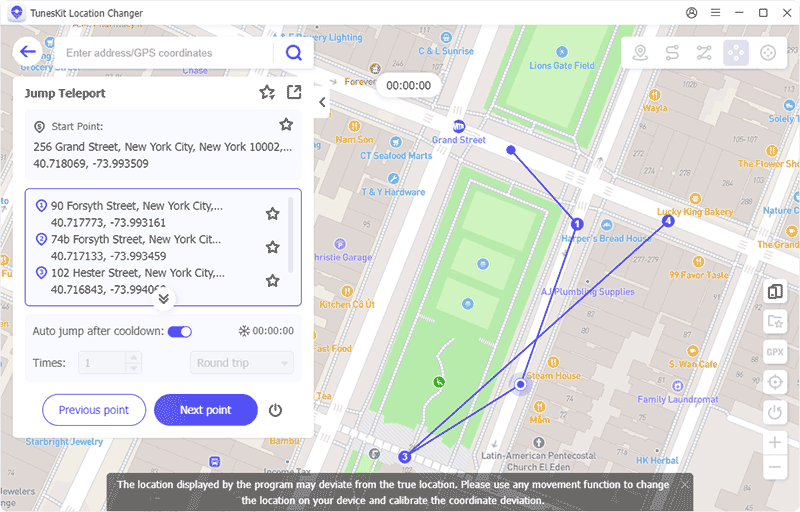
Note: It will automatically jump to the next point after each cooldown countdown.
Joystick Movement
Joystick Mode allows you to move your device's GPS location with a virtual joystick.
Step 1: Choose the Joystick Movement icon at the upper right corner. Set the speed of movement by controlling the bits with the joystick. You can drag the dot to adjust the direction of coordinate advance. (corresponding to the arrow pointer on the coordinates.) If you are confused, you can click the ? button to see Joystick Movement instructions.
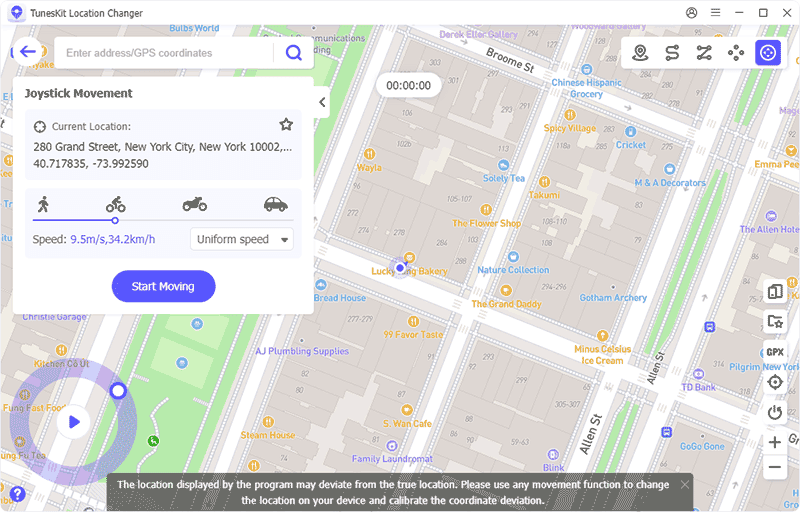
Step 2: Click the Start Moving button to start moving in the specified direction at the set speed. Click the Stop button to stop the moving process. While moving, speed and speed mode can be adjusted at any time.
Note: : Joystick Mode can be directly clicked on any point on the map to modify the location, it means that Joystick Mode includes the function of modifying location.
Feature 1. Multi-device Connection
Clicking on the Multi-Device Connection button will display the connected devices. Devices can be added by clicking the "+" button. You can choose to turn off any of the connected devices at any time.
Feature 2. Favorites & History
You can click the Favorites & History button to display your favorites and operation history, and you can select categories, delete checked items, rename route names, or view details.
Feature 3. Import & Export GPX files
3.1 Import GPX files: You can click the "Import GPX files" button to select a GPX file from your PC to import.
3.2 Export GPX files
3.2.1 GPX files can be exported in two-spot movement (exporting GPX files is supported only during movement, not before starting movement), multi-spot movement, and jump teleport. Just click the Export button.
3.2.2 Select the export folder and click Save. You can export the route as a GPX file.
Feature 4. Cooldown timing
4.1 Operation within the program to trigger the cooling down countdown: Change Location / Jump Teleport / modify location in Joystick Movement.
4.2 Cooldown time range:
1-5km: 1-2 minutes
6-10km: 3-8 minutes
11-100km: 10-30 minutes
100-250km: 30-45 minutes
250-500km: 45-65 minutes
500-900km: 65-90 minutes
900-13000km: 90-120 minutes
Above 13000km: 120 minutes
4.3 The game Pokémon GO introduced a cooldown time (CD: cool down time) to prevent players from cheating GPS locations. The cool down time is a certain amount of time that you need to wait after performing a game action. The length of time depends entirely on how far apart the two locations are.
4.3.1 In Pokémon GO, some in-game actions trigger cooldowns. Below is a list of actions that trigger cooldowns:
After performing actions 1-9 above in the game, if you perform any of these 9 actions again, the game will automatically determine if it is possible for the player to reach that location based on the time and distance you moved. For example, if you catch a wild Pokémon in London, England at 4:00 PM and then feed the wild Pokémon with berries in Washington, D.C., USA at 4:10 PM. The game will consider you cheating for moving too fast and will trigger the appropriate penalties.
4.3.2 Doesn't trigger cooldown actions: The following will not trigger the Pokémon GO cheat cooldown. That is, you can perform any of the following actions without a reminder. Additionally, if no cooldown is triggered, the location can be changed to anywhere.
Every time users change the location of their device using this tool, it will give a corresponding countdown prompt on the interface. In order to avoid account blocking, it is recommended to perform 1-9 actions after the countdown is over.
If you think this countdown function is not working, just click the "Reset" button in the pop-up window. The countdown will then recalculate the time the next time the positioning is modified.
If you're not a Pokémon Go player or don't like the countdown feature, click the "Off" button in the pop-up window to turn it off.
If you want to re-enable the cooldown timer feature, you can re-enable this feature in Preferences.
Feature 5. Restore True Location
You can click the Restore the true coordinate button to restore your device's true location. This action requires a device reboot.
Feature 6. Zoom in & Zoom Out
You can click on the + and - icons to zoom in and out of the map.
Now, you can watch the following short video and learn how to use TunesKit Location Changer to modify location step by step.
