How to Put iPhone/iPad in Recovery Mode?
"After spotting a few issues, I have been trying to put the iPhone in Recovery Mode, but I couldn't put things in order. Do you have any idea how to put the iPhone device in Recovery Mode"?
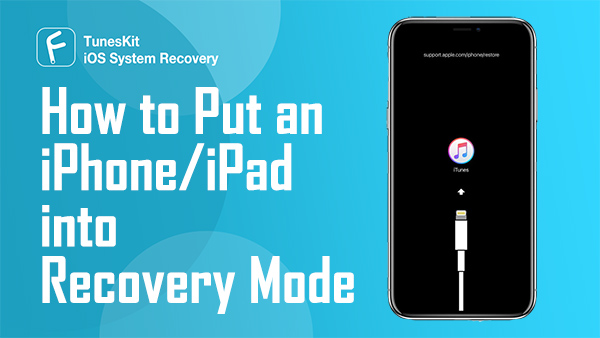
When your iPhone meets issues, one of the feasible ways to fix it is putting iPhone to Recovery Mode, which is a powerful way that can help you fix many iOS device issues. Though it will erase all your iPhone data, it is also recommended since it can bring our iOS devices back to normal. However, many people don't know how to put iPhone in Recovery Mode. To help those people, we've come up with a complete guide of telling the ways of putting the iOS device in Recovery Mode.
- Part 1: What is Recovery Mode?
- Part 2: What are the reasons for putting your device into Recovery Mode?
- Part 3: How to put the iPhone in Recovery Mode in different models?
- Part 4: How to put iPad to Recovery Mode?
- Part 5: [One-click way] Put iPhone/iPad in Recovery Mode - TunesKit iOS System Recovery
- Part 6: Conclusion
What is Recovery Mode?

iPhone Recovery Mode option is nothing but a failsafe in iBoot. It allows you to reflash your iPhone with a new operating system. Putting your iPhone into Recovery Mode helps you get rid of various iPhone issues by installing a new iOS version after revving your iPhone.
You may need to put your iPhone in recovery when the iOS version you're currently using gets damaged. Moreover, putting the iOS device to Recovery Mode also comes in handy when you intend to jailbreak or troubleshoot the device.
What are the reasons for putting your device into Recovery Mode?
Do you ever wonder why you need to put an iPhone in recovery?
Several reasons force you to put your device into Recovery Mode, and we're going to highlight some of the main reasons here. You may need to put your device into Recovery Mode when your iPhone gets stuck for various reasons.
When your iPhone's software update doesn't go well, you'd want to fix your issue by putting the device in Recovery Mode. Sometimes, your iPhone turns white, blue, black, and it doesn't function properly. You may need to bring the Recovery Mode option into the equation at that time. If your iPhone doesn't bother to get a charge, it might be the reason for putting it in Recovery Mode.
How to put the iPhone in Recovery Mode in different models?
If you're looking to put the iPhone in recovery, you can follow the guide below.
How to put iPhone 6 in Recovery Mode (or earlier models)
Step 1: First of all, you'll need to download the latest version of iTunes;
Step 2: Press and hold the iPhone On/Off button on the top for three seconds. Drag the slider to the right side when it appears. Now, the device is turned off. Next, you'll need to press and hold iPhone's Home button;
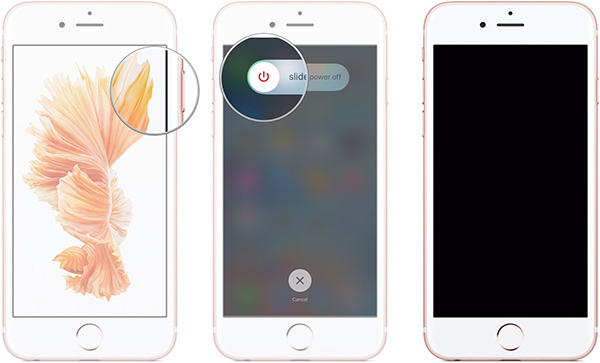
Step 3: After launching the iPhone, you'll need to connect your iPhone to your PC;
Step 4: Release your iPhone's Home button once the Connect to iTunes screen option appears.
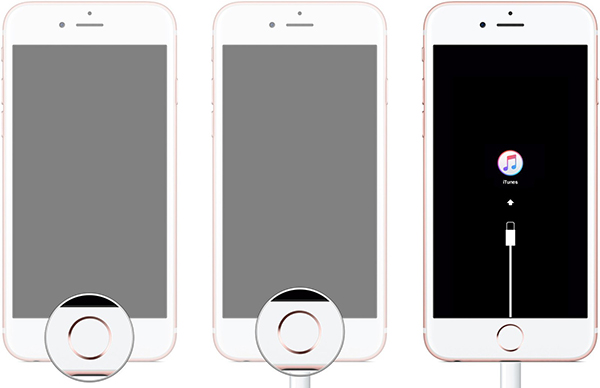
How to put iPhone 7 in Recovery Mode
iPhone comes with a Force Touch Home button instead of the physical Home button. Hence, the Volume Down button handles the Recovery Mode functionality.
Step 1: First of all, you'll need to turn your iPhone off but if you have not done yet, follow the guide below;
Step 2: Press and hold your iPhone's On/Off button for three seconds. Once the Power Off Slider appears, you'll need to swipe it to the right side;
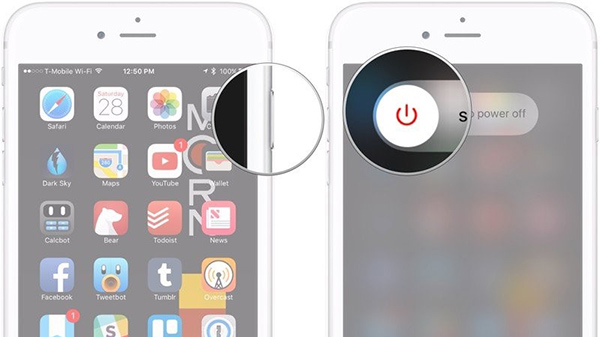
Step 3: You'll need to press and hold the iPhone's Volume Down button in this phase;
Step 4: Now, you'll need to plug your iPhone into your Windows PC or Mac and launch iTunes afterward;
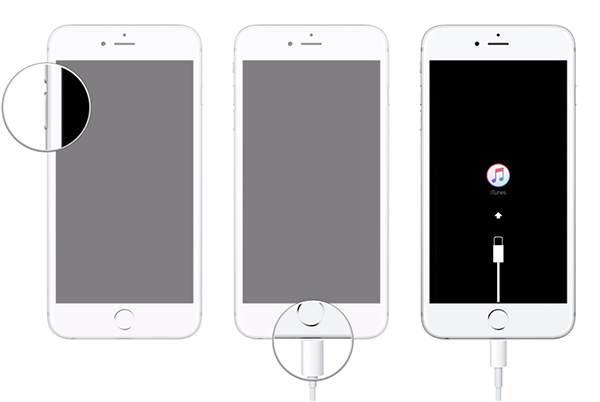
Step 5: After seeing the Connect to iTunes screen, you'll need to release the iPhone's Volume Down button you previously held.
How to put iPhone 8 in Recovery Mode (or later models)
Since iPhone 8 doesn't contain a physical home button and iPhone X, and 11 don't come with a Home button, the recovery procedure will occur through button presses.
Step 1: Close the iTunes on your computer if it's opened;
Step 2: Now, you'll need to connect your iPhone to your PC through a lightning cable;
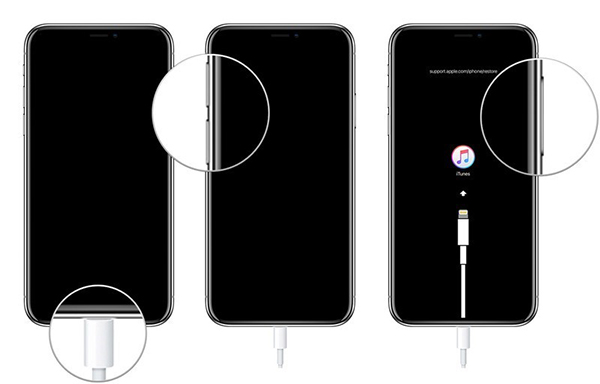
Step 3: Launch iTunes;
Step 4: First of all, you'll need to press and release iPhone's Volume Up and Volume Down buttons. Later, you'll need to press and hold your iPhone's Side button until the Recovery Mode screen appears. Now, you've successfully entered your device into Recovery Mode.
How to put iPad to Recovery Mode?
If your iPad ran into some problems and you want to put the iPad into Recovery Mode, you can follow the guide below.
Putting an iPad in recovery by using the Home button
Step 1: After visiting the official website of iTunes, you'll need to download and then install it afterward. Later, you'll need to launch iTunes to begin the proceedings. Next, you'll need to connect your iPad to your PC and make sure the iPad is turned off. After turning your device off, you'll need to press and hold the Home button.
Step 2: Release the Home button after the Connect to iTunes screen option appears. Your device is now in Recovery Mode. However, you can also exit the Recovery Mode by force restarting your device.

For iPad without a Home button
You'll need to press and quickly release your iPad's Volume Up button for the iPad model without a Home button. Later, you'll need to tap the Volume Down button. After, all you need to do is press and hold the iPad's Top button until the iPad enters into Recovery Mode.

Use a third-party tool for putting iPhone/iPad in Recovery Mode - TunesKit iOS System Recovery
If you think the methods we've discussed above are pretty difficult, you can use TunesKit iOS System Recovery to put iPhone in Recovery Mode. It is a fascinating third-party tool that allows you to put your iPhone in Recovery Mode with a single click. Apart from this, TunesKit iOS System Recovery allows you to fix 150+ iPhone issues like iPhone reboot loop, iPhone can't hear caller, iPhone stuck in Recovery Mode, etc. with no data loss. It supports the latest iOS versions and most iOS devices.
Characteristics of TunesKit iOS System Recovery:
- Fix more than 150 iPhone issues without data loss
- Put your iPhone in Recovery Mode within one click
- Provide Standard Mode and Advanced Mode
- Available for most iOS devices
- It supports the latest iOS versions including 15
Here's the guide to putting on iPhone or iPad in Recovery Mode.
Step 1Connect iPhone to the computer
Now, you'll need to connect iPhone to a Mac or PC via a lightning USB cable. Later, you'll need to launch the TunesKit iOS System Recovery tool.
Notice: If you are using an iPad, the steps are basically the same as the program can also help you to solve the iPad DFU mode in no time.
Step 2Enter Recovery Mode
Before going ahead, don't forget to turn your iPhone off. Later, TunesKit iOS System Recovery will detect your iPhone, and you'll see Enter Recovery Mode on your screen. All you need to do is hit this option and wait for a few seconds. After a few moments, you'll be successful in putting the iPhone in Recovery Mode.

Conclusion
By reading this guide, you'll know how to put the iPhone in Recovery Mode. The procedure of serving your purpose isn't as difficult as many of you would have thought, as you'll only need to follow a few steps to put things in order. All the methods you'll read here are pretty easy, and you won't face any difficulty following them. However, using TunesKit iOS System Recovery is the best method to begin with. The way it makes your job easy with minimal effort indicates how good this third-party tool is. We strongly recommend this TunesKit iOS System Recovery tool.
