How to Fix iPhone Flashlight Not Working Problem (iOS 16 Supported)
Currently, there are over 1.2 billion iPhone users across the world. Wow! That's quite an overwhelming number. Well, the iPhone is fitted with some of the most detailed, quality, unique and amazing features; that's why almost everyone would love to own an iPhone phone.
Interestingly, iPhone users don't seem to care much about all features until they actually fail, like the iPhone flashlight. Flashlight malfunction means that you cannot take clear photos at night or use the LED to light your path at night. Luckily, this piece includes feasible ways to fix the iPhone flashlight not working. Let's begin.
- Part 1: Why Is My Flashlight Not Working on My iPhone?
- Part 2: Fixing Tips for iPhone Flashlight Not Working(iOS 16 Supported)
- Method 1: Turn off the Camera App
- Method 2: Toggle the Flash on the Camera App
- Method 3: Reboot iPhone
- Method 4: Adjust Flashlight Brightness Level
- Method 5: Disable iPhone Low Powerful Mode
- Method 6: Charge Your iPhone
- Method 7: Cool Down Your iPhone
- Method 8: Restore Your iPhone to a Previous Backup
- Method 9: Reset iPhone to Default Settings
- Method 10: Restore Your iPhone to Factory Defaults
- Method 11: Update Device with New iOS Software
- Method 12: Fix iPhone Flashlight Not Working without Data Loss HOT
- Method 13: Contact Apple Support
- Part 3. Conclusion & Suggestion
Part 1. Why Is My Flashlight Not Working on My iPhone?
It is important to identify the root cause of the flashlight not working on iPhone so that you can fix it as soon as possible. And we have rounded up a few common causes of the flashlight not working on iPhone for your reference. If you are still unable to ascertain the culprit, then you can also try each of them.
• App Crash: The Camera app or Flashlight crash may cause the iPhone camera and flashlight not to work.
• Improper Settings: Some settings may conflict and compromise the flashlight's normal working.
• Longtime iPhone Usage: Overheating or a low battery after prolonged use of the iPhone can cause the iPhone 12 torch not to work ( other iPhone models as well).
• Water Damage: Probably dropping it in a pool of water could compromise flashlight functionality.
• iOS Update: It is the most probable reason for this misfortune. Updates to more recent iOS versions such as iOS 16, iOS 15, and earlier have been sighted to cause the iPhone flashlight greyed out.
Part 2. Fixing Tips for iPhone Flashlight Not Working(iOS 16 Supported)
The following are a number of solutions to the issue of the iPhone flashlight not working, even with the latest iOS 16 system.
Method 1. Turn off the Camera App
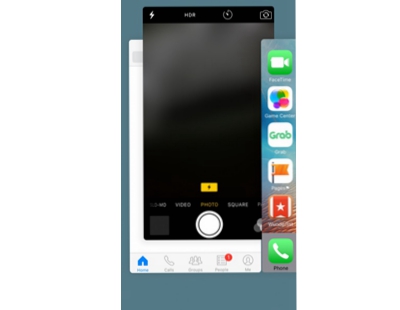
There are times when the iPhone camera and flashlight fail because these two apps are running at the same time, causing a function conflict resulting in flashlight failure. Due to this, it is recommended that you stop using and quitting the camera app, then restart the flashlight app.
Method 2. Toggle the Flash on the Camera App
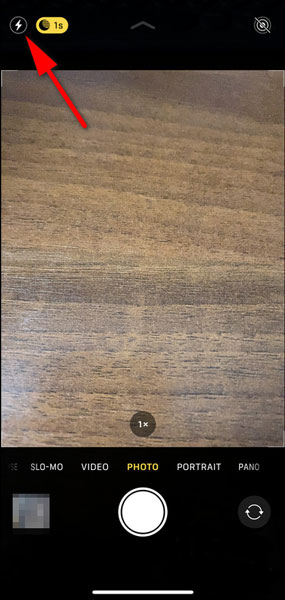
You are likely to encounter a problem where the flash does not work when you are using the Camera app of your iPhone to take photos. If this is the case, you may want to try toggling the flash icon on and off in order to restart the flash feature. This can be repeated a few times until you are able to operate the flash.
Method 3. Reboot iPhone
It is one of the most widely recognized remedies to solve a whole range of iPhone glitches. System bugs and failed software updates are some of the reasons why your flashlight is not working. Force restart allows for the new running of the OS and the flashlight application. With all factors held constant this particular fix is bound to work. In fact, it is a top-list troubleshooting technique recommended by Apple on its devices. Here is a guide on how to 'force restart your iPhone.
For iPhone 8, 8 Plus and later, quickly press the Volume Up button then Volume Down button and finally Power button and hold until the screen goes black.
For iPhone 7, 7 Plus, press and hold the Power and Volume Down button simultaneously until the phone restarts.
For earlier iPhone models, simply press the Power and the Home buttons concurrently.
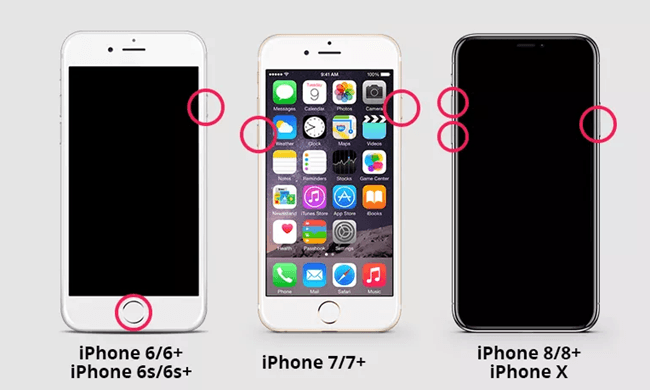
A force restart is a safe fix and you not any chance of losing your data. If this does not work you can now process to Reset Settings
Method 4. Adjust Flashlight Brightness Level
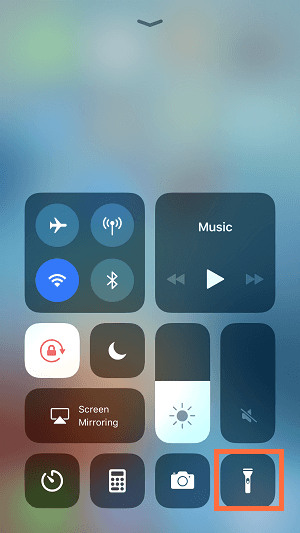
This is another basic fix. Occasionally, the iPhone flashlight not working on iPhone due to low brightness. By swiping down the Control Center and checking for the flashlight icon, you can adjust the brightness to its maximum setting. Make sure you press firmly on the button to access the flashlight brightness level and check if it is working properly.
Method 5. Disable iPhone Low Power Mode
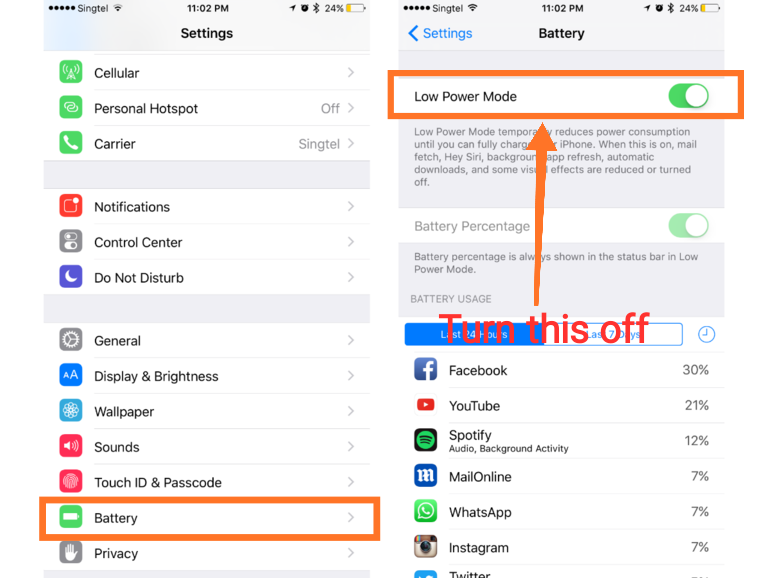
It is the default setting on your iPhone that the Low Battery Mode is automatically turned on when the battery is less than 20% charged. There are a number of features that are disabled when this mode is on, including the flashlight, which means that the iPhone torch not working when this feature is turned on. To stop this mode, go to Settings> Battery, and toggle off Low Power Mode.
Method 6. Charge Your iPhone
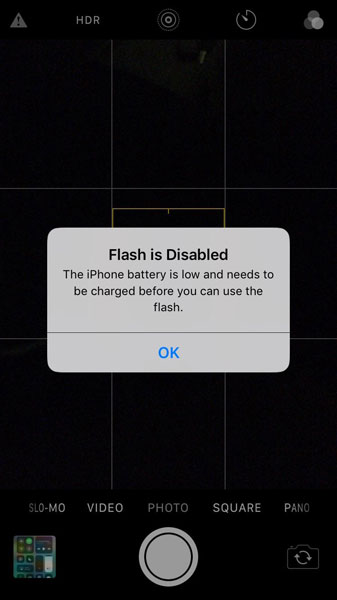
Despite disabling low battery mode on your iPhone, if there is not enough juice left on your phone, the iPhone flashlight may still be greyed out if there is not enough battery juice left on the device, so it disables the flashlight in an attempt to save battery power.
During this point, if you open the Camera app, you will see a notification telling you that 'FLASH is Disabled'. It's time to charge your iPhone.
Method 7. Cool Down Your iPhone
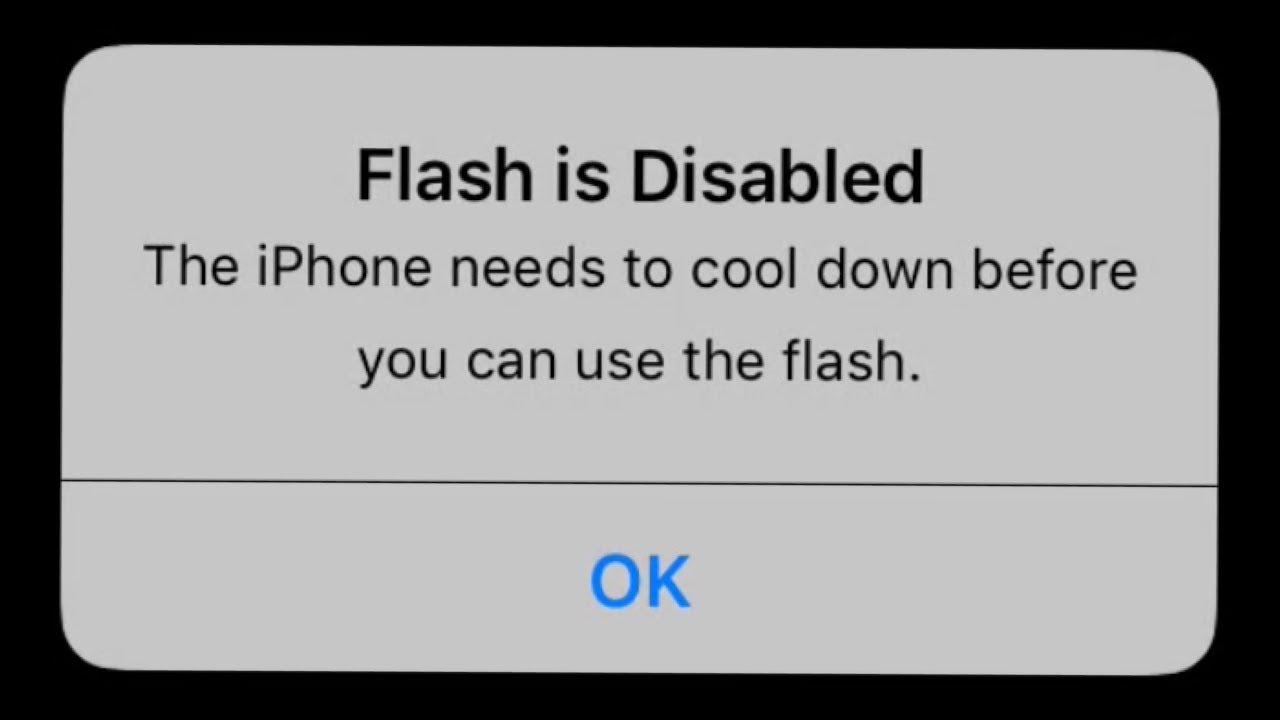
Overheating will also let the camera and flashlight not work on iPhone. The iPhone gets hot and shuts down because of its long-term use, started apps that consume a lot of storage space, and high environmental temperatures, among other things, and you'll get the notice that 'iPhone needs to cool down before you can use it'.
Method 8. Restore Your iPhone to a Previous Backup
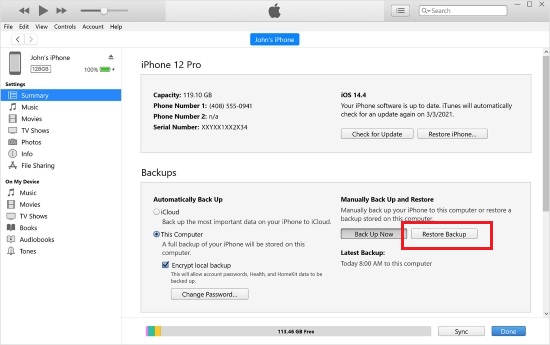
If you have ruled out the above as the cause of the flashlight not working on iPhone, then it is likely that you have unintentionally set something on your device then the flashlight is not working on iPhone. In case you have no idea what you have set, you may try restoring your phone to a previous backup to see if it is indeed an inadvertent setting causing the torch light not working on iPhone. But you should be aware that the recent data on your iPhone would be erased, and you'd better store the new images, music, text, and other files in iCloud in case the loss.
Simply connect your iPhone to a computer via a proper cable, open iTunes on your computer, select your iPhone device, and then choose Restore Backup.
Method 9. Reset iPhone to Default Settings
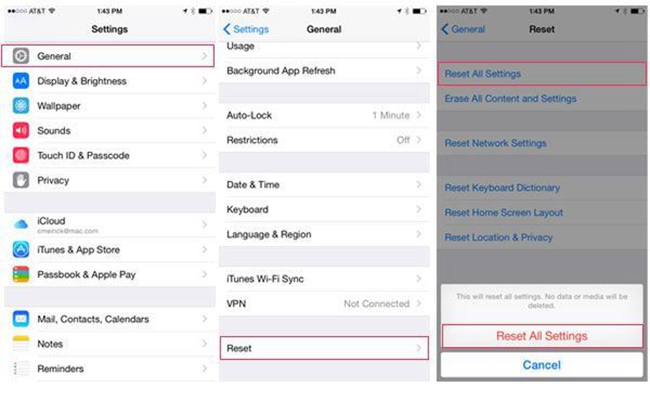
Another way to change your iPhone settings is to reset your iPhone to the default mode. This is, basically, backrolling all set to their original state, which means any settings you have made, including network settings, privacy settings, etc, will be reset to the default state. Thankfully, no data or media are deleted, but you can back them up just in case. To initiate the process, go to Settings > General, scroll down and tap on reset > Reset All Settings as shown below.
Method 10. Restore Your iPhone to Factory Defaults
The other option you have, in addition to restoring the last backup or resetting all settings on your iPhone, is to restore it to factory defaults. Choosing this option will result in wiping out all the data that is saved on your iPhone. Therefore, it is very important that you have a backup on your iTunes or iCloud account.
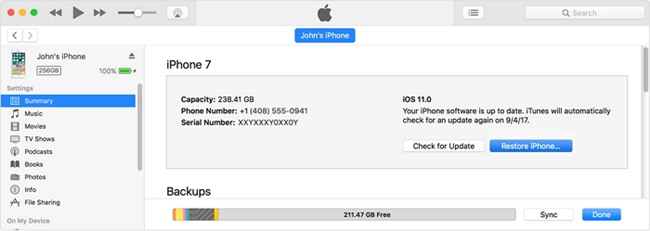
Step 1: Launch iTunes on your PC. Then use a lightning cable to connect your iPhone to the PC, and confirm your device.
Step 2: A new window will pop up, tap Summary > Restore iPhone.
Method 11. Update Device with New iOS Software
The lack of regular software updates could be another reason behind the flashlight icon greyed out on iPhone. Apple does constantly provide new software updates to curb iPhone glitches. Well, if you have not updated your iOS system, then it is high time you consider doing that.
To update your iOS software, go to Settings > General, and select Update Software. Always make sure that your device is connected to Wi-Fi and charged to capacity.
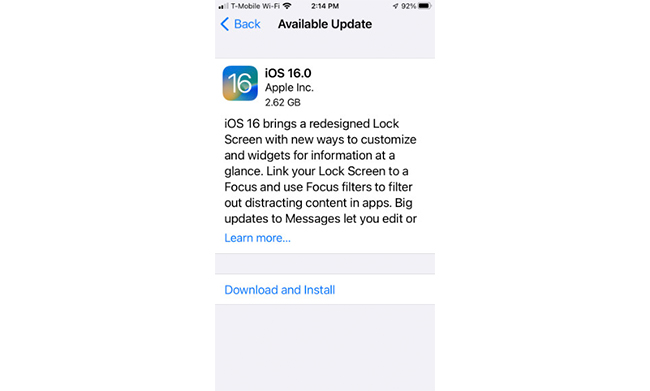
Check to confirm whether the iPhone flashlight greyed out problem is solved. If not, it could be an iOS system issue. Please proceed to the next solution.
Method 12. Fix iPhone Flashlight Not Working without Data Loss
After trying all the aforementioned methods, if your iPhone flashlight problem still exists, you can now turn to a professional third-party iOS system repair tool for help. Luckily, TunesKit iOS System Recovery is such a tool to provide you with a better option: fixing your iPhone flashlight not working with no risk of data loss, which means you do not have to undergo the stress of backing up your data and feeding it all over again after restoration.
Besides the problem of the flashlight on iPhone not working, it is powerful enough to fix more than 150 iOS related issues, such as iPhone stuck in recovery mode, iPhone keyboard not working, iPhone black screen of death, iPhone won't turn on, etc.
TunesKit guarantees you a 100% data safety as well effective fixing of the flashlight problem. All you need to is to download, install on your Mac or PC and follow the guide below.
Step 1: Launch the TunesKit iOS System Recovry and then connect iPhone to your computer using a USB cable. Click 'iOS System Repair' and tap 'Start'.
Step 2: Normally, 'Standard Repair' is sufficient to fix the iPhone flashlight not working problem, and this mode will not delete all your phone's data. After choosing 'Stander Repair', simply follow the prompts to set up your iPhone. Then download the firmware package by clicking on the 'Download' button.
Step 3: After completing the download, click the 'Repair' button. The iOS system recovery process will start automatically. Wait till it is over. Do not disconnect your iPhone until the process is complete. It may cause device bricking.
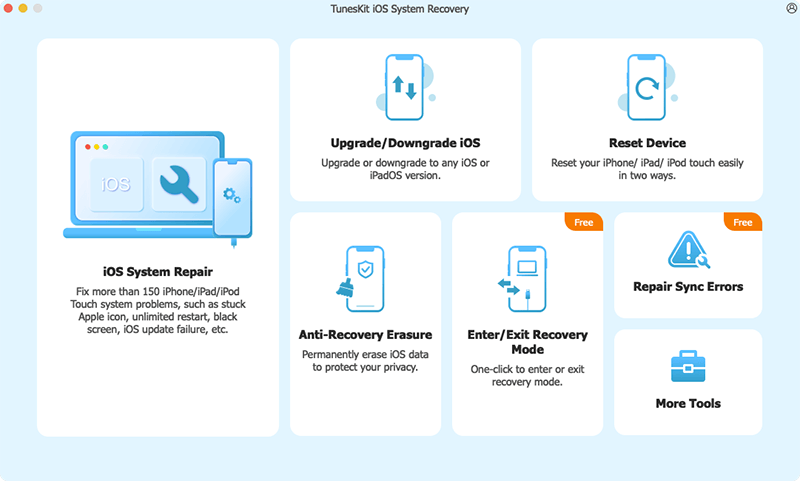
If it does not work, then you have to restore your iPhone. You can either use TunesKit iOS Sytem Recovery 'Deep Mode' to restore device or using iTunes app to do so. Both of them will erase the existing data on your iPhone, so make sure you have back up your iPhone data.
Method 13. Contact Apple Support
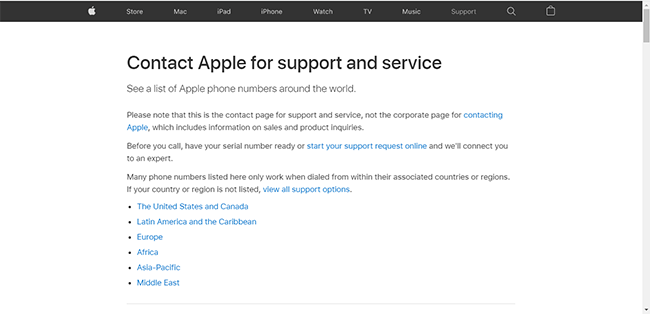
In the event that you have tried all of the above and have not been able to resolve the flashlight not working on your iPhone, you could contact AppleSupport online to get professional advice about how to proceed. If need be, you can also take your phone offline to an Apple Maintenance Service Center so that it can be repaired.
Part 3. Conclusion & Suggestion
As far as solving the iPhone flashlight not working issue is concerned, all of the solutions above have proven to be effective in solving the iPhone flashlight not working. It is of paramount importance for you to start by using simple troubleshooting methods such as rebooting your iPhone or revisiting your LED flash settings in the first place. If you are looking to restore your iPhone or fix the system issue, it is highly recommended that you use the TunesKit iOS System Recovery software in order to prevent any loss of data in the process.
