[Solved] AirPrint Not Working After iOS Update
AirPrint is not working on iPhone with a Canon printer, despite functioning on other devices. Does anyone know how to fix it, or if it's a known bug on iPhone?
From Apple Community
AirPrint offers a convenient function for iOS device users, it enables them to effortlessly print documents wirelessly directly from their iPhone, iPad, or iPod touch. After updating your iPhone to a new iOS system, you may be excited about the new features. However, many users are encountering difficulties with AirPrint. Despite their printers functioning properly before the update, they now show as connected but fail to work and disappear when selected. This indicates a communication issue between your iPhone and the printer. If you are facing similar problems, don't worry, let’s see how to fix AirPrint not working after iOS update.
Part 1. Why Is My AirPrint Not Working on My iPhone After iOS Update?
There could be multiple reasons why AirPrint doesn't work after iOS update. The first is an incorrect network connection, please ensure that your iOS device and the printer are connected to the same Wi-Fi network. The second possibility is an outdated printer firmware, you can check if there are any updates available for your printer's firmware. Manufacturers often release updates to improve compatibility and fix issues. The third possibility is that the printer is not compatible with the Apple device, make sure that your printer supports AirPrint. You can find this information in the printer's documentation or by checking the manufacturer's website.
Of course, there's also the likelihood that it's caused by an iOS update error. But whichever reason causes AirPrint not working, there is a solution for it. Continue reading.
Part 2. Top Ways to Fix AirPrint Not Working After iOS Update
Before delving into more advanced solutions, it's recommended to try the following quick workarounds.
- Confirm on Apple's official website and check if your printer model is compatible with AirPrint.
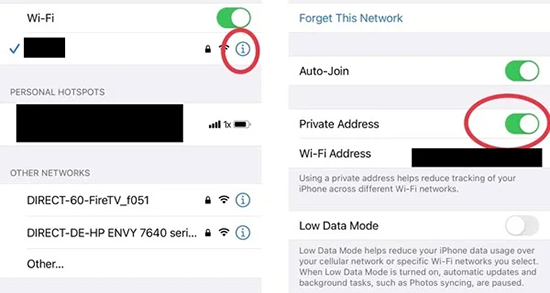
- Attempt disabling the Private Wi-Fi Address feature on your iPhone, simply tap on Settings > WLAN > "i" icon, then turn off the toggle button for the Private WLAN Address.
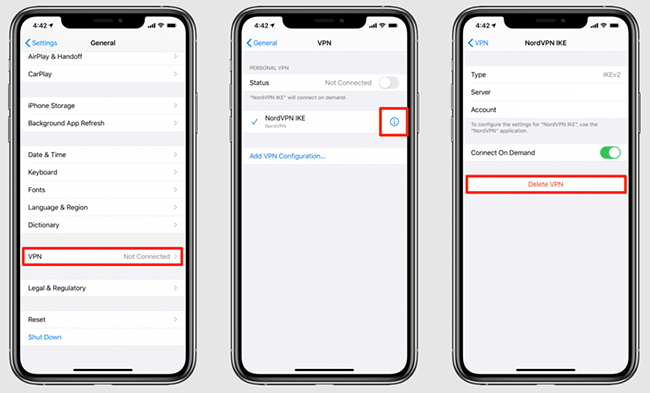
- Disable VPN: Just tap on Settings > General > VPN & Device Management on your iPhone, and tap on the information button next to your VPN. You can choose to temporarily disable or delete the VPN.
If AirPrint still does not work properly, proceed to the following advanced methods.
Way 1. Forget and Rejoin Wi-Fi Network
One of the main causes of AirPrint not working after iOS update is the communication between the printer and your iPhone. If you are still experiencing the issue despite you having connected your iPhone and printer to the same wi-fi, you can try the "Forget This Network" option. By doing so, you can see if it resolves the problem.
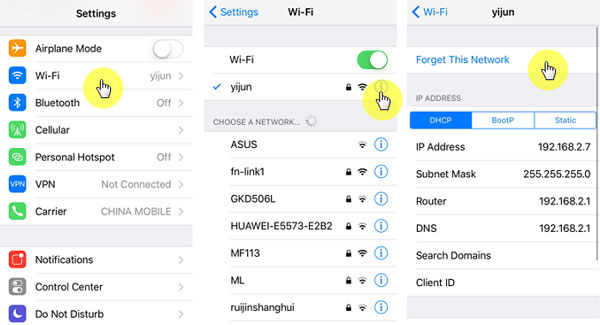
Step 1: Launch Settings app on your iPhone, tap on Wi-Fi option.
Step 2: Locate your Wi-Fi network and tap on the "i" icon next to its name.
Step 3: Choose the "Forget This Network" option to disconnect.
Step 4: Wait a moment, then select the network again and reestablish the connection by entering the password.
Way 2. Reset Network Settings on Your iPhone
At times, seemingly insignificant glitches can be the root of larger disruptions to the operating system. A slight hiccup in the network settings could be the culprit behind the communication breakdown. This ultimately leads to the AirPrint not working after iOS Update issue.
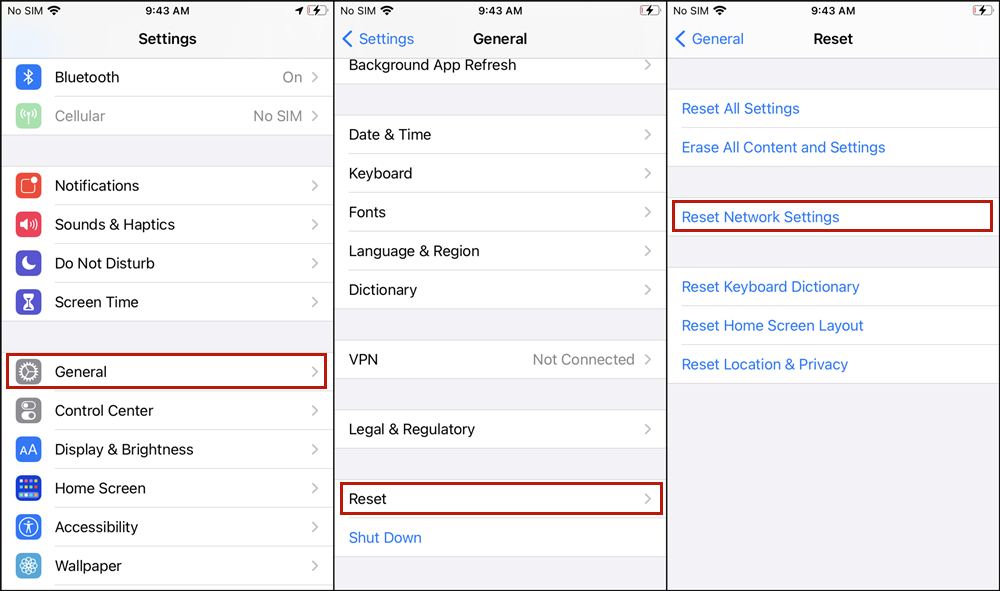
Resetting the network settings on your iOS device can sometimes resolve connectivity issues. Let's see how to do it.
Step 1: Navigate to Settings, tap on General, and choose Transfer & Reset iPhone.
Step 2: Tap on Reset > Reset Network Settings, and enter your lock screen passcode to confirm.
Step 3: Follow the on-screen prompts to finish resetting the network settings. Then your iPhone will restart automatically. After rebooting, see if AirPrint works.
Way 3. Update Printer Firmware
If AirPrint is not working after iOS update, it could be due to compatibility issues between your iPhone and the printer. Updating the printer firmware may fix this issue. Here's how.
Step 1: Go to the official website of your printer's manufacturer (e.g., HP, Canon, Epson, Brother).
Step 2: Navigate to the support or downloads section, then search for your printer model.
Step 3: Look for the firmware update section and check if there are available updates for your printer model.
Step 4: Read the instructions provided with the firmware update carefully. Ensure your printer is plugged in and turned on, and your printer is not in the middle of a print job.
Step 5: Follow the on-screen instructions to complete the update process.
Step 6: After updating the firmware, restart your printer and your iOS device to ensure that any changes take effect. Then try using AirPrint again to see if the issue has been resolved.
Way 4. Reboot Your Printer
Restarting the printer is an easy fix. This simple fix can help to reset the printer's connection and resolve any communication issues with your iOS device. To reboot a printer, you can follow these general steps:
Step 1: Turn off the printer by pressing the power button or unplugging it from the power source.
Step 2: Wait for about 30 seconds to 1 minute to allow the printer to fully power down.
Step 3: Turn the printer back on by pressing the power button or plugging it back into the power source.
Step 4: Wait for the printer to finish its startup process and become ready.
Way 5. Force Reboot Your iPhone
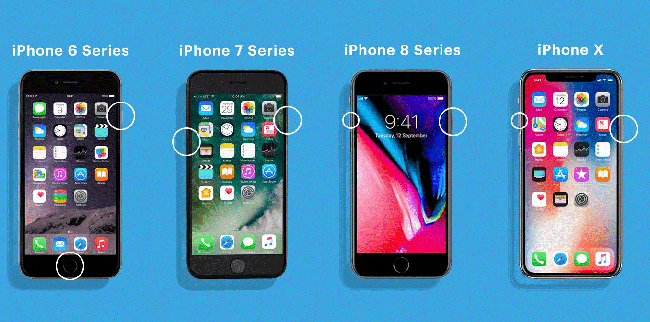
If you're dealing with the "AirPrint not working on iPhone" issue, a force restart of your iPhone might just do the trick. Think of it as a reset signal that can iron out basic bugs or glitches without the fear of losing any data. Here's the procedure:
Step 1: Quickly press and release the Volume Up button.
Step 2: Immediately follow by pressing and releasing the Volume Down button.
Step 3: Then, press and hold the Power/Side button until the Apple logo appears on the screen.
Way 6. Update or Reinstall the Printer App
Many devices, including printers, come with dedicated apps that allow for seamless operation via your iPhone. These apps simplify the process of managing print jobs and configuring settings directly from your mobile device.
Sometimes, the application may encounter issues that prevent the printer from communicating with the iPhone. To address this, you can update the app. If updating the app does not solve the problem, uninstall the printer app and reinstall it.
Update the printer app:
Step 1: Open the App Store on your iPhone, and tap on your profile picture at the top right corner.
Step 2: Scroll down to see the list of apps with available updates.
Step 3: Find the printer app in the list and tap Update next to it to install the latest version.
Reinstall the printer app:
Step 1: Press and hold the printer app icon on your home screen until it starts to jiggle.
Step 2: Tap the "X" icon on the printer app to delete it.
Step 3: Go to the App Store and search for the printer app, then download and install the app again.
Way 7. Check for iOS Updates
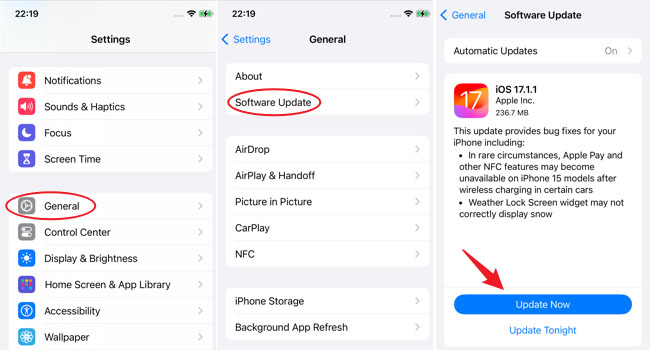
Sometimes, Apple releases minor updates to fix bugs. Go to Settings > General > Software Update to check for and install any available updates. Once the update is complete, see if the AirPrint not working issue is resolved.
Part 3. One-stop Solution to Fix AirPrint Not Working After iOS Update
If none of the above methods can fix AirPrint not working after iOS update, you might want to consider using TunesKit iOS System Recovery. This reliable software is tailored to tackle a variety of iOS-related problems, including iOS 18 no cellular data, iPhones frozen on the Apple logo, unresponsive black screen, and over 150 other common issues. It's a one-stop solution that can help get your AirPrint feature back to working order.
Characteristics of TunesKit iOS System Recovery:
- Fix AirPrint not working after iOS update without data loss
- Repair different iOS/iPadOS issues quickly and safely
- Provide Standard Repair mode and Deep Repair mode
- Allow users to enter Recovery mode within one click for free
- Supports the latest iOS 18 and iPhone 16 models
Here are the steps on how to use TunesKit iOS System Recovery to fix AirPrint not working after iOS update.
Step 1Attach iPhone to PC
Navigate to the TunesKit iOS System Recovery website, download the software, and install it on your PC. Open this app and plug your iPhone into your computer. Once TunesKit detects your device, click on the iOS System Repair button to proceed.

Step 2Choose a mode to repair
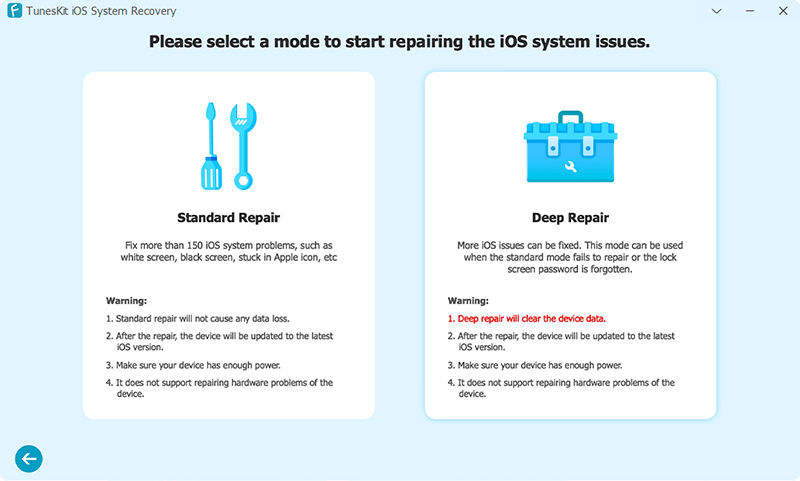
Simply hit the Start button to continue, and select a mode to start repairing AirPrint not working on iPhone issue. Selecting Standard Repair will not result in data loss, while choosing Deep Repair will erase all the device data.
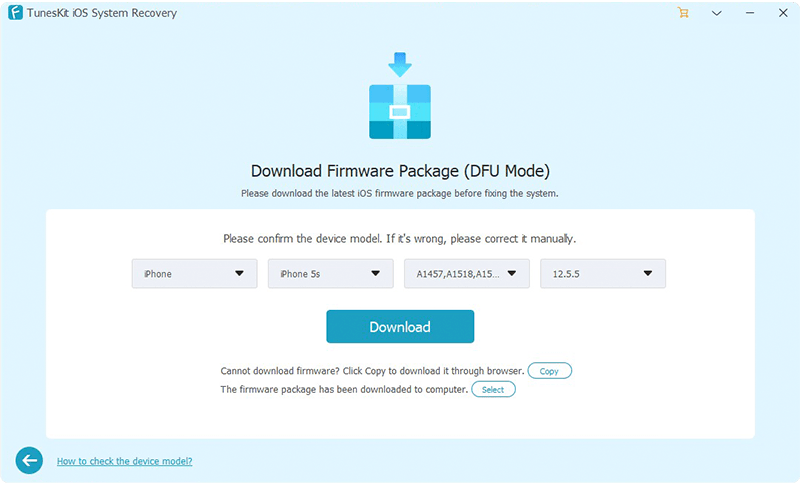
Step 3Download firmware package
Begin the repair procedure by obtaining the necessary firmware package. Click on the Download button and wait the process to finish.
Step 4Fix AirPrint not working after iOS update
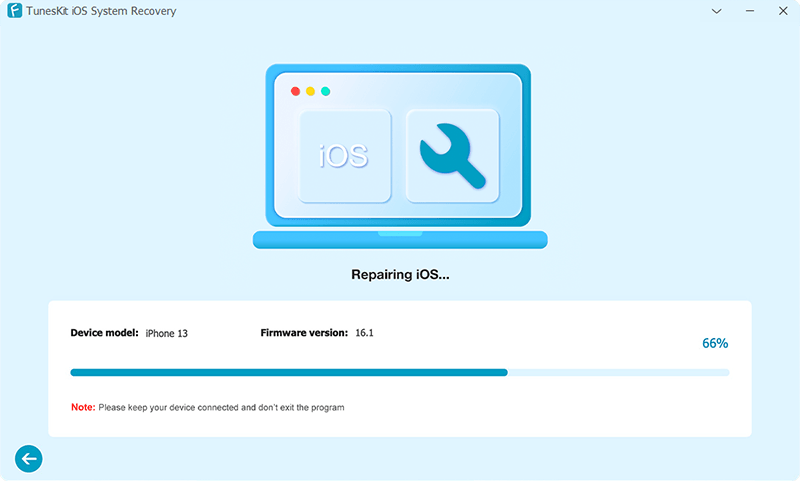
Click Repair button and wait for the repair progress to complete, then your iPhone will restart automatically once the repair process is done.
Conclusion
In a nutshell, the issue of AirPrint not working after iOS update is a major inconvenience for users who rely on the feature to print documents directly from their Apple devices. This issue shows the importance of having a reliable solution when a system update leads to unexpected failures.
TunesKit iOS System Recovery is an essential tool for users facing such issues. It provides an effective way to resolve various iOS-related issues without data loss. With its user-friendly interface, TunesKit iOS System Recovery allows users to restore their device's functionality, including the AirPrint feature, without requiring technical expertise.
