How to Fix iPhone Autocorrect Not Working
Many Apple users have reported that they found their autocorrect not working on iPhone after updating the iOS system. They can no longer find a red line under the misspelled words. They feel confused and don't know how to fix it by themselves. If you are also facing the same trouble, just take it easy. Here we will help you the analyze the reasons why your iPhone autocorrect goes wrong and provide you some effective solutions to fix the problem.
In general, your iPhone autocorrect now working is because of the wrong settings on your iPhone. If the autocorrect settings and other settings governing the keyboard are not set correctly, it will also lead to the autocorrect problem. And this iOS system issues will be the major cause of this problem. Based on these causes, we have listed some of the most effective solutions on autocorrect not working iPhone here for you.
- Part 1. Why is Autocorrect Not Working on iPhone
- Video Guide: Top Ways to Fix iPhone Autocorrect Not Working
- Part 2. Top 9 Methods to Fix Autocorrect Not Working on iPhone
- Solution 1. Check Auto-correction Settings
- Solution 2. Use iOS System Recovery Tool to Fix iPhone Autocorrect Not Working HOT
- Solution 3. Reset Keyboard Dictionary
- Solution 4. Restart Your iPhone
- Solution 5. Activate Predictive and Spelling Options
- Solution 6. Use Text Replacement
- Solution 7. Retrain Auto-Correction
- Solution 8. Update iOS to Latest Version
- Solution 9. Reset All Settings
- Part 3. FAQs About iPhone Autocorrect Not Working
- Part 4. Conclusion
Part 1. Why is Autocorrect Not Working on iPhone
Whenever your iPhone encounters software issues like autocorrect not working, you should consider if glitches are appearing on your iOS system. In most situations, an outdated version or system bugs will cause different issues. Fortunately, we had figured some workable ways that can fix this issue without any data loss. Read it on to get this issue done within several steps.
Video Guide: Top Ways to Fix iPhone Autocorrect Not Working
Part 2. Top 9 Methods to Fix Autocorrect Not Working on iPhone
Tip 1. Change the Display Settings
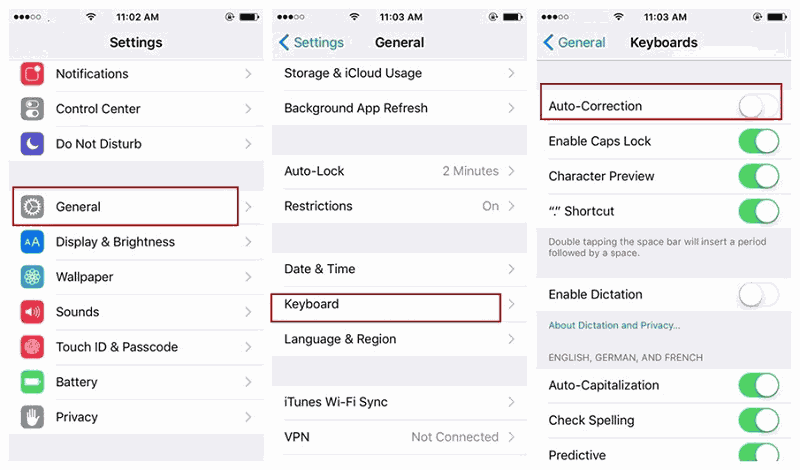
If the autocorrect not working, you should first go to the settings and check if the autocorrections function has been turned on. Here are the detailed steps.
Step 1. Go to Settings
Step 2. Tap on General > click Keyboard
Step 3. Scroll down to make sure Auto-correction is turned on
Solution 2. Use iOS System Recovery Tool to Fix iPhone Autocorrect Not Working
If you have tried the above tip but still can't fix your problem, maybe there is something wrong with your iOS system that causes your iPhone autocorrect not working. And an iOS system recovery tool is necessary to get your device working normally.
Here we will recommend you use TunesKit iOS System Recovery. Regarded as one of the best iOS repair tools in the market, TunesKit can help you fix more than 150 iOS issues on iPhone/iPad/iPod touch/Apple TV without any data loss. You just need to take 3 easy steps and can fix your problems like iPhone keypad not working, iPhone can't type, or iPhone screen not working.This program is now available on Windows and Mac platform, and fully compatible with the latest iOS version and iPhone models.
TunesKit iOS System Recovery Key Features
- Resolve 150+ iOS issues like iPhone autocorrect not working
- Concise and user-friendly interface
- Easy to operate with 3 easy steps
- Provide Standard and Advanced recovery modes
- No data loss in the Standard Mode
A brief tutorial of TunesKit iOS System Recovery:
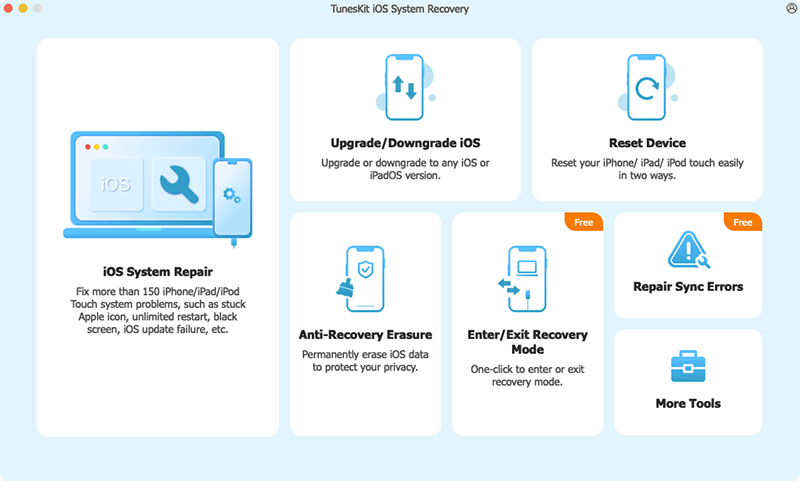
Step 1 Connect to Computer
Open TunesKit and Connect your iPhone to PC. Then, click on the Enter Recovery Mode to put your iPhone into Recovery mode.
Step 2 Download Firmware Package
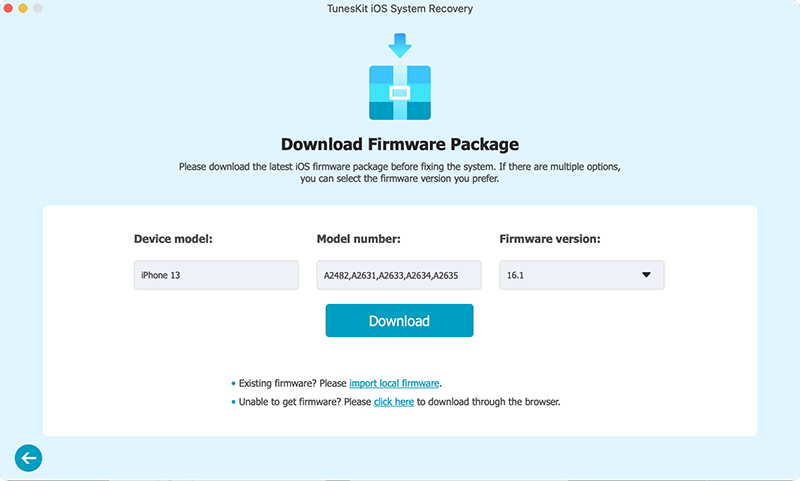
Select the Standard mode to fix your iPhone and Download firmware package. Before downloading, please ensure that all the given information is corresponding to your iPhone.
Step 3 Fix iPhone Autocorrect Not Working
TunesKit iOS System Recovery will start to fix your iPhone as soon as the firmware package is downloaded. And the autocorrect will get back to its normal state soon.

What's more, TunesKit iOS System Recovery is more than an iOS system repair tool, it can also help you downgrade iOS, provides 1-click to enter/exit Recovery mode for free, and fix iTunes errors like iTunes Error 54, iTunes Error 39. As it's very easy to operate, you can fix this problem by yourself and without asking for help from any specialists. So why not download it and have a try?
Solution 3. Reset Keyboard Dictionary
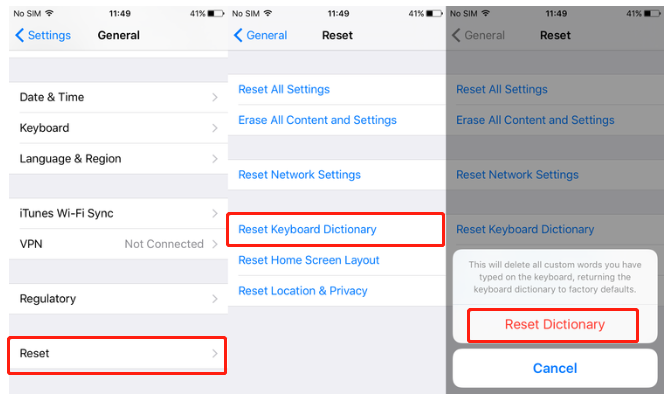
By resetting the keyboard dictionary, your phone will erase all the pesky misspelled words. And you can follow the steps below to delete all the custom words and return the dictionary back to factory defaults.
Step 1. Go to Settings
Step 2. Tap General > find Reset
Step 3. Select Reset Keyboard Dictionary
Solution 4. Restart Your iPhone
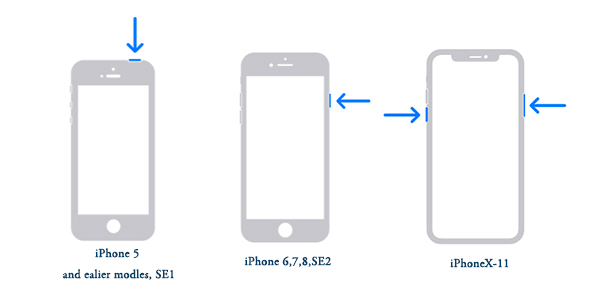
Sometimes, you can recover your iPhone temporarily from iPhone autocorrect not working by restarting your iPhone. So you can also have a try.
Step 1. Press the button to which the blue arrow points to according to the picture below until your phone's interface appears a slider.
Step 2. Drag the slider and wait for 30 seconds to turn off your phone.
Step 3. Press the button shown in the picture again to turn on your phone.
Solution 5. Activate Predictive and Spelling Options
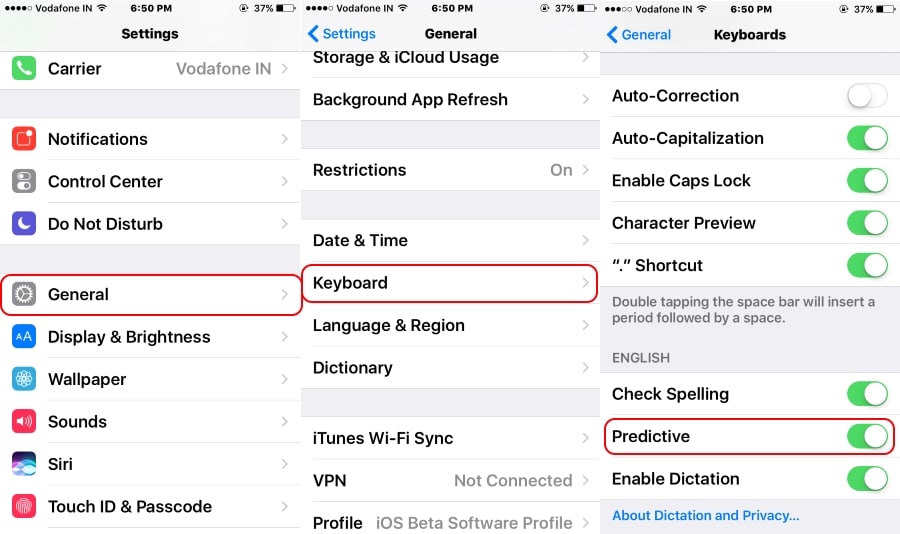
You should also enable the Predictive and the Spelling function in your settings. The Predictive functions will make your iPhone recognize what the vocabulary you type is and will give you a suggestion. The Spelling function will ensure the autocorrect work.
So to activate predictive and spelling options, you should go to Settings > tap the General button> turn on the Predictive button and the Check Spelling button.
Solution 6. Use Text Replacement
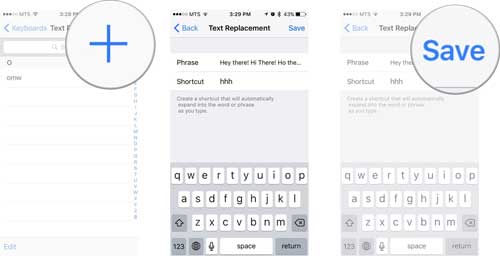
Text replacement is a built-in function that can automatically help you replace your common phrases with shortcuts or abbreviations. So you can also apply this cunning trick to create text replacements for those words that always autocorrect in the wrong way by your iPhone.
Step 1. Go to Settings > General > Keyboard.
Step 2. Find Text Replacement.
Step 3. Press on the + option to create desired text replacement.
Step 4. Type in the rights word into the Phrase box and save.
Solution 7. Retrain Auto-Correction
Auto-Correction can help you correct your wrong word before you fully type it in. It will also provide you the right word. However, as it follows your own patterns, it will also make some mistakes. To re-train Auto-Correction to remember the correct word, try to type a word and when the Auto-Correction provide the wrong one, tap the X to remove the suggestion. And then you will found, some wrong phrase will be disappeared.
Solution 8. Update iOS to Latest Version
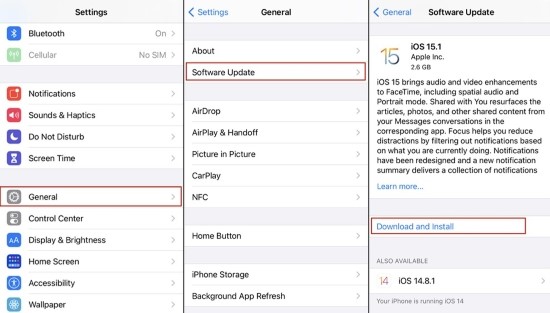
If you are using an outdated iOS version, there will be iOS bugs like iPhone autocorrect not working. Therefore, updating your iOS system is one of the recommended methods to fix it. You can update your iOS version via Settings > General > Software Update, and then click the Install button to update your iOS system. In addition, you can connect your iPhone to iTunes to get the latest iOS version.
Solution 9. Reset All Settings
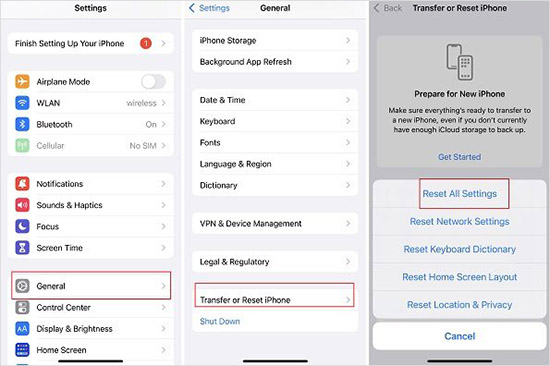
In case the above solutions are not able to fix the iPhone autocorrect not working problem, you can try to reset all settings on your iPhone. Resetting settings on your iPhone will set all the settings to the factory settings. Performing this reset will not cause any data loss on your iOS device. You can reset all settings on your iPhone via Settings > General > Transfer & Reset > Reset All Settings.
FAQs About iPhone Autocorrect Not Working
How to stop iPhone keeps automatically capitalizing words?
A case in point is that when you are typing words, but iPhone keeps capitalizing the word that you actually don't want to capitalize. This condition will annoy most iOS users. Therefore, you can stop automatically capitalizing via Settings > General > Keyboard > toggle the switch of Auto Capitalization.
How to turn off spell check on iPhone?
If you don't want your iPhone to correct any word you have typed, you can turn off the spell check to make it. However, it won't be a good choice as the screen is so small. Turn off the spell check via Settings > General > Keyboard > toggle the switch of Check Spelling.
Conclusion
Here are all the top 9 tips to fix autocorrect not working on iPhone. You can select the solution according to your own need. All the methods are effective that can help with the issue on your iPhone you are now encountering. And if you still have any questions about these tips, or you still don't know how to use TunesKit iOS System Recovery, you can leave your voice below.
