iPad Won't Restore? See Here
There is no denying that iPad is an all-around electronic device. But the device will land some users in trouble. When facing some issues, users often choose to restore the iPad. Unfortunately, iPad won't restore if connecting it to iTunes. This is the real situation once faced by some users. When you are making attempts to restore iPad, the iPad either may not be found or fails to complete restoring. No matter what you face in the restore process, there will be a way out. In this article, all workable solutions to the iPad restore error will be shown.

Fix 1: Check USB or Lightning Cable
In the case that the computer or iTunes can not detect your device, there may be a connection error. Hence, you should check the cable first. To do this, you can unplug the cable from your computer and iPad. Wait for a while and then plug it again to check if iPad won't restore. Or when you plug the cable into your computer, you can choose a new cable port on your computer. And there is another way: use a new cable.

Fix 2: Reboot Your Computer
If the cable is no problem, the second method is to restart your computer. For a Windows computer, click the Start option and then press the Restart. But for Mac, you need to click the Apple button at the top left corner of the screen, and then click the Restart option from the drop-down menu.
Fix 3: Update iTunes
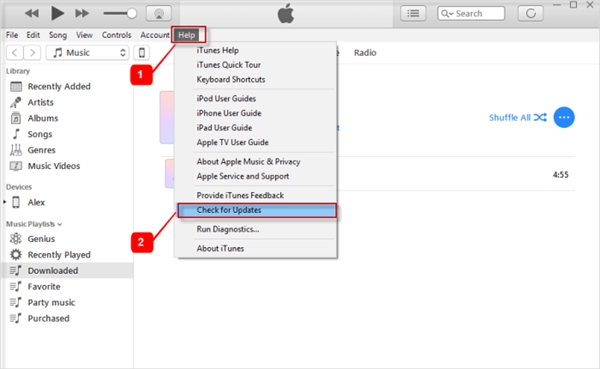
With the latest version of iTunes, you will have more chances to restore iPad without obstacles. It is necessary to check the version of iTunes on your computer before restoring your iPad. To upgrade the iTunes, go to the following steps.
If you have iTunes on a Mac: Launch iTunes on your Mac. Click on the iTunes option from the left-hand side of the toolbar and tap on Check for Updates button to install the latest version of iTunes.

If you have iTunes on Windows: Open and launch iTunes on PC. From the menu bar, select Help. On the pop-down window, choose Check for Updates.
Fix 4: Force Reboot iPad
If you have already the newest iTunes, iPad still fails to bypass the restore error. Then, it is time to force restart your iPad. Forcibly restarting iPad is not harmful at all, so it deserves a try.
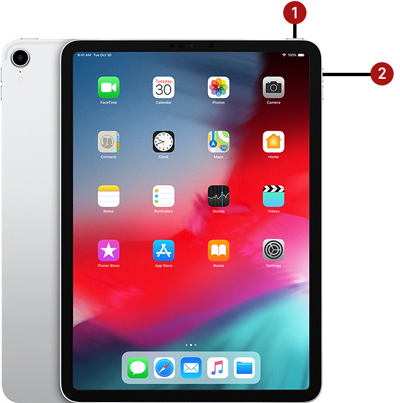
For iPad with Home button: Press and hold the top and Home buttons at the same time. When you see Apple logo on the screen appears, release both buttons. Then, wait for the iPad to restart automatically.

For iPad without Home button: Quickly press and release the volume up button, and then the volume down button. When the Apple logo appears, release the button. Wait for the iPad to restart by itself.
Fix 5: Use TunesKit to Restore iPad (No Data Loss)
Now that all the traditional ways above do not work well, this may tell you that your iPad may be stuck in serious issues. In this case, there is an iOS repair tool prepared for you. Using this tool, the iPad won't restore error will be fixed without data loss, even if your iPad won't restore in recovery mode. Here, you can use the best tool: TunesKit iOS System Recovery.
TunesKit iOS System Recovery, the widely used software, is used to fix more than 50 iPhone/iPad/iPod Touch/Apple TV issues. The issues TunesKit can repair include iPad stuck in Apple logo, screen flickering, black screen, etc. When TunesKit repairs Apple devices for you, it not only works fine, but also quickly. Additionally, it can also enter/exit recovery mode freely and downgrade iOS.
Characteristics of TunesKit iOS System Recovery:
- Fix iPad won't restore without data loss
- Repair different tvOS/iOS issues by yourself
- Provide Standard Mode and Advanced Mode
- Easy to use with friendly interface
In this part, do not miss the detailed steps to fix the iPad restore error.
Step 1: First of all, open and launch TunesKit on your computer. Next, use a USB cable to connect iPad to the computer. When the device is detected by TunesKit, you can choose to click Enter Recovery Mode on the left side and then the Next button.

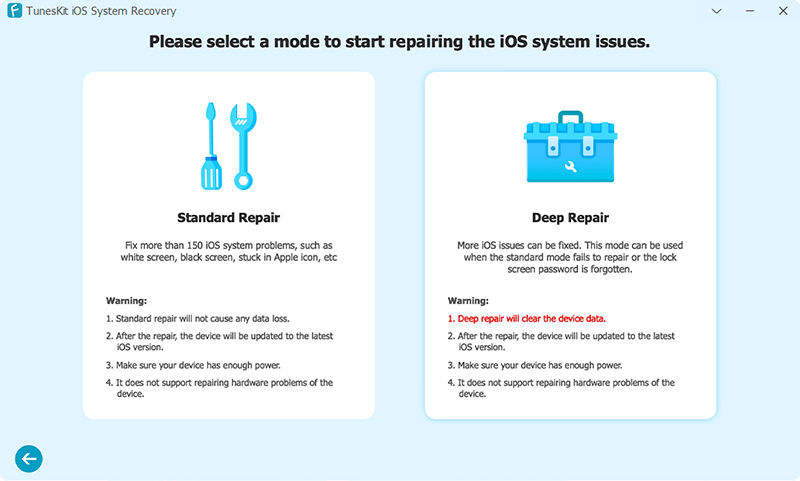
Step 2: Now, you can select a repair mode. In the software interface, TunesKit willshow you all the features of the two modes. Here, the Standard Mode is highly recommended. This mode will not erase any data. Or if you have backed up your iPad, you can choose the Advanced Mode as you like.
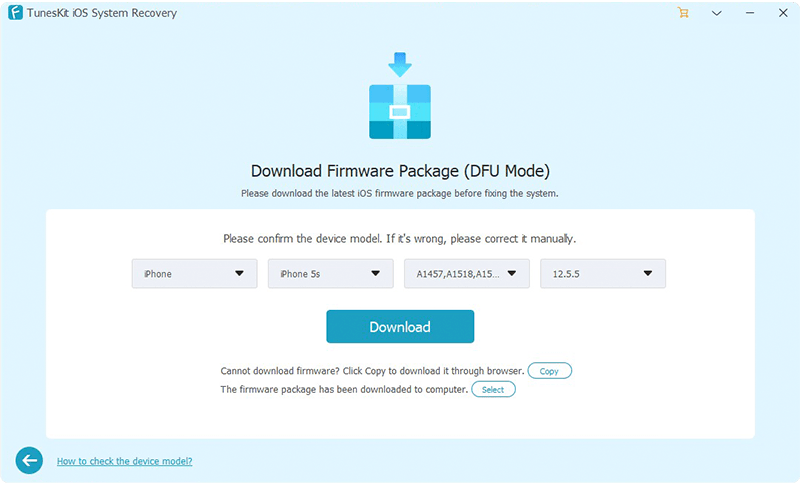
Step 3: Last, you need to download the firmware package. Before downloading, you can check device information. Then, click the Download button. After completing the download of the firmware, press the Repair button. The software will begin repairing the iPad.
Fix 6: Use DFU Mode and Restore via iTunes
Some users once said the iPad won't restore in recovery mode. Apart from recovery mode, you can also try DFU mode to restore your iPad. In the following part, we will show you how to put iPad in DFU mode. But users should know that the process may let you lose the data, and you can back up your iPad data.
Step 1: Connect your iPad to the computer via a cable. Open iTunes on the computer;
Step 2: Press and hold the top and Home buttons together before the iPad screen becomes black;
Step 3: After about several seconds, release the top button, while holding the Home button until there is a pop-up page shown on iTunes;
Note: For iPad with no Home button, turn your iPad off, and press and hold the top button. Wait for seconds, then press and hold the volume down button while keep holding the top button. After 10 seconds, release the top button while keep holding the top button for about five seconds until iPad turns black.
Step 4: On the page saying that iTunes has detected an iPad in recovery mode and you must restore it, click OK to restore your iPad.

Wrapping up
By providing all the six methods, we believe that iPad won't restore will be fixed finally. To be short, TunesKit is able to fix the restore error without the expense of data and keep the data intact. If you want to find a one-stop solution, try TunesKit.
